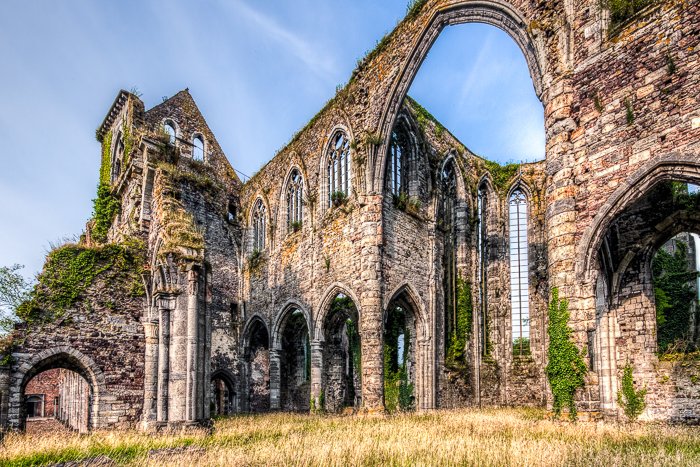
In this tutorial, we’ll show you how to use HDR to create natural-looking images. [ExpertPhotography is supported by readers. Product links on ExpertPhotography are referral links. If you use one of these and buy something, we make a little bit of money. Need more info? See how it all works here.]
What Is HDR Photography?
High Dynamic Range photography is the method of merging images to create a final photo. The method involves taking many pictures and then stitch them together. Each image captures the scene at different exposures. When merged, the picture provides an overall correct exposure. In most cases, this process needs at least three images. The first one is to capture a mid-range exposure shot. Meanwhile, the second meters for the highlights, and third for the shadows. You can take many images, as long as the number is divisible by 3 (excluding your mid-range exposure). These images show as a plus or minus on the Exposure Value Meter. +3 and -3 is a regular choice. For three images, the values should be 0, +3, and -3. +3. For seven images, your range should be -3, -2, -1, 0, +1, +2, +3. Your camera allows you to capture three images in this manner. Other cameras even have a dedicated HDR feature that let you freely adjust settings.
HDR vs. Non-HDR
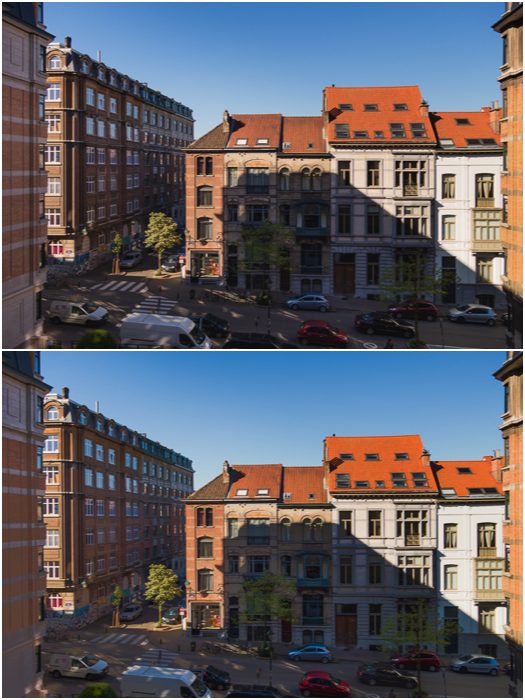
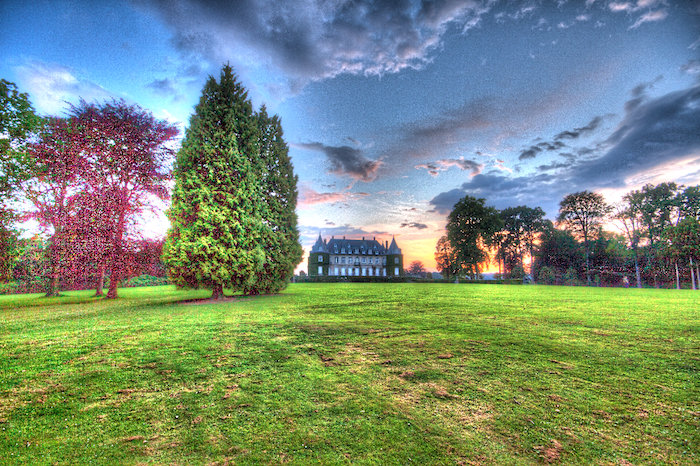
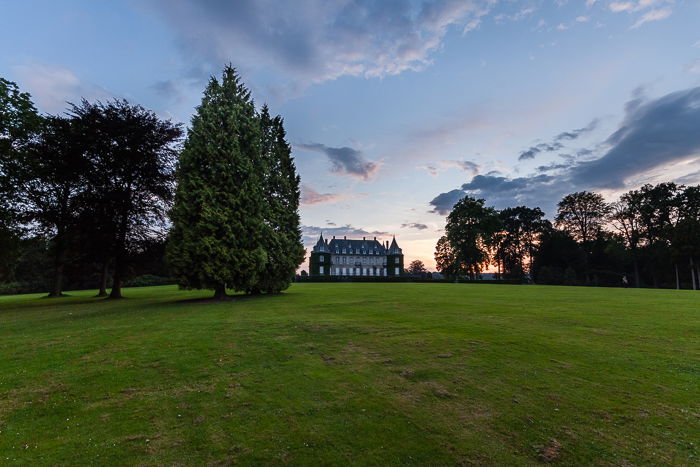
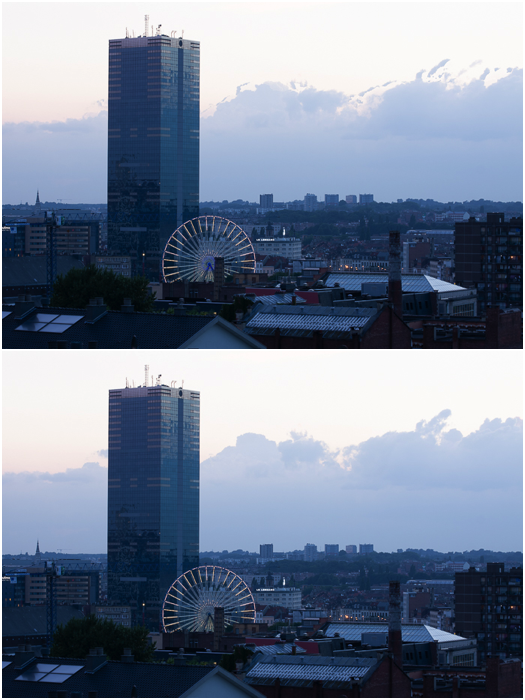
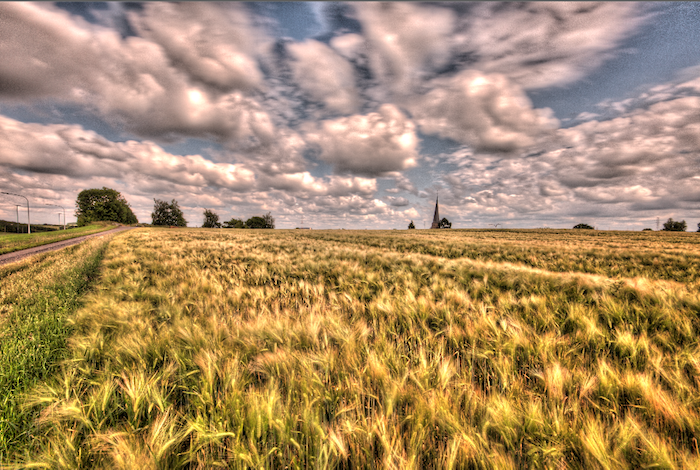
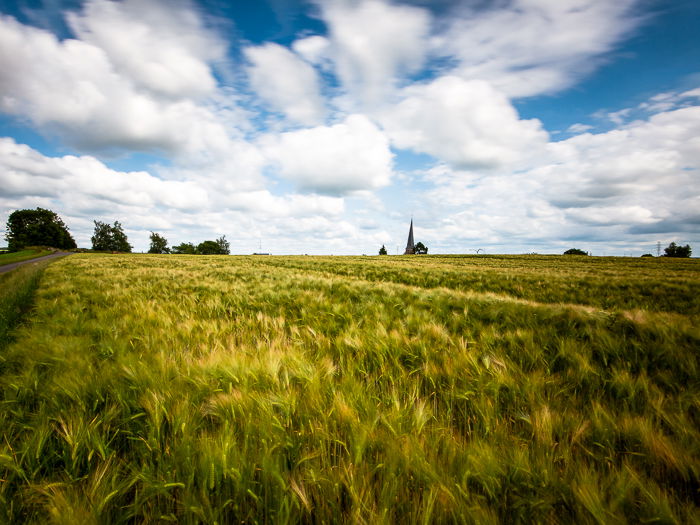
Modern sensors can cope with 12-stops dynamic ranges or more. You should be able to capture the whole 5 EV dynamic range, right? Unfortunately not. At least if you want some good image quality. Let’s consider a single exposure and say this exposure has value 0 EV. Next, let’s create an HDR version by combining three exposures taken at -2 EV, 0 EV, and +2 EV. After editing them with the same settings in Lightroom, let’s compare them in the image below.
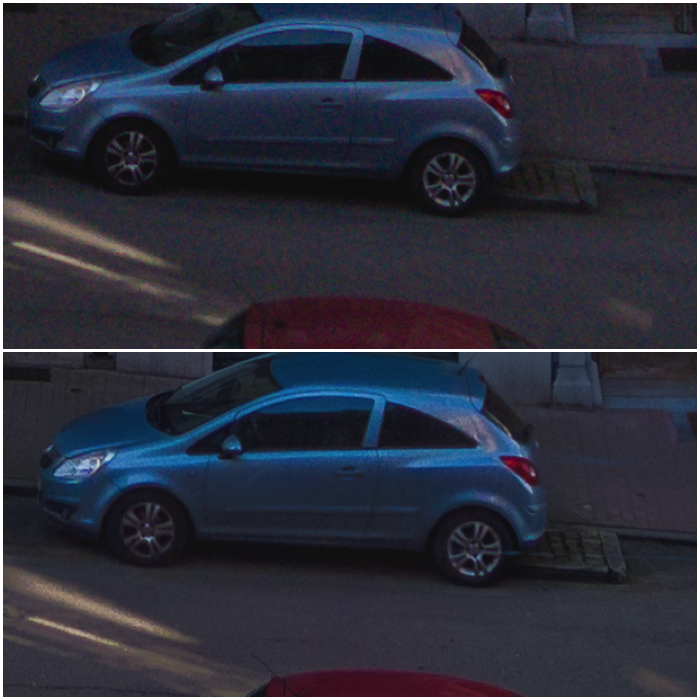
The two images are very similar. But the HDR image presents a little less contrast. It has more detail in the shadows. Not to mention the colors are more vibrant and saturated. You could say you need to brighten up the shadows in the single exposure. What if you reduce the contrast and increase saturation? Will you get the same results as the edited shot? Let’s see a 100% crop of the two images:
As you can see, the HDR shot (bottom) is cleaner and more detailed. Lifting the shadows more in the single exposure degrades the image further. Even with the modest 5 EV dynamic range, a single exposure will have terrible image quality. Especially when compared to an image obtained by combining multiple exposures.
Why HDR Photography Has a Bad Reputation
HDR was particularly popular among photographers some years ago. Unfortunately, with automated tools, the internet became flooded with bad pictures. They show surreal, fake and oversaturated HDR pictures. The problem is that it is easy to over-process HDR photos. There are many presets available in automated HDR software and nowadays there are also HDR filters. They produce unappealing images. In time, those images became synonymous with HDR mode. But HDR is not a style. It’s a technical tool. The goal of HDR mode is to expand the dynamic range of your pictures. Good HDR photos are subtle and keep the natural look of your images. Furthermore, you don’t need to remove contrast because it’s what keeps things natural. The way you manipulate the picture has little to do with HDR. You can opt for realistic editing, or you can go wild.
When Would You Use HDR Photography?
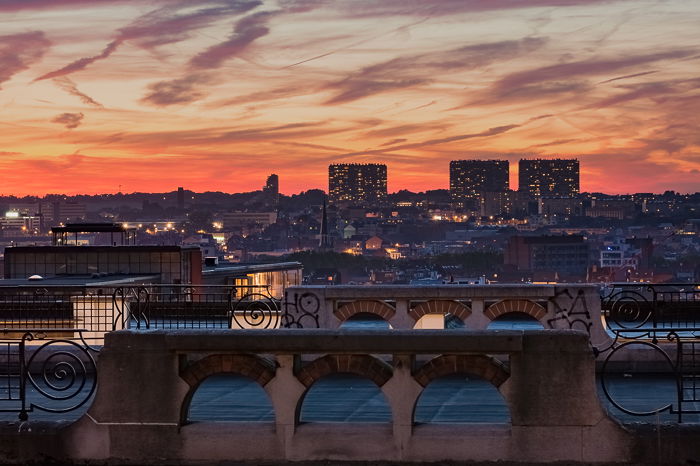
There are a number of situations where HDR photography can come in handy when used well. Some of these include interior photography, nightscapes and dramatic skies. Sunrise and sunset make for perfect HDR images. Most often than not, your golden hour photo looks nothing like what you can see in real life. Depending on how you set your exposure (manual or auto), you can find that:
The sky is very bright and the foreground quite dark with little details Your foreground is well exposed, but your sky looks washed out. The sky is perfect, but the foreground is solid black.
As a rule of thumb, a diffused light during overcast days reduces the contrast in the scene. The cloudy sky acts as a giant softbox by diffusing the harsh sunlight. As a result, the contrast between shadows and highlights reduces. On a sunny day with a clear sky, the light is hard and direct. It casts deep black shadows while objects in full sunlight are very bright. This high contrast scene has a great dynamic range (DR). At sunset, the foreground is much darker than the sky. Unfortunately, achieving correct exposure for both is impossible. And that’s where HDR can help. In the image below, it is clear you can’t capture the whole dynamic range in one single photo. Lightroom highlight warning shows up in the sky. This warning shows areas that are almost pure white. So there are no details there to recover. And the histogram shows there are almost no middle tones. But a high dynamic range can solve the problem.
How Do I Make HDR Photos?
Camera Settings for HDR Photography
Some phone and compact cameras have a built-in HDR mode. But they only work if you save the images in jpeg format. That means you have little to no control over the whole process. So it’s always better to do it yourself manually. Here’s a short checklist for HDR camera settings you need to use:
Set your camera to save the photo in RAW format and to manual mode; Use the lowest ISO setting to work for your situation. Increasing the ISO will reduce the DR the sensor can record. Keep the same aperture for all the photos, as this will affect your depth of field; Note the suggested shutter speed for the 0EV exposure; Set the shutter speed to the most underexposed image you need (e.g., 4EV). Change the shutter speed in steps of 1EV (double the shutter speed) after each photo. Continue the sequence until you get the brightest image you need.
Some cameras have automated bracketing functions. These are great if you want to limit yourself to the +/-2EV range in 3 to 5 photos. But it all depends on the settings and the camera.
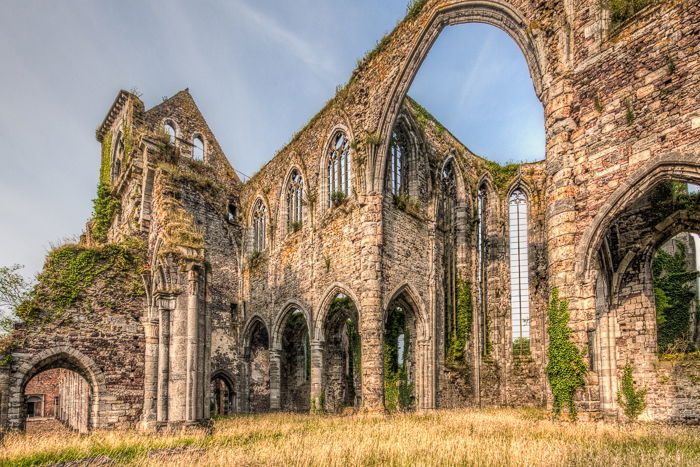
Use Multiple Exposures to Capture all the Details
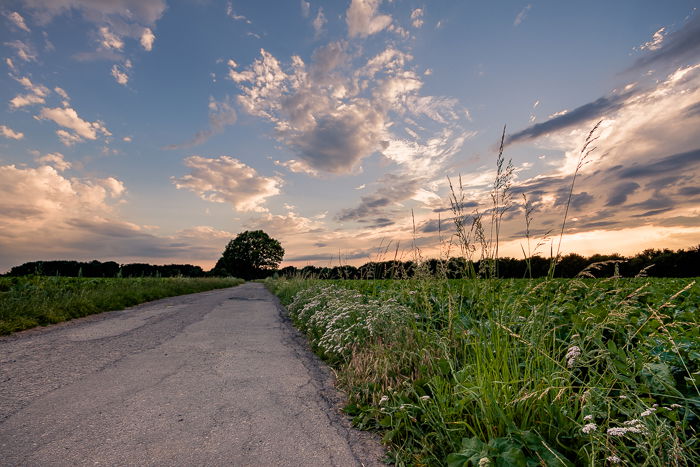
You can create high dynamic range photos on a single file. But it is best to rely on multiple exposures. Also, you do not need to collect the same number of underexposed and overexposed images. It depends on the scene you want to photograph. For sunsets, it may be better to use more underexposed images. This lets you capture all the details in the bright sky. For my urban sunset, I needed to underexpose 4 EV to capture all the details in the highlights. I could have stopped at +2 EV for the foreground. To play it safe, I pushed to 3 EV. I took all these photos with 1 EV apart. Pro Tip: Before starting a new sequence, take a photo with your hand in the frame. Doing so will help you separate one group of sequences from another. You will be combining different images. Thus, you should have as little movement as possible between the frames. Set up your camera on a tripod. Use a remote shutter to avoid camera shake. Here is my final result, you can see that it is a combination of the best details:
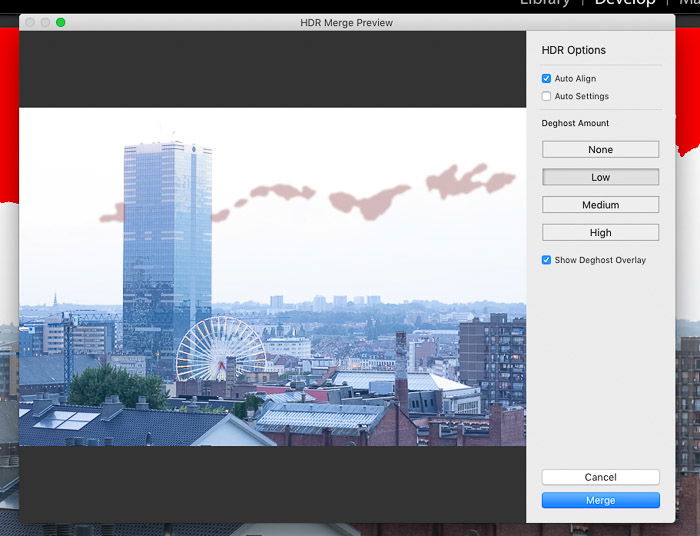
Use De-Ghosting to Correct Movement
It is also best to photograph a scene without fast-moving clouds, people, or traffic. A certain degree of movement among the different exposures is OK. You can correct it with a de-ghosting procedure, available in any HDR software. In the image below, the clouds moved, creating patches in the sky (top image). I then removed this by de-ghosting (bottom).
HDR Photography Software
Adobe Lightroom and Photoshop
Lightroom and Photoshop have a Photo Merge mode. Doing so allows you to combine different photos into a single HDR image. You won’t have a lot of options to tweak the HDR. But you can auto-align the images. This feature is useful for handheld sequences. You can also apply auto settings to the final exposure. Furthermore, you can adjust the level for the Deghost.
Photomatix/Photomatix Pro
Photomatix is the big guy in the HDR world. You can reimport the images from Lightroom automatically. It has many options and presets. You can choose different methods to create HDR. Some of the tools you can use include Detail enhancer, Tone mapping, Tone, and more. Photomatix Pro comes with a plugin for Lightroom called “Merge 32 bit”. This feature creates a basic 32-bit HDR image you can edit in Lightroom.
Phone Apps For HDR Photography
Many phone cameras have an HDR mode function in their default camera app. But you can also try dedicated apps such as True HDR and Pro HDR X .
Common HDR Issues
Flattening Your Image
An HDR image contains a huge amount of data that can be extracted, and dark areas can be brightened up quite a lot to reveal the smallest details. But this does not mean you should do it. The amount of details you show across the scene is only one aspect of a good photograph: contrast is the other part. Flattening the image by reducing the contrast between the original bright and dark areas is often bad practice. It makes the image look less natural, difficult to understand and not really appealing. It is best to retain some contrast to keep the shot interesting.
Black Clouds
Another common HDR mistake in landscape photography is to allow the clouds to go black. For sure, black clouds are real in bad weather, but the puffy clouds scattered in a blue sky are mostly white. You should keep them as such in your HDR image.
Halos
Halos around highly contrasted edges are the first indicator that you have over-processed your image by boosting the contrast and clarity too much. Those halos are typical of too many HDR images posted online and are, simply put, rubbish. A more gentle approach to editing will make for a more pleasant image, with no halos.
Conclusion
You should learn to use High Dynamic Range because you’ll find it useful in situations when you just need greater details. Just remember that you don’t need to create unrealistic HDR images. Instead, use our tips to help you create natural results. Check out our post on how to use tone mapping next! For in-depth knowledge on how to edit in Lightroom, take a look at our Effortless Editing course!
title: “What Is Hdr Photography And How To Use Hdr Correctly " ShowToc: true date: “2023-02-01” author: “Melissa Robinson”
In this tutorial, we’ll show you how to use HDR to create natural-looking images. [ExpertPhotography is supported by readers. Product links on ExpertPhotography are referral links. If you use one of these and buy something, we make a little bit of money. Need more info? See how it all works here.]
What Is HDR Photography?
High Dynamic Range photography is the method of merging images to create a final photo. The method involves taking many pictures and then stitch them together. Each image captures the scene at different exposures. When merged, the picture provides an overall correct exposure. In most cases, this process needs at least three images. The first one is to capture a mid-range exposure shot. Meanwhile, the second meters for the highlights, and third for the shadows. You can take many images, as long as the number is divisible by 3 (excluding your mid-range exposure). These images show as a plus or minus on the Exposure Value Meter. +3 and -3 is a regular choice. For three images, the values should be 0, +3, and -3. +3. For seven images, your range should be -3, -2, -1, 0, +1, +2, +3. Your camera allows you to capture three images in this manner. Other cameras even have a dedicated HDR feature that let you freely adjust settings.
HDR vs. Non-HDR
Modern sensors can cope with 12-stops dynamic ranges or more. You should be able to capture the whole 5 EV dynamic range, right? Unfortunately not. At least if you want some good image quality. Let’s consider a single exposure and say this exposure has value 0 EV. Next, let’s create an HDR version by combining three exposures taken at -2 EV, 0 EV, and +2 EV. After editing them with the same settings in Lightroom, let’s compare them in the image below.
The two images are very similar. But the HDR image presents a little less contrast. It has more detail in the shadows. Not to mention the colors are more vibrant and saturated. You could say you need to brighten up the shadows in the single exposure. What if you reduce the contrast and increase saturation? Will you get the same results as the edited shot? Let’s see a 100% crop of the two images:
As you can see, the HDR shot (bottom) is cleaner and more detailed. Lifting the shadows more in the single exposure degrades the image further. Even with the modest 5 EV dynamic range, a single exposure will have terrible image quality. Especially when compared to an image obtained by combining multiple exposures.
Why HDR Photography Has a Bad Reputation
HDR was particularly popular among photographers some years ago. Unfortunately, with automated tools, the internet became flooded with bad pictures. They show surreal, fake and oversaturated HDR pictures. The problem is that it is easy to over-process HDR photos. There are many presets available in automated HDR software and nowadays there are also HDR filters. They produce unappealing images. In time, those images became synonymous with HDR mode. But HDR is not a style. It’s a technical tool. The goal of HDR mode is to expand the dynamic range of your pictures. Good HDR photos are subtle and keep the natural look of your images. Furthermore, you don’t need to remove contrast because it’s what keeps things natural. The way you manipulate the picture has little to do with HDR. You can opt for realistic editing, or you can go wild.
When Would You Use HDR Photography?
There are a number of situations where HDR photography can come in handy when used well. Some of these include interior photography, nightscapes and dramatic skies. Sunrise and sunset make for perfect HDR images. Most often than not, your golden hour photo looks nothing like what you can see in real life. Depending on how you set your exposure (manual or auto), you can find that:
The sky is very bright and the foreground quite dark with little details Your foreground is well exposed, but your sky looks washed out. The sky is perfect, but the foreground is solid black.
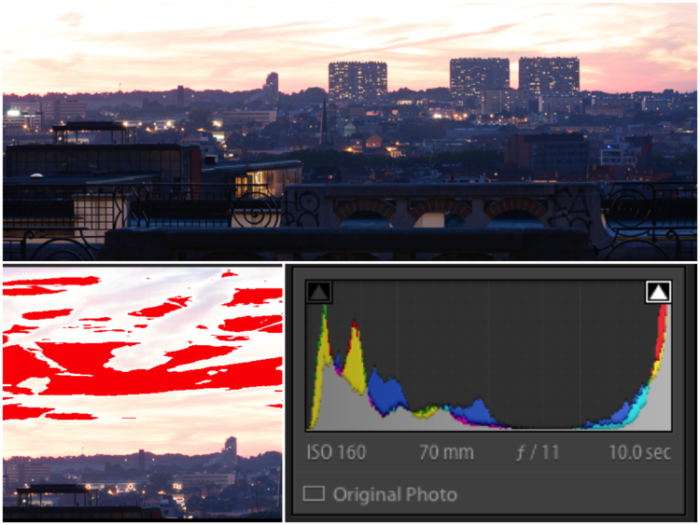
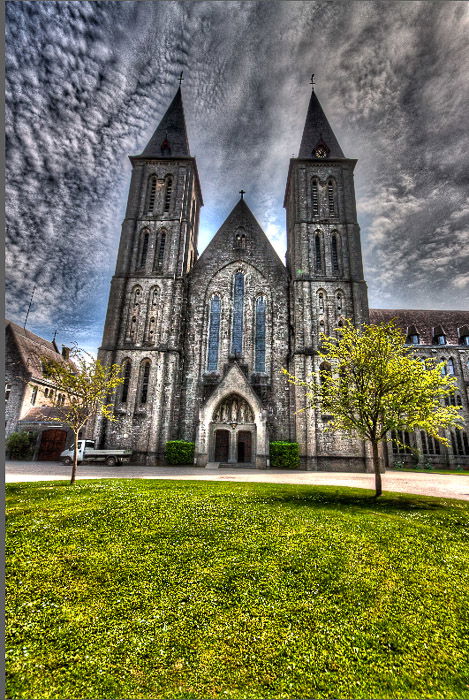
As a rule of thumb, a diffused light during overcast days reduces the contrast in the scene. The cloudy sky acts as a giant softbox by diffusing the harsh sunlight. As a result, the contrast between shadows and highlights reduces. On a sunny day with a clear sky, the light is hard and direct. It casts deep black shadows while objects in full sunlight are very bright. This high contrast scene has a great dynamic range (DR). At sunset, the foreground is much darker than the sky. Unfortunately, achieving correct exposure for both is impossible. And that’s where HDR can help. In the image below, it is clear you can’t capture the whole dynamic range in one single photo. Lightroom highlight warning shows up in the sky. This warning shows areas that are almost pure white. So there are no details there to recover. And the histogram shows there are almost no middle tones. But a high dynamic range can solve the problem.
How Do I Make HDR Photos?
Camera Settings for HDR Photography
Some phone and compact cameras have a built-in HDR mode. But they only work if you save the images in jpeg format. That means you have little to no control over the whole process. So it’s always better to do it yourself manually. Here’s a short checklist for HDR camera settings you need to use:
Set your camera to save the photo in RAW format and to manual mode; Use the lowest ISO setting to work for your situation. Increasing the ISO will reduce the DR the sensor can record. Keep the same aperture for all the photos, as this will affect your depth of field; Note the suggested shutter speed for the 0EV exposure; Set the shutter speed to the most underexposed image you need (e.g., 4EV). Change the shutter speed in steps of 1EV (double the shutter speed) after each photo. Continue the sequence until you get the brightest image you need.
Some cameras have automated bracketing functions. These are great if you want to limit yourself to the +/-2EV range in 3 to 5 photos. But it all depends on the settings and the camera.
Use Multiple Exposures to Capture all the Details
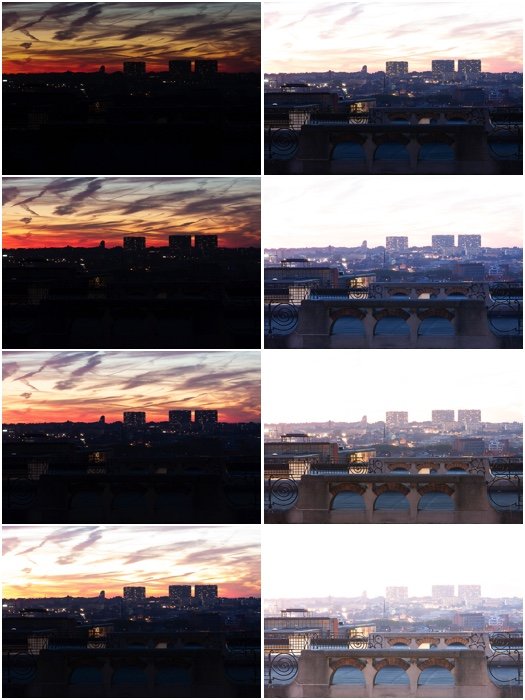
You can create high dynamic range photos on a single file. But it is best to rely on multiple exposures. Also, you do not need to collect the same number of underexposed and overexposed images. It depends on the scene you want to photograph. For sunsets, it may be better to use more underexposed images. This lets you capture all the details in the bright sky. For my urban sunset, I needed to underexpose 4 EV to capture all the details in the highlights. I could have stopped at +2 EV for the foreground. To play it safe, I pushed to 3 EV. I took all these photos with 1 EV apart. Pro Tip: Before starting a new sequence, take a photo with your hand in the frame. Doing so will help you separate one group of sequences from another. You will be combining different images. Thus, you should have as little movement as possible between the frames. Set up your camera on a tripod. Use a remote shutter to avoid camera shake. Here is my final result, you can see that it is a combination of the best details:
Use De-Ghosting to Correct Movement
It is also best to photograph a scene without fast-moving clouds, people, or traffic. A certain degree of movement among the different exposures is OK. You can correct it with a de-ghosting procedure, available in any HDR software. In the image below, the clouds moved, creating patches in the sky (top image). I then removed this by de-ghosting (bottom).
HDR Photography Software
Adobe Lightroom and Photoshop
Lightroom and Photoshop have a Photo Merge mode. Doing so allows you to combine different photos into a single HDR image. You won’t have a lot of options to tweak the HDR. But you can auto-align the images. This feature is useful for handheld sequences. You can also apply auto settings to the final exposure. Furthermore, you can adjust the level for the Deghost.
Photomatix/Photomatix Pro
Photomatix is the big guy in the HDR world. You can reimport the images from Lightroom automatically. It has many options and presets. You can choose different methods to create HDR. Some of the tools you can use include Detail enhancer, Tone mapping, Tone, and more. Photomatix Pro comes with a plugin for Lightroom called “Merge 32 bit”. This feature creates a basic 32-bit HDR image you can edit in Lightroom.
Phone Apps For HDR Photography
Many phone cameras have an HDR mode function in their default camera app. But you can also try dedicated apps such as True HDR and Pro HDR X .
Common HDR Issues
Flattening Your Image
An HDR image contains a huge amount of data that can be extracted, and dark areas can be brightened up quite a lot to reveal the smallest details. But this does not mean you should do it. The amount of details you show across the scene is only one aspect of a good photograph: contrast is the other part. Flattening the image by reducing the contrast between the original bright and dark areas is often bad practice. It makes the image look less natural, difficult to understand and not really appealing. It is best to retain some contrast to keep the shot interesting.
Black Clouds
Another common HDR mistake in landscape photography is to allow the clouds to go black. For sure, black clouds are real in bad weather, but the puffy clouds scattered in a blue sky are mostly white. You should keep them as such in your HDR image.
Halos
Halos around highly contrasted edges are the first indicator that you have over-processed your image by boosting the contrast and clarity too much. Those halos are typical of too many HDR images posted online and are, simply put, rubbish. A more gentle approach to editing will make for a more pleasant image, with no halos.
Conclusion
You should learn to use High Dynamic Range because you’ll find it useful in situations when you just need greater details. Just remember that you don’t need to create unrealistic HDR images. Instead, use our tips to help you create natural results. Check out our post on how to use tone mapping next! For in-depth knowledge on how to edit in Lightroom, take a look at our Effortless Editing course!
