Understanding how it works is key to correct exposure for beautiful pictures. But don’t worry… Our article gives you all the f-stop know-how. You just have to put it into practice. [ExpertPhotography is supported by readers. Product links on ExpertPhotography are referral links. If you use one of these and buy something, we make a little bit of money. Need more info? See how it all works here.]
What is an F-Stop on a Camera?
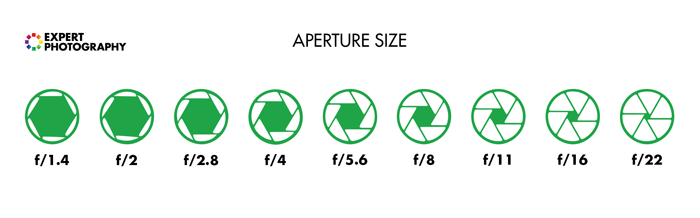
So what does the “f” stand for in f-stop? The “f” stands for focal length. The number following it is a fraction of the focal length. But before we would jump in further, it’s essential to understand how the aperture works. We’ll keep it short… The aperture blades, also known as a diaphragm in your lens, work just like the pupil of a human eye. In low light, the pupil gets larger. It lets in as much light as possible. The same goes for your camera’s aperture. But why is it so important? It’s because the f-stop scale is what helps you to measure and understand the aperture size. You’ll see “f/” or “f” on your camera, followed by a number. This denotes how wide the aperture is. So the lower the number, the wider the aperture. And you can adjust these settings in aperture priority and manual modes in your camera. This may be confusing. Why does a low number represent the max aperture? The answer is simple. But first, you need to know the f-stops scale as follows—f/1.4, f/2, f/2.8, f/4, f/5.6, f/8, f/11, f/16, and f/22. This is what the aperture scale looks like from wide (left) to narrow (right):
How Do You Calculate an F-stop’s Aperture Size?
At this point, things get a little bit complicated and somewhat mathematical… To calculate the size of your aperture at a certain f-stop, you must divide the focal length by the fraction. For example, if you are shooting with a 200mm lens at f/4, the diameter of the aperture is 200 ÷ 4 = 50mm. Here are a couple more f-stop settings examples:
A 50mm lens with an aperture of f/2 is 50 ÷ 2. So it has a lens opening 25mm wide. A 50mm lens with an aperture of f/8 is 50 ÷ 8. So it has a lens opening 6.25mm wide.
How F-stop Affects Your Image
So what’s the most important thing to know about these f-stop numbers? From each number to the next, the aperture decreases to half its size. So if you are changing from f/2 to f/2.8, you are halving the exposure. In doing so, you’re halving the open area of the aperture in the lens. This allows 50% less light through the lens (one f-stop). This is because the f-stop numbers come from an equation. The lens’s focal length determines the aperture size. Let’s say you are photographing portraits of someone at the beach during sunset. As the sun keeps going down, you have less and less light. So it would be best if you compensated for this somehow. One possible solution is to open your aperture to let more light in through the lens and onto your camera’s sensor. Jumping up an f-stop brightens up your image. But it also causes a change in your photo’s depth of field. So what if you shoot with a wider aperture, such as f/2.8? You will notice that the area of focus is much smaller than if you were using a bigger f-stop, like an f/5.6 or f/8. So the wider the aperture is, the shallower the depth of field. You can get creative with adjusting your f-stops for a different depth of field. But you also need to be aware of how to do it properly. A wide aperture can easily blur your picture in undesirable areas… especially in portraits, where if you use a very small f-stop such as f/1.8, your subject’s nose could be out of focus while their eyes are still sharp. In this case, the area of focus can be less than 10mm. This is a very shallow depth of field.
Narrower apertures (f/8, f/11, f/16, f/22) are mostly used for landscape photography. That’s because they have a bigger area of focus to keep most of the environment sharp. But as explained earlier, these f-stops don’t let as much light in as wider ones. So your shot can come out underexposed. All lenses have a limit to how wide you can open their apertures. These max apertures are usually the following f-stops—f/1.4, f/1.8, f/2.8, f/3.5, f/4, and f/5.6. In some cases, the focal length of your lens can affect the smallest f-stop you can use. Some zoom lenses don’t come with variable apertures. And the lowest f-stop you can use depends on your lens’s focal length. Here’s an example. A 70-200mm variable aperture lens can use the smallest one at 70mm. But once you zoom out to 200mm, your aperture automatically sets itself to f/5.6 or something similar. These lenses are usually cheaper than fixed aperture zoom or prime lenses. (A prime lens is when the focal length is not adjustable.) A lot of professional photographers tend to use prime lenses. Primes can usually produce a much wider aperture opening. What happens when you use the widest possible aperture of your lens, but there’s still not as much light as you need? Your image will be underexposed. Then you have two options to correct it. Either you get an additional light source. Or you can adjust other settings in your camera other than the aperture.
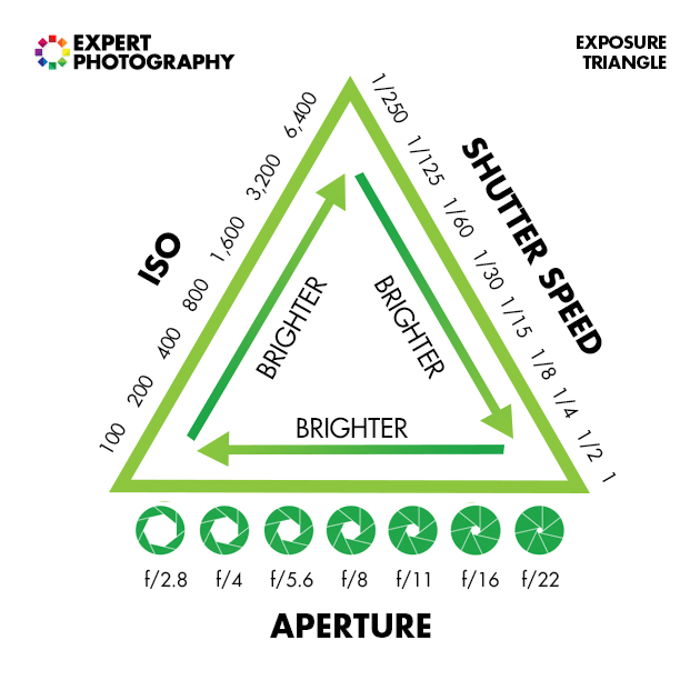
Understanding the Exposure Triangle
Camera exposure is created using three settings. These settings make up the exposure triangle. These are the shutter speed, ISO, and aperture settings. As your photography skills improve, you can start to shoot in manual mode more. That way, you gain more control over how the camera exposes the scene. Knowing what exposure stops can do for the shutter speed, ISO and aperture affect how you change each one.
Shutter Speed and ISO Stops
Apart from the aperture f-stop scale, we can also measure the ISO and shutter speed in stops. The same concept works here with a small difference. You double or halve each value with each full ISO or shutter speed stop. Another difference from the aperture f-stops is that ISO and shutter speed do not affect the depth of field. But by adjusting these two settings on your camera, you can control how much light your image has. Besides controlling the exposure, ISO and shutter speed have other effects on your shot.
ISO Stops
Let’s start with the easiest to understand, which is ISO. One-stop up from ISO 100 is 200. And one-stop up from ISO 200 is 400. The intervals aren’t equal. Instead, the ISO doubles between stops. That’s easy enough to understand. So I’ll leave it at that. Be careful, though. The higher you set the ISO, the more noise your image will have! Why? Because raising the ISO makes the camera sensor more sensitive to light. The camera does this with an increased electric charge. And the noise in the photo is the by-product of this adjustment. But don’t be afraid of stepping up your ISO. This can help you to be more flexible with adjusting shutter speed and aperture to achieve different effects in your photos. For example, maybe you don’t have that much light. And perhaps your aperture is also as wide open as possible. So increasing ISO can help you expose your shot correctly.
Shutter Speed Stops
The majority of the time, when you use your digital camera, you’re shooting at a fraction of a second. The same principle applies if you shoot at speeds of one second or longer. You double the time from one second to two, then from two seconds to four. Simple. When shooting at a fraction of a second, such as 1/200 s? You double this number (halve the denominator—the number on the bottom of the fraction, in this case, 200). If you’re new to photography, don’t worry. This becomes second nature. 1/100 s is twice the time of 1/200 s. So that’s one-stop. And the exposure is doubled. 1/50 s is twice the time as 1/100 s, and so on.
Adjusting F-stop, Shutter Speed, and ISO for Correct Exposure
Let me make this simpler for you. Say you’re shooting at f/2.8, at 1/100 s, with an ISO of 200. But you want a very shallow depth of field. You know that widening your aperture opening to f/2 produces a shallower depth of field. Perfect! But it also triples the amount of light entering your camera lens. You have jumped up two f-stops with your aperture and made the exposure brighter. So you need to counter this with a change in shutter speed or ISO. You can halve the ISO to 100. Or you can double the shutter speed from 1/100 to 1/200 s. As you can see, this is quite important to know to expose photos properly.
Conclusion
To summarise, increasing the exposure by one stop doubles the exposure. And decreasing the exposure by a one-stop will halve it. But wait, there’s more! With your aperture, shutter speed, and ISO, there are more intervals than just doubling and halving exposures. For example, between f/1.4 and f/2, you find another f-stop… f/1.8. These are third f-stops that give you more control over your exposure. We hope this article helped answer, “What is an f-stop?” Now you understand how the f-stop scale works and why it’s important. And it’s time to go out there and put everything you learned into practice. You can now check out our post on understanding the difference between a t-stop and an f-stop.
![]()
![]()
![]()
![]()
