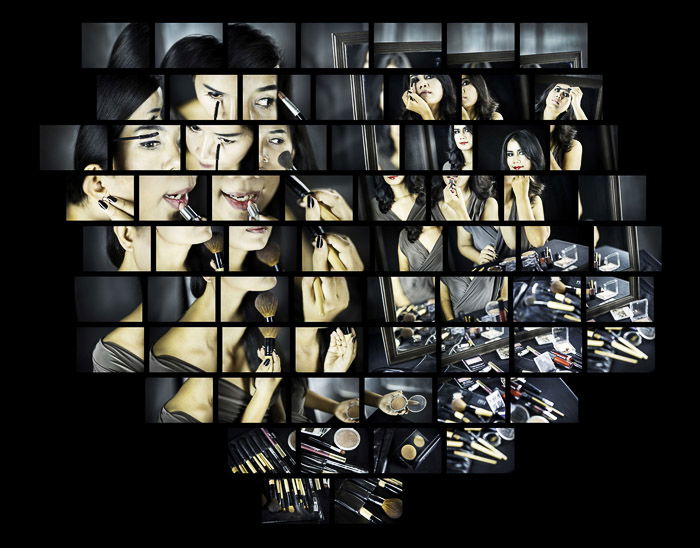
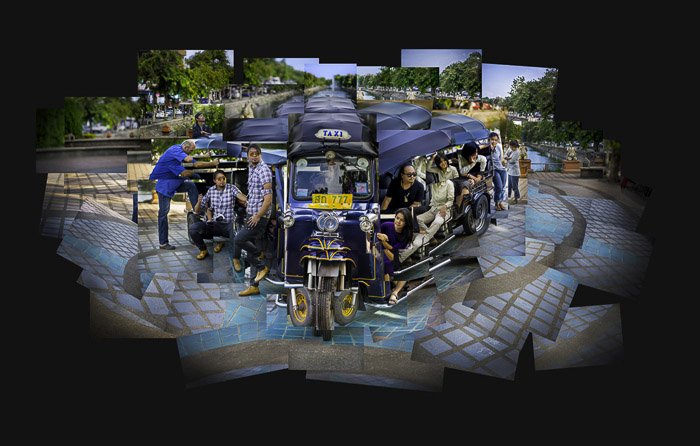
What Is a Photomontage?
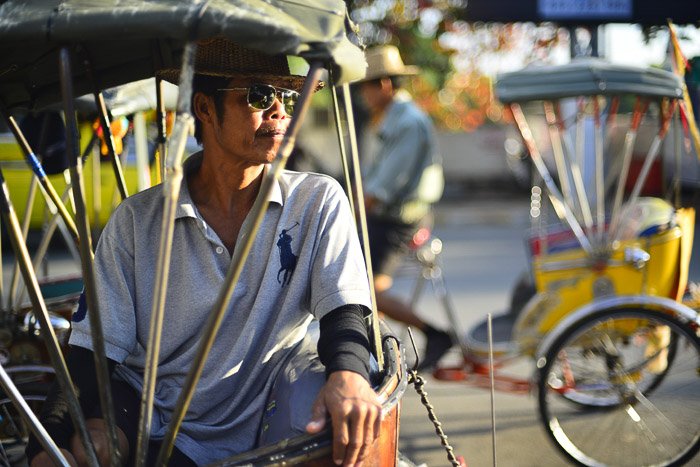
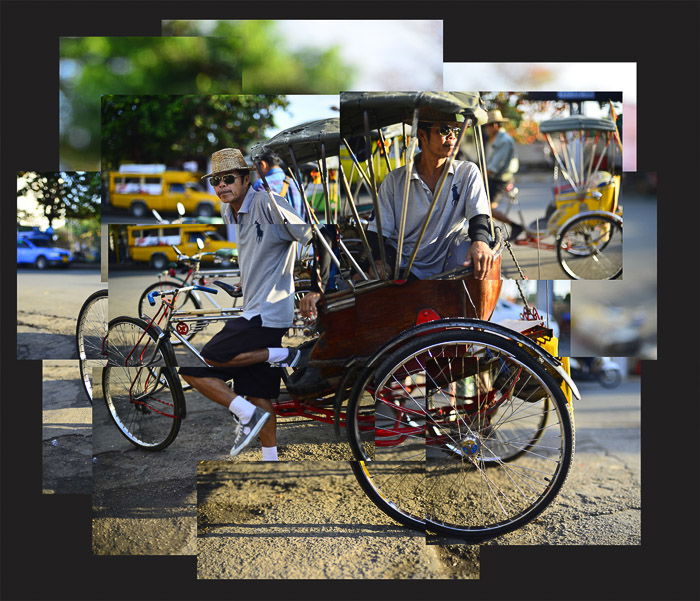
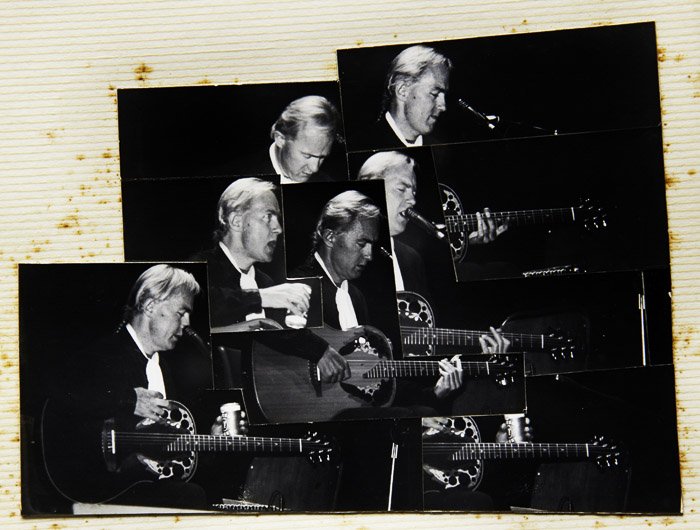
A photomontage is a series of individual photographs. You take several photos of one subject and arrange them together to create a single image. We find it normal to see only separate photos. We create most photographs in a fraction of a second. This short window in time is captured at one location. A photomontage can contain any number of photos. There is no limit to the amount of time it takes to create this series of images. There is also no limit to the variety of locations the photographer can use to make the photos. To be practical in the execution of a photomontage, some limitation is advisable. Photomontages are similar to cubism. There are no bounds of perspective or time. You can create a single artwork using several images of the same or many subjects. Doing this in a cohesive manner gives exciting results. Doing this without attention to essential visual elements can cause an ocular nightmare.
What Is Not a Photomontage?
Photomontage software and apps have become popular. It’s easy to use a photomontage creator to break up a single photograph and create an illusion that it is many. This is not a true photomontage. The results of such manipulations might look appealing. But a flat image created by breaking up a single photo has no real depth or artistic expression. Some people have a different definition of a photomontage. They arrange a collection of unrelated or semi-related photos together. This article is not about those.
My Experience With Photomontage
Back in the early 1980s, I watched a short documentary about British artist David Hockney. The program followed him through the creation of what he called a ‘joiner’. I was most interested in his expression about time and space. How photographs differ from paintings. Paintings take time to produce and there are fewer limitations than with photography. Creating a photomontage from a series of photos negates these limitations. I started simply with small scale black and white compositions. First, I found it very difficult to make a photomontage I was proud to show other people. This has changed over time. I had montages published in newspapers during my time as a photojournalist. I have held solo exhibitions of my work. Now, I follow my fascination and try to incorporate video and make my photomontages move.
Make Creative Photography with More Than Single Images
Everyone finds different types of photos exciting. The good news is that you can make a photomontage of any genre of creative photography. All you need is an active imagination, plenty of time and disciplined focus. This is not something easy and is very different than making single photographs. It is like painting, writing or sculpting. The creative process takes a lot of time and energy.
Step by Step – How to Create Your First Photomontage
In these steps, I encourage you to create a simple photomontage. Get familiar with the processes and have a workflow you are comfortable with. After that, I hope you will progress on to more imaginative works.
What You’ll Need to Create Your Own Photomontage:
Camera Computer Prints Board, Glue, Black marker pen.
Choose Your Subject
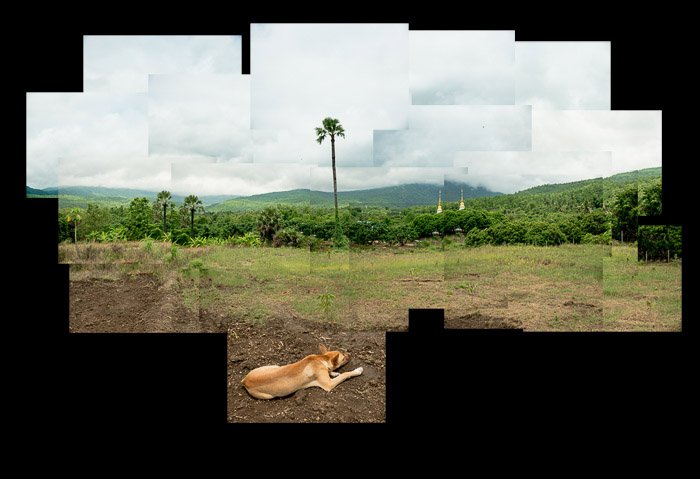
You need to consider your subject for a photomontage. This could differ from your regular photography ideas. You should consider your potential to express space and time. For your first photomontage pick a static subject. The best one to choose is a subject you can return to and photograph more than once if you need to. Don’t choose something that moves as this will add complications. You are more likely to be successful as a first-time photomontage maker if you start with a simple scene.
Plan
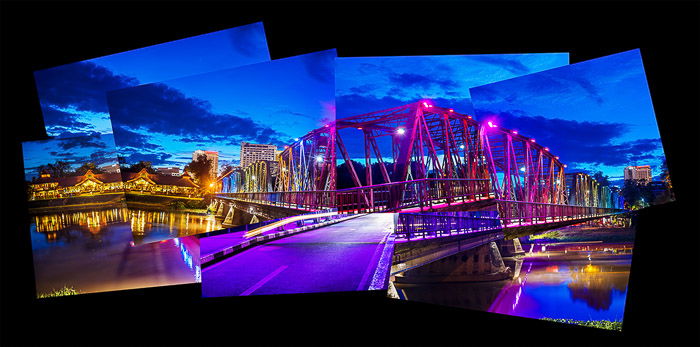
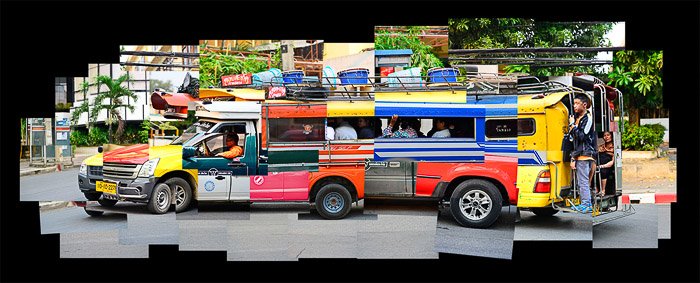
Calculate how you want to photograph your subject. Plan how many photos you want to make. You will need to think about how close you are to your subject and which lens to use to get the number of pictures you want. Using a standard 50mm lens will make compiling your photos easier. A wide-angle lens might create problematic distortion at the edges of the images. Aim to create a montage that will have 20 to 30 photographs in the finished piece. Having too many or too few images can make it more difficult to compile. For my photomontage of the bridge at dusk, I wanted a minimal number of images. I used only seven photographs in this montage. It was very difficult to put them together and keep the integrity of the picture.
Photograph More Than You Need To
Make each photo count. Plot out a grid in your mind and follow through so you are making sure to record every part of your subject at least once. I start from a corner most of the time. Overlap your photos. If you are taking pictures from left to right, look at something which appears near the right side of your composition. Take the photo and then move your camera to the right. Compose your next picture, so the same thing is still in the composition, but towards the left of the frame. It’s good to have the option of including photos which overlap and are not all in straight lines. This gives you more flexibility when you come to lay the photomontage out. Don’t go crazy and take hundreds, but make sure you have every part of your subject covered. Try to make individual creative photographs of each part of your subject. Aim to compose them with a small difference. Sometimes I photograph an object or part of a scene many times. I will place it at the top and the bottom of the frame or at each corner. Doing this will give you more options as you are laying your photomontage out.
Look For Lines in Your Composition
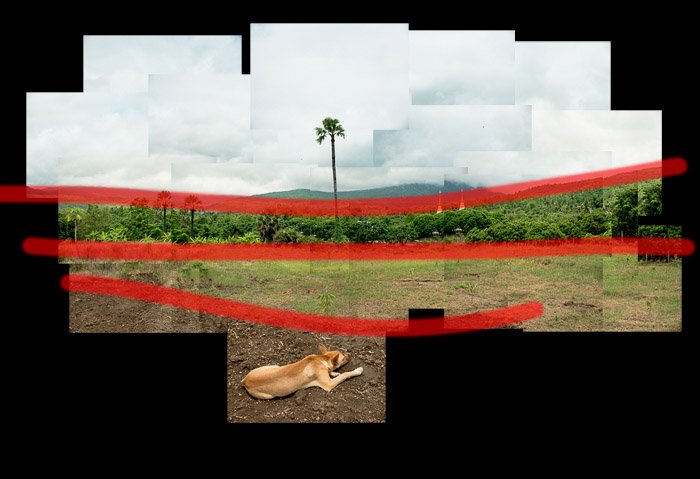
Using vertical, horizontal, and/or diagonal lines will help. Look for lines, straight or curved, as you are making your photographs. Be mindful of how they could appear in your finished photo montage. Making use of these lines will help hold your montage together and make it more attractive to look at. If there is no flow of lines through your finished piece, it will look muddled and confusing.
Manage Your Images Well
I use Adobe Lightroom and Photoshop to compile my montages on a computer before having the photos printed. You can use any imaging software that allows you to have separate images on many layers. Load all the photos you made onto your computer. Do not delete any of them, even if there are technical flaws. You might use one of them to fill a gap. I will look through my series of photos and pick out the strongest images. Photos that will stand alone as good pictures whether they are part of a photomontage. Make a separate folder for these and place them in it. Next, choose the bulk of your photos you think will be best suited to compose your photomontage. Imagine where the edges will be and pick images to fill your composition space. Place these in another folder. Place the remaining photos in a third folder.
Resize Your Photos
Resize your photos based on how large you want your finished photomontage to be. Keep your resolution at 300 dots per inch (dpi.) This will mean the size is the same when you get them printed. Decide roughly how many photos will make up the width and how many the height. You can size your individual images to fit into the dimensions you want. You can alter this photomontage later, but it’s good to work with a base size from the start. I always compile my photomontages using .jpeg images with small compression. This varies depending on the number of photos you are working with and the processing power of your computer. When creating larger photo montages, it becomes more important to be well organised. Sizing your photos carefully will help to achieve a more steady workflow.
Create Your Photoshop ‘Canvas’
Create a new ‘canvas’ of a suitable size. Make sure the dpi matches the dpi of your photos. Don’t be too concerned about the correct canvas size. You can always alter it later to suit your needs if it’s too small or too large.
Import Your Photos
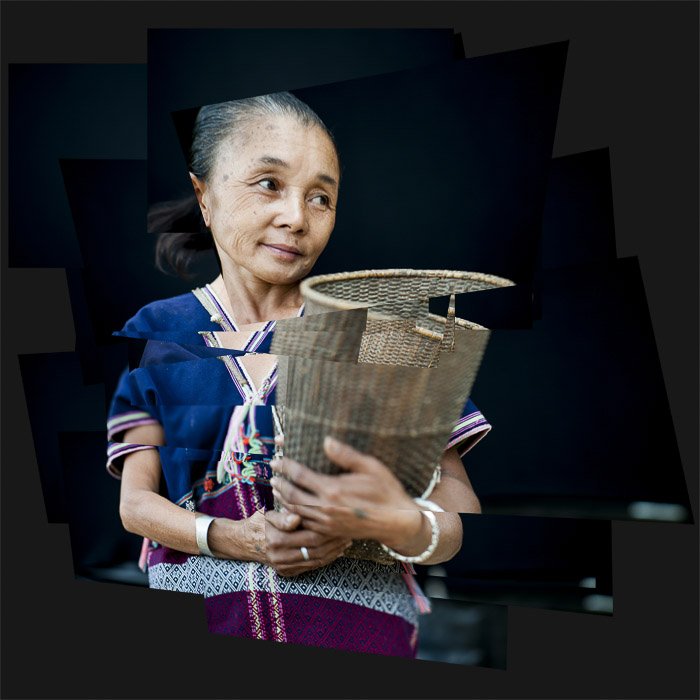
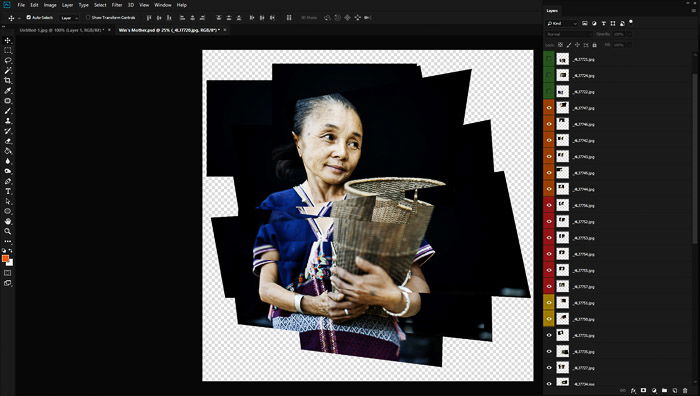
Export the photos from the first two folders and import them to Photoshop by going to File > Scripts> Load Files To Stack. Using this option, you can load all the images you need into one document as separate layers. If you are using this method, select all the layers. Then drag and drop them into the document where you create your empty canvas. You need all your photos to be on their own layer in the document you have created. At this stage, they may all appear to be stacked on top of each other, unlike this image below:
Arrange Your Photos
Start to drag and drop each photo roughly where you want it. If you have the ability to color code each layer, it is a good idea to do so. I usually use three colors. One for the images on the left, one for the images that make up the middle and one for those on the right. When I am working on large photomontages, I will make separate groups in the layers panel and add layers to them. This allows me to hide all the images in one group, which can make the workflow more efficient. Move your photos around and position them so they resemble the whole subject you photographed. Some images will still appear stacked on top of each other. This is okay. Now you have all the photos roughly in position. This is when the real creative photography fun begins. It’s time for you to free your imagination. Move the photos around and experiment as you like. Think outside the box! As you work, parts of images you want to see might be hiding below another layer. You can move each photo higher up or lower down in the layers hierarchy to suit. This can take a long time the first time you try it. Don’t expect to complete laying out a montage the first time you sit down to do it. If a series of photos is not composed well, the results will not be attractive. You must be careful to lay down your photos in a manner that is pleasing to look at. If you do not, the results can appear muddled, ambiguous and unattractive to viewers. The way I achieve this is to compile my photos with sharp lines running through my montage. These lines will help hold the images together and make them appear cohesive.
Hide Layers to Finish Your Photomontage
As your photomontage begins to take shape, you can start to turn off the layers you are not using. Don’t delete them, only hide them. Compiling a photomontage requires flexibility. Be open to your creative expression. As you move photos around, your montage will keep changing. Being able to hide or show individual images allows you to be more innovative with your layout. You might see gaps in your montage at this point. Check your pictures in the third folder you created but did not import any photos from. You may find a photo to fill your gap. If not, be creative and duplicate an image you have already used. You can also leave the gap blank if it looks good to you. Give yourself plenty of time for compiling your photomontage, but make sure you finish it. This can be a never-ending process if you let it be. Of course, you can always revisit a montage later and compose it in a different way if you like. In my experience, a montage is rarely laid out the same way twice. How it looks on your computer screen will be different than the way you lay the prints out and stick them down.
Printing Your Photos (a Fun Optional Step)
You do not have to print and paste up your montages. As digital artworks, they are quite acceptable. Printing the photos takes them to another dimension, though. I find that it makes them even more special. You need to print the photos you have used and are visible in the finished layout if you decide to have a tangible copy. You can have them printed out as individual photographic prints in a quick and easy way.
Decide How to Adhere Your Prints
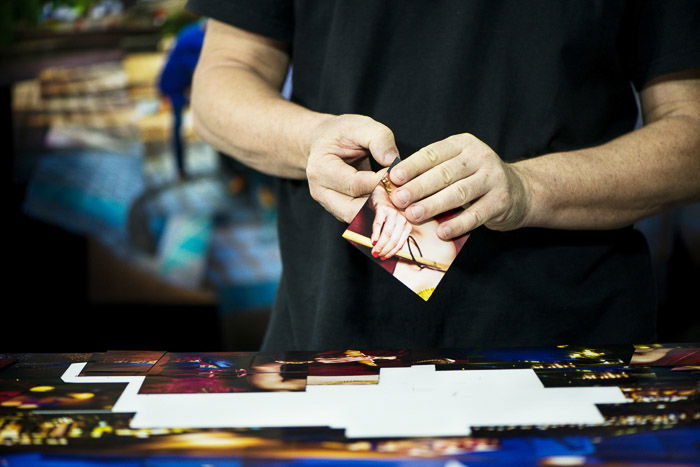
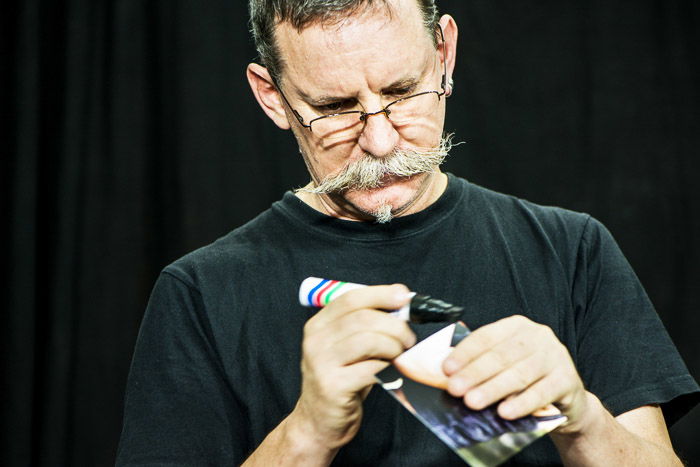
Sticking the prints down can be a difficult step. Using glue can be very messy, and it is easy to damage overlapping prints. For many years I have used a roll of double-sided adhesive paper. I apply this to each image before I start laying them out. If you are using contact glue you will need to apply this as you are about to stick your prints down. I recommend you lay out your prints first before you start to stick any down. This will allow you to see an impression of how your photomontage will look. You must be careful not to get excess glue on the board or your other prints. Before I stick my prints down, I blacken the edges of the prints with a thick marker pen. Having the edges dark makes them less visible on the finished photomontage.
Lay Out Your Prints
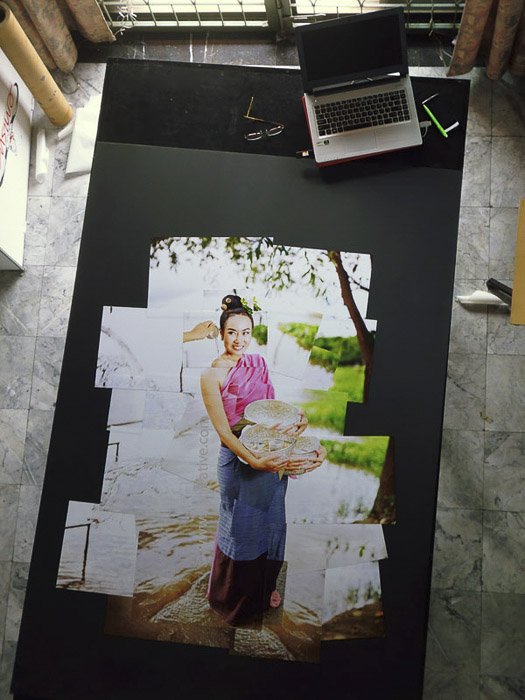
When you have all your prints ready, begin to lay them out on your board. The easiest is to have your computer next to you. This allows you to use the digital version of your photomontage for guidance. Turn all the layers off except the bottom one. The visible layer will be the first print you place on the board. Turn on the next layer and place the print on the board. Work from the bottom up and make sure each print you lay down is one that overlaps a print you already have on the board. During this first laying out of the photographs, I do not stick any of them down. The prints will move around. You will knock and nudge them as you are positioning other prints. The whole process is quite kinetic. You could use masking tape to hold each print in place, but I never do. I like the movement as it can sometimes open up different placements I had not thought of. As you are laying out your prints, step back and have a look at your work from a distance. If you can get up above the table you are working on, this is even better. Being able to see your montages from a distance as you compile them will help, especially if they are large.
Stick Your Photomontage Down
Once you are happy with your photomontage layout, it’s time to glue them. I usually start from a corner with a print that is not overlapping any others. You must make sure whatever is under each one is the board or another print already stuck down. Don’t glue a print that supposed to have another behind it. This could ruin the look of your photomontage.
Once You Have Finished
Share your photomontage with your friends. Get them to come and see it or take your photomontage to them. Showing the printed artwork is far different than showing the digital version. Often people do not realise individual prints make up my montages. Experiment and explore time and space. Study some cubists. Find whole other dimensions in photography that are not possible with a single image! Tried photomontages and feel like doing more creative photography ideas? The photomontage is one of the topics we cover in our creative photography course, Wow Factor Photography. If you’d like to learn more, check out the course here.


title: “What Is A Photomontage And How To Make One " ShowToc: true date: “2023-02-02” author: “Benjamin Arneecher”
What Is a Photomontage?
A photomontage is a series of individual photographs. You take several photos of one subject and arrange them together to create a single image. We find it normal to see only separate photos. We create most photographs in a fraction of a second. This short window in time is captured at one location. A photomontage can contain any number of photos. There is no limit to the amount of time it takes to create this series of images. There is also no limit to the variety of locations the photographer can use to make the photos. To be practical in the execution of a photomontage, some limitation is advisable. Photomontages are similar to cubism. There are no bounds of perspective or time. You can create a single artwork using several images of the same or many subjects. Doing this in a cohesive manner gives exciting results. Doing this without attention to essential visual elements can cause an ocular nightmare.
What Is Not a Photomontage?
Photomontage software and apps have become popular. It’s easy to use a photomontage creator to break up a single photograph and create an illusion that it is many. This is not a true photomontage. The results of such manipulations might look appealing. But a flat image created by breaking up a single photo has no real depth or artistic expression. Some people have a different definition of a photomontage. They arrange a collection of unrelated or semi-related photos together. This article is not about those.
My Experience With Photomontage
Back in the early 1980s, I watched a short documentary about British artist David Hockney. The program followed him through the creation of what he called a ‘joiner’. I was most interested in his expression about time and space. How photographs differ from paintings. Paintings take time to produce and there are fewer limitations than with photography. Creating a photomontage from a series of photos negates these limitations. I started simply with small scale black and white compositions. First, I found it very difficult to make a photomontage I was proud to show other people. This has changed over time. I had montages published in newspapers during my time as a photojournalist. I have held solo exhibitions of my work. Now, I follow my fascination and try to incorporate video and make my photomontages move.
Make Creative Photography with More Than Single Images
Everyone finds different types of photos exciting. The good news is that you can make a photomontage of any genre of creative photography. All you need is an active imagination, plenty of time and disciplined focus. This is not something easy and is very different than making single photographs. It is like painting, writing or sculpting. The creative process takes a lot of time and energy.
Step by Step – How to Create Your First Photomontage
In these steps, I encourage you to create a simple photomontage. Get familiar with the processes and have a workflow you are comfortable with. After that, I hope you will progress on to more imaginative works.
What You’ll Need to Create Your Own Photomontage:
Camera Computer Prints Board, Glue, Black marker pen.
Choose Your Subject
You need to consider your subject for a photomontage. This could differ from your regular photography ideas. You should consider your potential to express space and time. For your first photomontage pick a static subject. The best one to choose is a subject you can return to and photograph more than once if you need to. Don’t choose something that moves as this will add complications. You are more likely to be successful as a first-time photomontage maker if you start with a simple scene.
Plan
Calculate how you want to photograph your subject. Plan how many photos you want to make. You will need to think about how close you are to your subject and which lens to use to get the number of pictures you want. Using a standard 50mm lens will make compiling your photos easier. A wide-angle lens might create problematic distortion at the edges of the images. Aim to create a montage that will have 20 to 30 photographs in the finished piece. Having too many or too few images can make it more difficult to compile. For my photomontage of the bridge at dusk, I wanted a minimal number of images. I used only seven photographs in this montage. It was very difficult to put them together and keep the integrity of the picture.
Photograph More Than You Need To
Make each photo count. Plot out a grid in your mind and follow through so you are making sure to record every part of your subject at least once. I start from a corner most of the time. Overlap your photos. If you are taking pictures from left to right, look at something which appears near the right side of your composition. Take the photo and then move your camera to the right. Compose your next picture, so the same thing is still in the composition, but towards the left of the frame. It’s good to have the option of including photos which overlap and are not all in straight lines. This gives you more flexibility when you come to lay the photomontage out. Don’t go crazy and take hundreds, but make sure you have every part of your subject covered. Try to make individual creative photographs of each part of your subject. Aim to compose them with a small difference. Sometimes I photograph an object or part of a scene many times. I will place it at the top and the bottom of the frame or at each corner. Doing this will give you more options as you are laying your photomontage out.
Look For Lines in Your Composition
Using vertical, horizontal, and/or diagonal lines will help. Look for lines, straight or curved, as you are making your photographs. Be mindful of how they could appear in your finished photo montage. Making use of these lines will help hold your montage together and make it more attractive to look at. If there is no flow of lines through your finished piece, it will look muddled and confusing.
Manage Your Images Well
I use Adobe Lightroom and Photoshop to compile my montages on a computer before having the photos printed. You can use any imaging software that allows you to have separate images on many layers. Load all the photos you made onto your computer. Do not delete any of them, even if there are technical flaws. You might use one of them to fill a gap. I will look through my series of photos and pick out the strongest images. Photos that will stand alone as good pictures whether they are part of a photomontage. Make a separate folder for these and place them in it. Next, choose the bulk of your photos you think will be best suited to compose your photomontage. Imagine where the edges will be and pick images to fill your composition space. Place these in another folder. Place the remaining photos in a third folder.
Resize Your Photos
Resize your photos based on how large you want your finished photomontage to be. Keep your resolution at 300 dots per inch (dpi.) This will mean the size is the same when you get them printed. Decide roughly how many photos will make up the width and how many the height. You can size your individual images to fit into the dimensions you want. You can alter this photomontage later, but it’s good to work with a base size from the start. I always compile my photomontages using .jpeg images with small compression. This varies depending on the number of photos you are working with and the processing power of your computer. When creating larger photo montages, it becomes more important to be well organised. Sizing your photos carefully will help to achieve a more steady workflow.
Create Your Photoshop ‘Canvas’
Create a new ‘canvas’ of a suitable size. Make sure the dpi matches the dpi of your photos. Don’t be too concerned about the correct canvas size. You can always alter it later to suit your needs if it’s too small or too large.
Import Your Photos
Export the photos from the first two folders and import them to Photoshop by going to File > Scripts> Load Files To Stack. Using this option, you can load all the images you need into one document as separate layers. If you are using this method, select all the layers. Then drag and drop them into the document where you create your empty canvas. You need all your photos to be on their own layer in the document you have created. At this stage, they may all appear to be stacked on top of each other, unlike this image below:
Arrange Your Photos
Start to drag and drop each photo roughly where you want it. If you have the ability to color code each layer, it is a good idea to do so. I usually use three colors. One for the images on the left, one for the images that make up the middle and one for those on the right. When I am working on large photomontages, I will make separate groups in the layers panel and add layers to them. This allows me to hide all the images in one group, which can make the workflow more efficient. Move your photos around and position them so they resemble the whole subject you photographed. Some images will still appear stacked on top of each other. This is okay. Now you have all the photos roughly in position. This is when the real creative photography fun begins. It’s time for you to free your imagination. Move the photos around and experiment as you like. Think outside the box! As you work, parts of images you want to see might be hiding below another layer. You can move each photo higher up or lower down in the layers hierarchy to suit. This can take a long time the first time you try it. Don’t expect to complete laying out a montage the first time you sit down to do it. If a series of photos is not composed well, the results will not be attractive. You must be careful to lay down your photos in a manner that is pleasing to look at. If you do not, the results can appear muddled, ambiguous and unattractive to viewers. The way I achieve this is to compile my photos with sharp lines running through my montage. These lines will help hold the images together and make them appear cohesive.
Hide Layers to Finish Your Photomontage
As your photomontage begins to take shape, you can start to turn off the layers you are not using. Don’t delete them, only hide them. Compiling a photomontage requires flexibility. Be open to your creative expression. As you move photos around, your montage will keep changing. Being able to hide or show individual images allows you to be more innovative with your layout. You might see gaps in your montage at this point. Check your pictures in the third folder you created but did not import any photos from. You may find a photo to fill your gap. If not, be creative and duplicate an image you have already used. You can also leave the gap blank if it looks good to you. Give yourself plenty of time for compiling your photomontage, but make sure you finish it. This can be a never-ending process if you let it be. Of course, you can always revisit a montage later and compose it in a different way if you like. In my experience, a montage is rarely laid out the same way twice. How it looks on your computer screen will be different than the way you lay the prints out and stick them down.
Printing Your Photos (a Fun Optional Step)
You do not have to print and paste up your montages. As digital artworks, they are quite acceptable. Printing the photos takes them to another dimension, though. I find that it makes them even more special. You need to print the photos you have used and are visible in the finished layout if you decide to have a tangible copy. You can have them printed out as individual photographic prints in a quick and easy way.
Decide How to Adhere Your Prints
Sticking the prints down can be a difficult step. Using glue can be very messy, and it is easy to damage overlapping prints. For many years I have used a roll of double-sided adhesive paper. I apply this to each image before I start laying them out. If you are using contact glue you will need to apply this as you are about to stick your prints down. I recommend you lay out your prints first before you start to stick any down. This will allow you to see an impression of how your photomontage will look. You must be careful not to get excess glue on the board or your other prints. Before I stick my prints down, I blacken the edges of the prints with a thick marker pen. Having the edges dark makes them less visible on the finished photomontage.
Lay Out Your Prints
When you have all your prints ready, begin to lay them out on your board. The easiest is to have your computer next to you. This allows you to use the digital version of your photomontage for guidance. Turn all the layers off except the bottom one. The visible layer will be the first print you place on the board. Turn on the next layer and place the print on the board. Work from the bottom up and make sure each print you lay down is one that overlaps a print you already have on the board. During this first laying out of the photographs, I do not stick any of them down. The prints will move around. You will knock and nudge them as you are positioning other prints. The whole process is quite kinetic. You could use masking tape to hold each print in place, but I never do. I like the movement as it can sometimes open up different placements I had not thought of. As you are laying out your prints, step back and have a look at your work from a distance. If you can get up above the table you are working on, this is even better. Being able to see your montages from a distance as you compile them will help, especially if they are large.
Stick Your Photomontage Down
Once you are happy with your photomontage layout, it’s time to glue them. I usually start from a corner with a print that is not overlapping any others. You must make sure whatever is under each one is the board or another print already stuck down. Don’t glue a print that supposed to have another behind it. This could ruin the look of your photomontage.
Once You Have Finished
Share your photomontage with your friends. Get them to come and see it or take your photomontage to them. Showing the printed artwork is far different than showing the digital version. Often people do not realise individual prints make up my montages. Experiment and explore time and space. Study some cubists. Find whole other dimensions in photography that are not possible with a single image! Tried photomontages and feel like doing more creative photography ideas? The photomontage is one of the topics we cover in our creative photography course, Wow Factor Photography. If you’d like to learn more, check out the course here.
