Want to learn how to use fill light in photography? Read on because we have plenty of tips for you!
What Is the Purpose of a Fill Light?
Do you keep getting silhouettes in your photos even when it’s bright out? Well, it’s most likely because you’re backlighting. In other words, you’re taking pictures where the light is behind your subject. The light may hit their back, but not their faces. As a result, your model ends up looking dark in your images. It could also happen in other lighting situations where there is only one light source. Often, it’s not enough to illuminate the entire subject. A secondary light source is necessary. Fill light photography is that second light source. It helps fill in shadows and balance the exposure.
What Is a Key Light and Fill Light?
Before we dive into the details of fill light, we first need to define key light and fill light. The key light is your main light source which could be the sun or artificial lighting. Meanwhile, the fill light is that additional light source that “fills” in the dark areas on the subject. In general, the fill light needs to be less bright than the key light. That way, you don’t end up overexposing or washing out the details on your subject.
How Do You Use Fill Light in Photography?
There are many ways to create fill light. You may use a flash, strobe, continuous light, or reflector. So what’s the difference between these light sources? Flash and strobes produce extra light in addition to the key light to create a balanced exposure. Meanwhile, a reflector bounces the available light back to the subject. And where do you put a fill light? In most cases, you place it in front of the subject or beside them. Its purpose is to eliminate the shadows on your model’s face and body. Generally, you’ll need to place your fill light opposite the main light source. If the light is behind the subject, you’ll need to position your fill light in front of them. And if the light is beside the subject, you’ll need to move your fill light to the side.
How Do I Use Fill Light in the Studio?
Apart from using fill lights outdoors, it’s also a useful technique indoors. In a studio setting, most photographers use fill light in a technique called 3 point lighting. Lighting 3 point requires a key light, fill light, and rim light. So how does it work? Usually, the key light illuminates one side of the face, and the fill light illuminates the other side. Meanwhile, rim light illuminates the back of the head. People also call it hair light because it highlights the person’s hair. Most people place the flash a few feet directly behind the subject. Others prefer positioning it at about 45 degrees behind your model, away from the camera frame.
Set the Fill Ratio for Best Results with a Fill Light
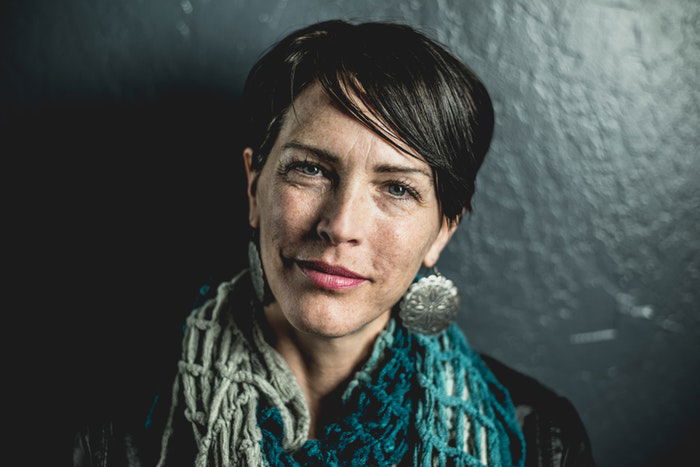
The key to effective use of fill lighting is to set the correct fill ratio. To do this, make an exposure reading from the lightest part of your composition. That spot could be your subject’s face that’s in the sun, or it may be the background. Use your camera’s spot meter to ensure you get an accurate reading. Once you determine the available light, you can add in as much fill as you need for the shot. It’s crucial to balance the fill light to the available light. Doing so eliminates the shadows on your subject’s face altogether. In this photo below, I used a flash as my main light, which was to my right. I added light from a small softbox on my left as the fill light. I set my fill light with less power than the primary light, so there are no dark shadows. Balancing the light ratio so closely results in a reasonably flat-looking portrait.
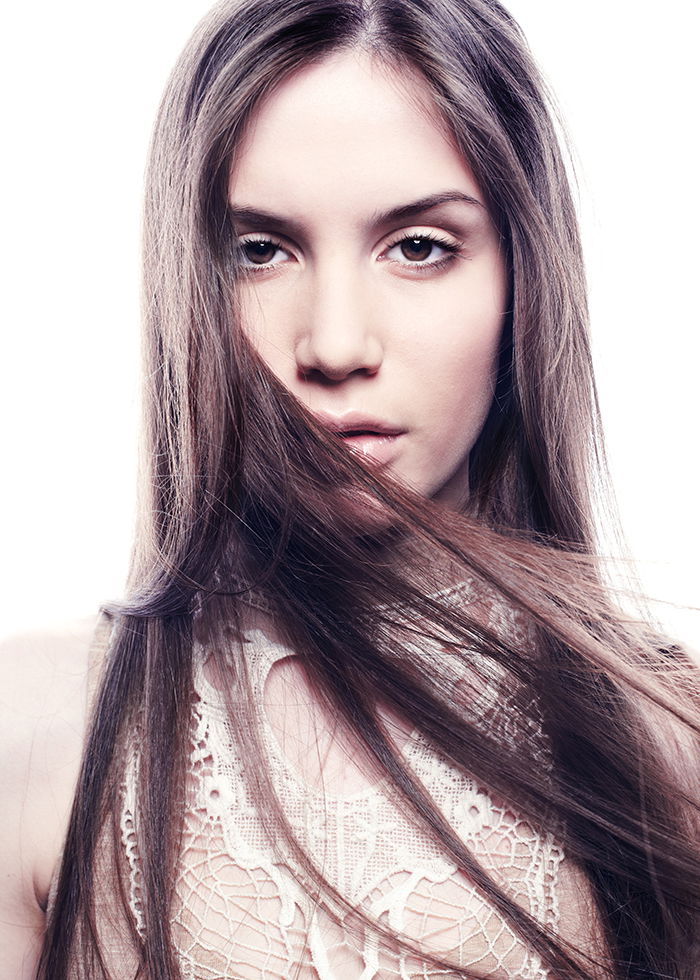
Making your fill light one or two stops less than the primary light will leave some shadows on your subject. Filling in some of the shadows will create more depth in your portrait. For the next portrait, I placed a small softbox to the right of my subject. I made an exposure reading of the ambient light and set my flash to output a slightly higher ratio. Doing so resulted in some soft shadow on the left side of her face.
It’s essential to decide how much fill light you want to add to your portrait to get the look you want.
Control Fill Light Using a Flash
Using a flash on the manual setting allows you to have control over the amount of output, regardless of the available light. When you use your flash in any of the auto modes, the flash and camera will determine the output. This calculation partly relies on ambient light. Don’t be too focused on getting the ‘correct’ exposure by the numbers. Pay attention to your monitor and histogram to see the effect your fill light is having. Studying the image on your monitor helps determine the best fill ratio.
Using a Reflector as a Fill Light
Portable foldable reflectors are a popular means of adding fill light to a portrait. They provide a different feel of light than a flash. But it can also be challenging to control. The best way to use a reflector for portrait lighting is to have an assistant who understands what they need to do. Spend some time educating an assistant as to how to use the reflector properly. Doing so saves you stress when you are taking your portraits. Choosing the best reflector surface and having it at the right angle will provide a good photography fill light on your subject. Too much light reflecting can result in inadequate exposure. I find it’s helpful to tell my subjects to look away from the reflector, so they don’t hurt their eyes. Having your assistant stand in the right place with the reflector will provide the most appealing portrait lighting. Opposite the location of the primary light source is often the best place for a reflector. With a reflector, you can see the light on your subject and observe the ratios before taking a photo. A reflector is bigger than a flash. It provides a softer light, especially from a non-shiny surface.
How Do I Make my Fill Light Look Better?
Using an unmodified flash can produce unflattering results. Even if you balance your fill light ratio beautifully, a bare flash will reflect off the skin. The resulting hot spots are pretty ugly. Bouncing your flash or using a modifier to soften it will help you make more flattering portraits. My preferred method of modifying my flash is to use a small softbox. It makes working a bit slower, but the soft light from the softbox is worth it. Compared to a bare flash, the light from the softbox is much more gentle and appealing.
A careful choice of the right surface on a reflector is essential. In bright sunshine, I don’t use the gold or silver reflectors as they bounce too much harsh light onto my subject. Using a flat white surface in bright sunshine will bounce soft light onto my subject. In overcast conditions using the shiny gold or silver surfaces will help you achieve a soft light and a good ratio for your fill light source.
Conclusion
Often, two lights are better than one. The key is learning to control the output so you can achieve the desired ratio. Keeping your fill light lower than your primary light will leave a little shadow on your subject. Doing so helps create some depth. Look for naturally reflecting light to use in your photos. I love doing this with street photography.
Know the look and feel of the light you want. With a well-controlled fill light, you can control the shadow and the mood of your portrait. We have great posts on how to use a key light, hair light, or rim light to check out next! Use our Quick Capture Cheat Sheets on your next shoot for more handy tips!