I imagine every photographer has been in this situation. So can Gigapixel AI really rescue you from unacceptably fuzzy images? This review looks at the software’s capabilities and limitations. You’ll find out if we think it’s good value for money and worth your consideration.
What You Need to Know—Topaz Gigapixel AI Review
Topaz Labs has a suite of three main programs—Sharpen, DeNoise, and Gigapixel AI. You can buy them individually or as a set for a one-time fee. But it’s worth taking advantage of the free trial. Topaz Labs designed Gigapixel AI to enlarge images. Its design is based on artificial intelligence and machine learning algorithms. It can help us produce larger prints while retaining detail and clarity. And the new Face Recovery tool makes improving the quality of old photos more effortless than ever. Plus, it comes with the same tools to improve sharpness and reduce noise as the standalone Topaz Labs Sharpen AI and DeNoise AI products. Yes, we might get similar results with Preserve Details 2.0 or Super Resolution in Photoshop. But Gigapixel AI is a dedicated program that offers a good combination of simplicity, performance, and regular updates.
Using Gigapixel AI
After you download and install Gigapixel AI, you’re all set. If you use Topaz Gigapixel AI as standalone software, you can drag images directly into the main window (or onto the dock icon on a Mac). Alternatively, you can click “browse images” to find the photos you want. You can also right-click on any image in Lightroom or Photoshop, choose “edit in” from the pop-up menu, and then “Topaz Gigapixel AI.” (The program is automatically added to this menu when you install it.) The Gigapixel AI interface is very intuitive. It has buttons and sliders for magnification, image sharpening, and noise reduction. And its results are on par with anything that Photoshop has to offer.
Is Topaz Labs Gigapixel AI Meant for You?
There are several different reasons why you might choose to use Topaz Labs Gigapixel AI:
Your camera (or smartphone) doesn’t have a high enough resolution. You want a massive print. You want a new and sharper version of an old family photo. You’ve cropped your image so heavily that you’ve lost a lot of pixels.
As a result, Topaz Labs Gigapixel AI fills a gap just as Sharpen and DeNoise do. Just as you might want to sharpen your images or reduce noise, you might want to increase a photo’s file size and resolution. It doesn’t matter if you’re a professional photographer or a keen amateur. It works for everyone! And Gigapixel AI allows you to reduce or enlarge photos by a scale factor of 0.2 to 10.45 times.
Benefits of Gigapixel AI
There are multiple benefits:
Better image quality Better face recognition and recovery Sharper details Noise reduction Increased image resolution A more natural look Removal of digital artifacts Enhanced texture (i.e., skin, surfaces, etc.) Fixed pixelation Better prints Better zooming and cropping Increased realism in computer graphics Conversion of old video footage into 4K
How Does Topaz Gigapixel AI Work?
Topaz Gigapixel AI works with any operating system and boasts many useful features. Let’s have a look at what it can do.
Flexible Scaling
Gigapixel AI offers great flexibility when it comes to reducing or enlarging images. Three buttons open up all the relevant options:
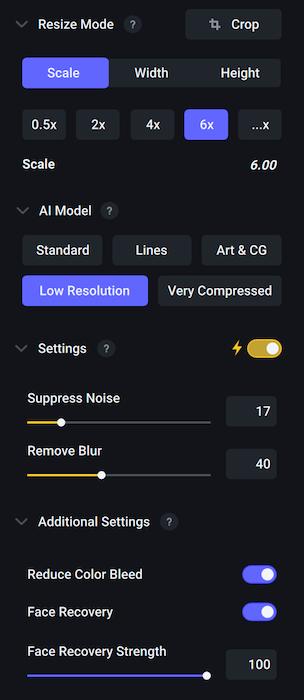
Scale—allows you to choose the scale factor. There are preset buttons for 0.5x, 2x, 4x, and 6x and a custom button for any custom value within the acceptable range. Width—allows you to set the output width in pixels, inches, or centimeters. Height—lets you set the output height in the same way.
These options are vital if you’re trying to enlarge an image for printing because you need to get the correct resolution. Generally, printers do best with files that are 300 dpi (or 360 dpi with Epson models). Anything less, and they’ll look soft or even pixellated. If you know the size of print you want in inches, you can multiply that by 300 (or 360) to get the required number of pixels for the height and width. For example, a 10 x 8-inch print needs a digital file that is 3000 pixels (10 x 300) on the long side and 2400 pixels (8 x 300) on the short side. A Crop button also lets you crop the image before scaling it. You can choose a freehand crop or use a ratio such as 3:2. This makes it easy to flip an image from landscape to portrait format or vice versa.
Different AI Models
Different images have to be processed in different ways by the AI technology to create the best result, and Gigapixel AI offers you five options:
Standard—the original AI model (previously called “Natural”). Lines—the model to choose if you have an architectural image or one with many straight lines. Art & CG—is for non-photographic images such as animation, computer graphics, and paintings. Low Resolution—meant to extract maximum detail from images with a low dpi (dots per inch) or ppi (pixels per inch). Very Compressed—is meant for small JPEGs or images with severe compression artifacts.
Automatic Settings
It’s best to use Sharpen or DeNoise before scaling your image. But Gigapixel AI does have an auto option for sharpening and noise reduction (plus manual sliders). There are also two extra toggle switches:
Reduce Color Bleed—offers automatic “gamma correction” to improve color rendition and brighten darker areas. Face Recovery—is designed to improve detail in small faces, for instance in crowd scenes.
Using Face Recovery
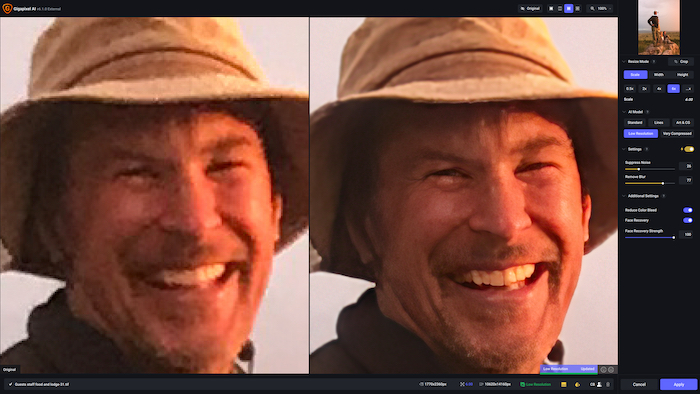
The Face Refinement toggle switch was introduced in version 5.8. But this has now been radically updated in version 6.1 and renamed Face Recovery. It’s a great way to improve portraits. And it’s particularly useful with low-resolution images. We all have pictures taken in the past that we tend to forget about. And sometimes they’re too blurred or grainy to bother with. They’re perhaps either on our phones or computers or printed out in a small frame on our dressing tables. Wherever they are, Gigapixel AI gives you the chance to rescue them. That might mean simply improving a digital image so that you can enjoy looking at it a bit more. Or it might mean digitizing an old print and enlarging it to a decent size for the first time. Either way, the process is very straightforward. All you need to do is make sure the Face Recovery switch is turned on and the Face Recovery Strength slider is at 100. The rest, as they say, is magic! If you feel the sharpening or noise reduction has gone too far, you can simply dial the effect up or down with the slider. This offers a range from 0 to 100 and allows you to override the automatic settings. I tested Face Recover out with an old picture a guest took of me with an iPhone 7 Plus. The original image was only 1770 x 2360 pixels, and my face was only around 5% of the whole frame. I chose 6x magnification and the Low-Resolution model in the Gigapixel AI side panel. Apart from that, I left all the settings on automatic. As you can see from the image, it can’t turn me into George Clooney. But at least I don’t look like a pixellated Mr. Blob! The screenshot was taken at 100% with the original on the left and the edited image on the right. Although this is a low-resolution image (700 pixels wide), you can clearly see more detail in the right-hand version. Individual hairs in the beard are visible, and each individual tooth is clearly defined. There are also no ugly artifacts. Yes, my face still looks a little blotchy, and my right ear looks a bit strange. But that’s still pretty impressive when you consider the original number of pixels and the degree of magnification. You still can’t see the stitching on the brim of the hat. But technically that’s not actually part of my face. So it’s not what Face Recovery was designed to do. All in all, this is an excellent add-on to Gigapixel AI.
Flexible Viewing
Gigapixel AI has the same viewing options as Sharpen AI and DeNoise AI, making it easy to navigate. You can use a preview window to center the image by clicking on the most critical area. You then have four viewing options:
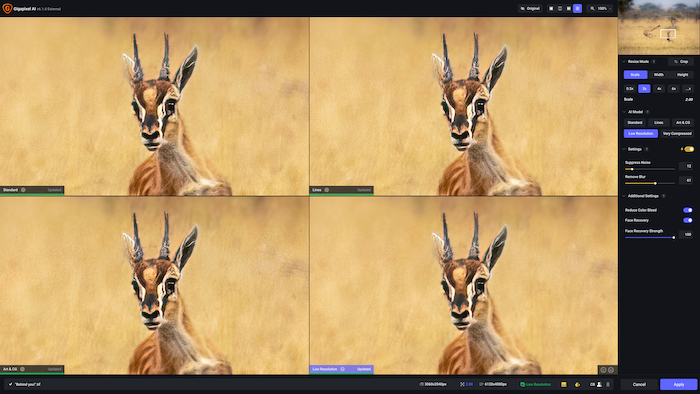
Single View—shows the image fullscreen. Split View—shows the original image on the left and the scaled version on the right, with a dividing line you can play around with. Side-by-Side View—shows the scaled and original images next to each other. Comparison View—shows the output from four different models in four window panes.
Comparison View is probably the most useful because you can simultaneously see the effect of four artificial intelligence models. If you want to check out a different model, you can choose it by clicking on the relevant button. This replaces the existing model with the new one, so selecting the “worst” model of the four before changing it is a good idea. You can also click and hold the Original button or the space bar for comparison purposes. Once you let it go, the image returns to the scaled version. Or you can click on the window pane to see the original image. That’s the easiest way to get a before-and-after view. Finally, a zoom button offers “zoom to fit,” 50%, 100%, 200%, and 400% presets (with keyboard shortcuts). You can also use the slider provided or enter a value in the text box.
Bulk Editing
If you have multiple images to process, Gigapixel AI allows bulk editing. You can drag the files into the main window from Finder or File Explorer (or click “browse”). Then click the checkboxes for individual images to change the AI model and other settings. Bulk editing can save a lot of time, but you need to be careful. It’s tempting to be lazy and let the program decide which settings to use. But that may come at the expense of image quality, making it a false economy. Here’s a before and after 2x enlargement with retained details and resolution.
Topaz Gigapixel AI Alternatives
There are plenty of other photo enlargement programs on the market. But these are your best bet.
Adobe Photoshop
Photoshop is an obvious alternative to Gigapixel AI. It’s best to enable Preserve Details 2.0 in the Preferences > Technology Previews drop-down menu beforehand. You can then right-click on your image, check the Super Resolution box and click “enhance” to create a DNG file with double the resolution. Note that Gigapixel AI automatically sharpens the image, whereas Photoshop doesn’t. So, if you want a like-for-like comparison, you have to use a basic sharpening filter in Photoshop. Photoshop performs similarly to Gigapixel AI. But it tends to over-sharpen less. And it produces fewer artifacts, especially in shadow areas.
VanceAI
VanceAI is like Gigapixel AI. It’s an AI-based, standalone image enlargement program that allows you to make files 2 to 8 times larger. It has built-in sharpening and noise reduction tools, drag-and-drop functionality, and an incredibly simple web-based user interface. You’re limited to 5 free files, though. So you’ll need to pay after that. The pro software (the monthly and yearly subscription) is much faster than the web-based version. But it lacks editing tools such as filters and only supports a limited number of export formats.
Imglarger
Imlarger is another AI-based solution. It offers image enlargement (2x, 4x, and 8x) and batch processing for a monthly fee. There is a 5MB and 1200 x 1200-pixel file size limit, though. And it only supports a few formats, such as JPEG and PNG.
Bigjpg
Bigjpg lets you upscale images up to 16x using software based on a “convolutional (artificial) neural network. It’s a cheap and cheerful solution that works best with animé photos and illustrations. Bigjpg supports bulk editing, but it’s not very stable. And after a 20-image free trial, you must pay a small monthly subscription.
AI Enlarge PhotoLabs
AI Enlarge PhotoLabs is a fully automated solution from Pixbim. It also uses artificial intelligence to enlarge images. But it only offers 2x and 4x enlargement. They offer a free trial followed by a one-time fee.
Verdict
Our Topaz Gigapixel AI review shows that this software is excellent for hobbyists and professional photographers alike. It’s beneficial if you want to produce large prints or have a lot of old, low-resolution photos you want to put up on your wall. Introduced in version 6.1, the new Face Recovery toggle switch makes it especially useful for old family photos. You can adjust the effect to taste, and it gives you so many more options when it comes to “rescuing” souvenirs of days gone by. Gigapixel AI has an easy-to-use front end with built-in sharpening and noise reduction. It’s among the best of the enlargement programs on the market! Like Sharpen and DeNoise, it has a habit of occasionally producing ugly artifacts. So you do have to watch out for those—especially if you’re creating something for a client! But if you are interested in trying Topaz Gigapixel AI, remember to take advantage of Topaz’s free trial. And if you opt for buying, don’t forget to use our promo code EXPHOTO15 to save 15% on any Topaz products.
Scores

![]()
![]()
![]()
![]()
