When I managed to work it all out, I started taking some pretty spectacular images. This Photography for Beginners guide will share with you everything I’ve learned from my mistakes. [ExpertPhotography is supported by readers. Product links on ExpertPhotography are referral links. If you use one of these and buy something, we make a little bit of money. Need more info? See how it all works here.]
Photography for Beginners: How Do Cameras Work?
As beginner photographers, we tend to be visual learners. And it’s my job to make beginning photography as easy as possible for you. So I thought to myself, “What better way to help beginner photographers learn how to use their cameras than by creating an infographic?” And that’s exactly what I did. I collaborated with an illustrator friend, and together we made these images. The following will make understanding exposure and how cameras work much easier! Check out what we came up with below.
Exposure
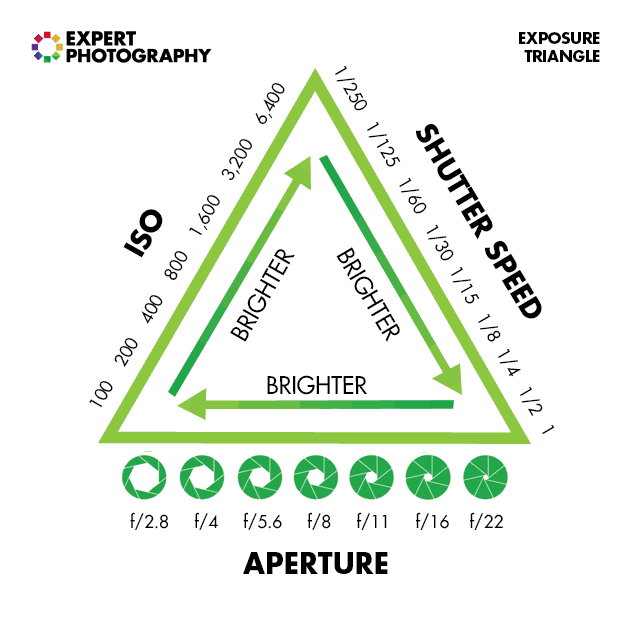
For those beginning photography, exposure is key to capturing a great image. Learning how exposure works will help you take control of your camera and take better photos. Shutter speed, aperture, and ISO are the elements that combine to create an exposure. As you’ll soon learn, these elements affect more than exposure. They also cause alterations in depth of field, motion blur, and digital noise. Once you understand how each one works, you can dive into manual mode. This is where you take control back from your camera. The exposure triangle is a great way to remember the three settings. Combined, they control the amount of light captured from any scene. This will help you to understand that changing one setting will need a change in the others. That is, if you photograph the same scene with the same lighting conditions. Read here for all the information you need on the exposure triangle.
Aperture
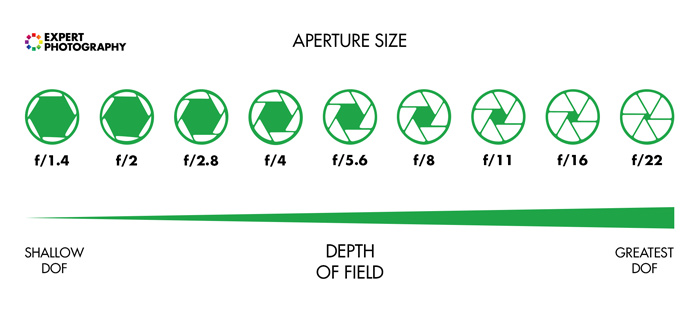
Exposure happens in three steps. We will start with the aperture. This is the hole inside the lens through which the light passes. It’s similar to the pupil of your eye. The wider the aperture, the more light is allowed in, and vice versa. Simple? Not quite. As the aperture widens, the f-number gets lower and more light is allowed into the camera. This is great for low light. But be aware that it will make the field depth very shallow. This is not ideal when taking landscape photos. This is a short summary, but I go into full detail about that in this post. The aperture is the preferred setting to set first, as it directly influences how much of your scene is in focus. But, if you want to create motion blur, it is second to the shutter speed. Exposure will be much easier if you can memorize the f-stop scale. The scale is f/1.4, f/2, f/2.8, f/4, f/5.6, f/8, f/11, f/16, f/22.
Shutter Speed
Once the light has passed through the lens’s aperture, it reaches the shutter. Now you need to decide how much of that light you will allow into the camera. Ordinarily, you only want a very small fraction of a second (for example, 1/250 s) to prevent motion blur. However, different shutter speeds complement different situations. Shutter speed can be anything from really fast (1/4000 s) for sports photography to really slow (30 seconds) for night photography. It all depends on what you’re shooting and how much light you have available to you. Knowing how your shutter speed works is a key element in the basics of photography.
ISO
Once the light has passed through the aperture and is filtered by the shutter speed, it reaches the sensor. This is where we decide how to set the ISO. As you turn the ISO number up, you increase the brightness. But, at the same time, the image quality decreases. There will be more digital noise or “grain.” So you have to decide upon your priorities in terms of exposure versus the grain. For example, I would reduce the image quality if it meant that I could prevent motion blur in my photo. There’s no possible way to fix that in post-production (yet, at least).
Exposure Summary
Once you’ve understood aperture, shutter speed, and ISO, you need to learn how each element of exposure work together. For all those basics of photography, exposure is the most important. If you don’t have this down, composition and framing become a moot point in beginner photography. This post will teach you about the “stop-based” system for measuring exposure. And you’ll also learn how to prioritize the aperture, shutter speed, and ISO for the best photo.
Understanding Your Camera
Metering Modes
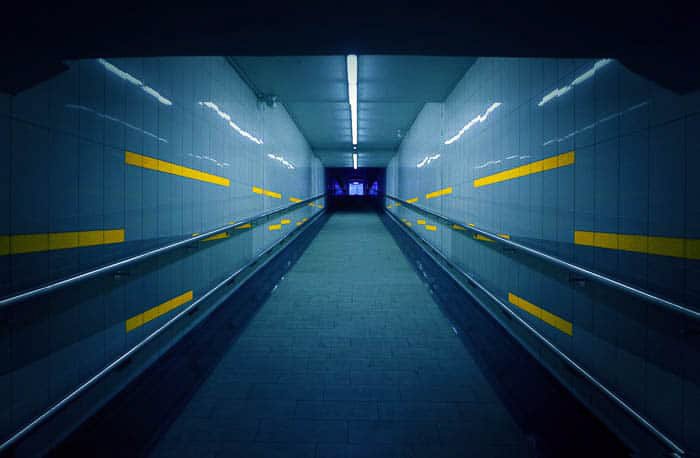
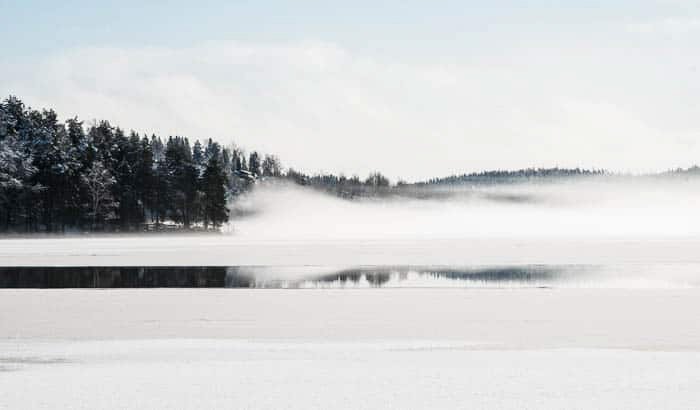
Digital Photography for Beginners can be confusing. Exposure isn’t as simple as learning about aperture, shutter speed, and ISO. You also have to learn about how your camera looks at light. Metering modes tell your camera how you want it to look at a scene. The picture below was taken in spot metering mode. If you were to take the same photo using the evaluative mode, you would have a completely different exposure. This is also covered in my free video training. If you’re looking for an article that explains digital metering modes (including Canon), we’ve written one about how and when to use them. This basic photography point might be the key to understanding why your photos come out underexposed or overexposed.
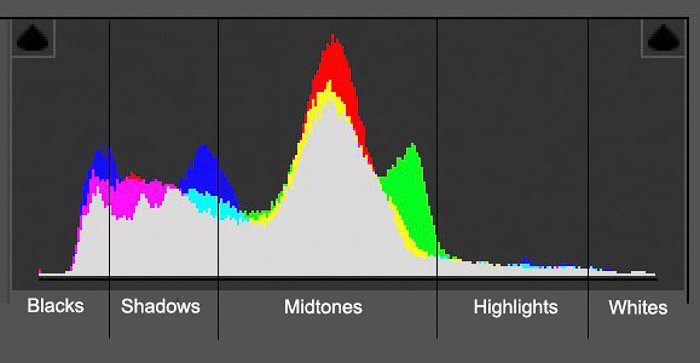
Histograms
The histogram shows you a mathematical exposure overview after taking the photo. It tells you how evenly exposed a photo is. New photographers often find it frightening to understand. But it is easy, and I show you this in this article. LCD screens aren’t very good at showing you this information through their image display. This is because they are affected by the ambient lighting conditions you’re in and the screen’s brightness. That’s why the histogram is a powerful tool to use in beginning photography correctly.
Shooting Modes
Full-Auto, Program, Aperture Priority, Shutter Speed Priority, or Manual mode. How do you work out which one you should be using? There are also a lot of misconceptions about which mode to use under which conditions. When you understand what each mode does, the one that will suit your situation becomes much clearer. This is also covered in my free video training.
Depth of Field
When shooting in low light, you must widen your aperture to allow enough light into the lens. But this has a major side effect—a shallow depth of field. You can creatively use this. But it’s not the only possibility. There are many situations, such as landscapes, where you’ll want to use a narrower aperture. You want to use a narrow aperture so that the whole scene remains focused. This tutorial walks you through everything you need to know. It’s about choosing the right aperture (and the depth of field) for the right situation. When it comes to covering all the basics of photography, depth of field is very important.
White Balance
White balance is something I wish I’d learned more about much sooner than I did. I look back on some photos now and wonder what I was thinking. The white balance changes the color cast of the entire photo. It’s responsible for overall warmth. It can determine whether your photo appears blue or orange, cold or warm. Auto white balance (AWB) doesn’t often do a good job, especially with tungsten light. The sooner you learn about this basic photography principle, the more accurate your photos look. This is also covered in my free video training.
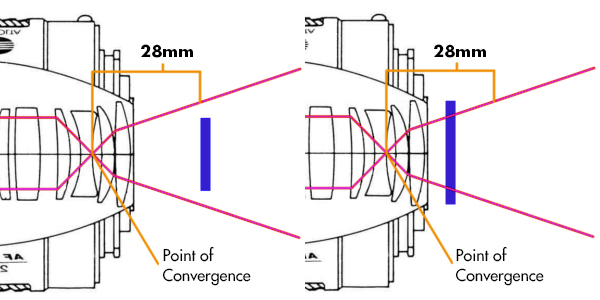
Focal Length
Have you ever wondered what the “mm” on your lens means? Or do you wonder why people use longer focal lengths for portraits? It’s all discussed in this post on focal length. It affects more than the “zoom.” It also influences the perspective. I cover which focal length you would want to use in different situations and their possible side effects. It’s a worthy read and one of my favorite tutorials to date.
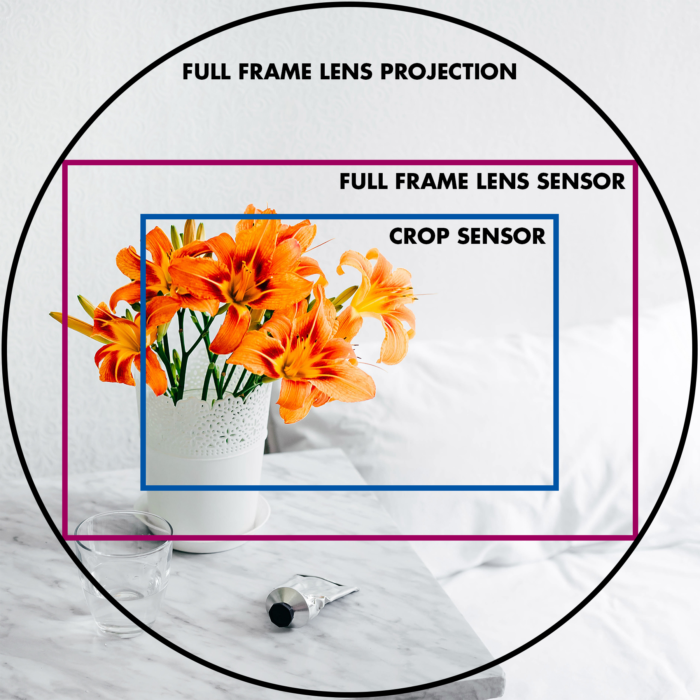
Crop Factor
Many of you may not realize, but unless you spend about $2000 on your camera, you’re shooting on a crop sensor. This means that your sensor is much smaller than professional DSLR cameras. It is cropping your image. And the crop factor has a range of effects on your photos. It creates a narrower viewing angle and will influence your lens purchases in the future. For those beginner photographers, research what lenses will help your field of photography first.
Polarizing Filters
Polarizing filters only allow light into the lens from a certain direction. This results in the removal of glare and reflections from non-metallic objects. Water and glass are the most affected, as well as haze from the sky. Cutting out these reflections and anomalies will make for more naturally saturated colors. This looks fantastic, and it cannot be replicated in post-production. That’s why it’s so important to understand.
How to Take Sharp Images Like a Pro
Photography beginners, I will walk you through the 10-step process of taking sharp photos like a professional. It covers everything from choosing the right aperture and shutter speed to shooting in RAW. It’s pretty easy to make only a few small mistakes that result in less-sharp images. That’s why we cover all 10 in order of importance.
The Nifty Fifty
What can I say about the nifty fifty? What’s not to love? For beginner photographers, when I talk about the nifty fifty, I’m referring to the 50mm f/1.8 (or faster) prime lens. This can be picked up very cheaply for most DSLRs. It’s a great introduction to buying better-quality lenses. And it’s an excellent way of getting to grips with what aperture is. The article linked is a review and guide. I wrote it because I recommend this lens as the first upgrade for every beginner photographer to make. It’s easy to use and, for the price, will yield some excellent results.
Composition
It’s important to understand exposure. But, if you can’t get to grips with basic composition, you’ll struggle to take really good photos. I’m not saying that you have to follow every compositional rule. But it helps to learn these rules so they can help guide you in taking better photos.
Rule of Thirds
This is often the first compositional rule that any beginner photographer comes across. And that’s for an excellent reason—it’s simple and works. The basic premise is that you divide your camera’s frame into thirds. By planting key objects on these lines, the image’s composition works better. This is a tool that always works. But it is easy to overuse it. If you’ve not learned much about photography yet, it’s a great way of improving your photos. It will help to make them more exciting.
Visual Weight
Visual weight differs in size or weight as we know it. It’s all about what we’re drawn to when we look at a photo. When you understand visual weight, you’ll understand how people look at photos. You’ll learn to position certain elements in a frame to direct the viewer’s attention to where you want them to look. It’s not so much a tool or a rule… but an understanding.
Triangles
Shapes are essential in photography. Triangles are in almost everything we see in one way or another. It’s only a case of distinguishing and knowing what to do with them. Triangles make great compositional tools. They’re easy to make and manipulate and are quite common. They are a great way to create the simplest and most basic photography compositions. They are also perfect for combining different compositional techniques. These include lines and paths to create a more interesting part of a photograph. You can even use them to make a photo feel more stable or unstable.
Eye Lines
If you take photos of people, you’re taking photos with eye lines. It’s important to understand how eye lines affect how we view a photo. Eye lines are the direction your subject’s eyes are pointed. The negative space in front of the subject’s face is called “lead room.” These can focus our attention on a particular part of the photo. They also produce tension and other photographic elements. Although they’re not physical lines, they can be used as such to produce different elements. These will help make triangles and vertical lines.
Balance
Balance in a photo affects how we feel when we look at it. An unbalanced photo can make us feel uneasy. A balanced photo will make us feel more relaxed. Whether you choose to make the photo balanced or unbalanced doesn’t matter. But it’s best to understand why you’ve chosen one or the other. Both affect your photos in different ways. Again, it’s one of those situations where the more you know, the easier it will be to produce the desired effect.
Conclusion
So that’s a brief introduction to digital photography for beginners. But, of course, there are tons more you can learn about photography. I encourage you to go and explore for yourself in my tutorial archive. You can check out this video if you want to get started with free premium training for photographers. Or you can check out our Photography for Beginners course to master everything you need to know about taking photos!