In this article, I’ll talk about why you might carry a bean bag with you and how to use it when photographing nature and wildlife. I’ll even show you how to make a camera bean bag with things you likely have at home.
Reasons to Use a Camera Bean Bag for Wildlife Photography
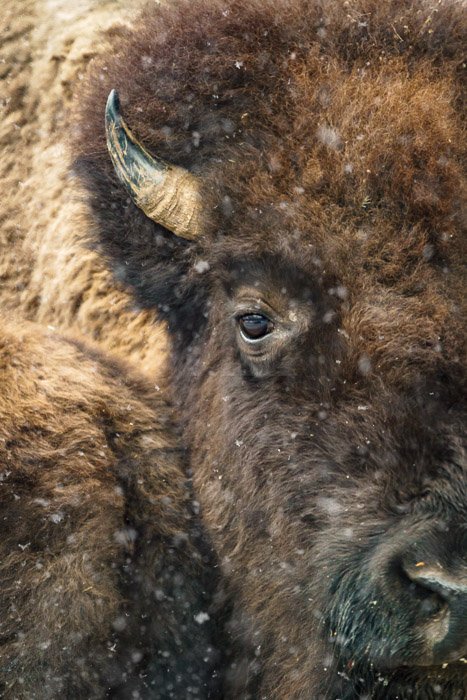
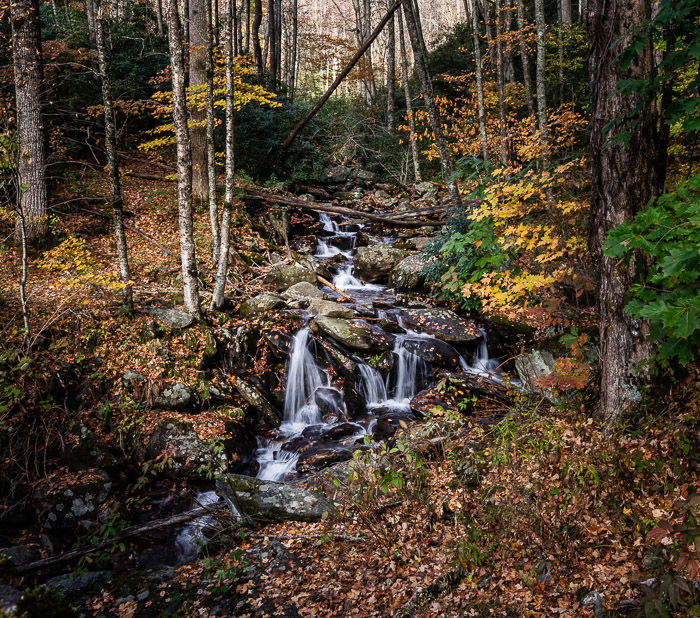
When you think “bean bag” you may imagine colorful children’s toys or squishy places to sit. The same reasons bean bags are fun to sit in are why they work well for photographers. Beanbag chairs mould themselves around us and move with our bodies. They support us without getting in the way. Photography bean bags work the same way. They mould themselves to my lens and move fluidly when I want to change my position. They support my lens without getting in the way. Also, the underside of the bag moulds onto whatever surface I’ve placed it. This brings me to an important reason to use a camera bean bag when photographing wildlife. It provides flexible support on any surface. I can place the camera bean bag on a fence post, on a rock, or the ground. Most often, I place one on my car door. When I’m in the field and moving around, I often use a monopod to support my camera. But there are times when I’m driving along and see something interesting to photograph. I stop as quickly and noiselessly as I can. I grab my camera and a small beanbag I carry for just this situation. I use the beanbag to stabilize the camera on the door frame with the window open and start shooting. Sometimes, I get closer to wildlife in my car than if I was walking. Birds always don’t fly away and deer don’t flee from my vehicle. Sometimes it isn’t safe to get out of my car to photograph wildlife like elk, bear, or bison. Other times I stay in my car, so I don’t have to fight the weather while shooting. I can position my car in the rain, the snow, or the cold and photograph in relative comfort. Bean bags are useful for photographers shooting all sorts of nature scenes, not just wildlife. I didn’t get out of my car to photograph this roadside waterfall in the Smokey Mountains of Tennessee. A bean bag helped stabilize my camera set at a shutter speed of 1/6th of a second, slow enough to blur the water. I also use a beanbag to stabilize my camera in any place where a tripod isn’t allowed. Our local botanical gardens don’t allow tripods into special events (like the orchid show). There’s nothing to say I can’t put my bean bag on a railing or another surface and stabilize my camera.
How to Use a Bean Bag to Photograph Nature
Bean bags are simple to use. Place the bag under your lens rather than under your camera body. My go-to wildlife lens is a Sony 100-400mm. This lens measures about 8-inches. There’s a sweet spot about 1/2 to 2/3rds of the way on a long lens that allows the most stability and flexibility. I want to be able to freely move my camera around and reposition the lens on the bean bag. Bean bags should be large enough cradle the lens and provide a stable surface. My smallest bean bag tends to fall off of my car door. My larger one drapes over the door frame. With low perspective photos, using a bean bag is much easier than trying to get my tripod down low. If I need a little height, I put the bean bag on top of my camera bag.
Buying or Making a Camera Bean Bag
There are many photography bean bags for sale online. A popular choice seems to be the LensCoat LensSack Pro Beanbag Support designed to go over a car door. There are many less expensive options in different sizes and designs. Some of the options include a mounting screw or bracket. I can’t give you advice about buying bean bags because I always make mine with things I have laying around the house. I’ve made bags in different sizes. The larger bags tend to be a bit heavy for carrying around, but they double as sandbags. I’ve used them to stabilize my tripod or drape them over light stands so they won’t fall over in a breeze. Bean bags need not be more complicated than a pouch. I made my largest bean bag by sewing two rectangles of soft upholstery fabric together. Upholstery fabric stands up to a lot of tossing around, and I chose soft material so it won’t damage my car door. But this bean bag isn’t waterproof. If you want to use your bean bag in outdoor conditions, use waterproof fabric and place the filling in plastic bags inside the pouch. I’ve got an old waterproof windbreaker that is perfect for a bean bag. I cut off the sleeves and sew one end shut. The other sleeve goes inside as an extra layer of protection. I cut off a bit of the length, add the filling, and sew the other end shut. I have a perfect waterproof photography bean bag! Check filling amount by placing the bean bag on a flat surface and pressing down reasonably hard with your hand. You hand should be supported 1 to 2 inches off the surface. Be careful not to overfill the bag. You want the filling to have room to move and squish down. The bean bag I use the most is small enough to toss in my camera bag. It’s made from a black, pre-made, canvas zippered pouch that I picked up somewhere. It measures about 8×6”. I placed a ziplock bag inside and filled it with rice. The pouch has a strap so I can throw it over my shoulder. Canvas bags for grocery shopping seem to be everywhere, and some of them even zip closed. These are perfect for making a simple photography bean bag. I use rice in my bean bags because I had it handy, but other fillings will work – including beans. Other options are plastic beads, lentils, sunflower seeds, or birdseed. You could even use the packing material that came with your last online photography purchase. Choose filling that is small enough to shift when you place something heavy on it (like rice), but not so little that it will compact (like sand).
Final Thoughts
Of all the camera equipment you need to make better wildlife photos, a camera bean bag may be one of the least expensive and most useful. On any surface, camera bean bags provide support and reduce camera shake. This allows me to use longer lenses and long exposures without a tripod.


title: “How To Use A Camera Bean Bag For Photography” ShowToc: true date: “2023-01-24” author: “Wilma Roberts”
In this article, I’ll talk about why you might carry a bean bag with you and how to use it when photographing nature and wildlife. I’ll even show you how to make a camera bean bag with things you likely have at home.
Reasons to Use a Camera Bean Bag for Wildlife Photography
When you think “bean bag” you may imagine colorful children’s toys or squishy places to sit. The same reasons bean bags are fun to sit in are why they work well for photographers. Beanbag chairs mould themselves around us and move with our bodies. They support us without getting in the way. Photography bean bags work the same way. They mould themselves to my lens and move fluidly when I want to change my position. They support my lens without getting in the way. Also, the underside of the bag moulds onto whatever surface I’ve placed it. This brings me to an important reason to use a camera bean bag when photographing wildlife. It provides flexible support on any surface. I can place the camera bean bag on a fence post, on a rock, or the ground. Most often, I place one on my car door. When I’m in the field and moving around, I often use a monopod to support my camera. But there are times when I’m driving along and see something interesting to photograph. I stop as quickly and noiselessly as I can. I grab my camera and a small beanbag I carry for just this situation. I use the beanbag to stabilize the camera on the door frame with the window open and start shooting. Sometimes, I get closer to wildlife in my car than if I was walking. Birds always don’t fly away and deer don’t flee from my vehicle. Sometimes it isn’t safe to get out of my car to photograph wildlife like elk, bear, or bison. Other times I stay in my car, so I don’t have to fight the weather while shooting. I can position my car in the rain, the snow, or the cold and photograph in relative comfort. Bean bags are useful for photographers shooting all sorts of nature scenes, not just wildlife. I didn’t get out of my car to photograph this roadside waterfall in the Smokey Mountains of Tennessee. A bean bag helped stabilize my camera set at a shutter speed of 1/6th of a second, slow enough to blur the water. I also use a beanbag to stabilize my camera in any place where a tripod isn’t allowed. Our local botanical gardens don’t allow tripods into special events (like the orchid show). There’s nothing to say I can’t put my bean bag on a railing or another surface and stabilize my camera.
How to Use a Bean Bag to Photograph Nature
Bean bags are simple to use. Place the bag under your lens rather than under your camera body. My go-to wildlife lens is a Sony 100-400mm. This lens measures about 8-inches. There’s a sweet spot about 1/2 to 2/3rds of the way on a long lens that allows the most stability and flexibility. I want to be able to freely move my camera around and reposition the lens on the bean bag. Bean bags should be large enough cradle the lens and provide a stable surface. My smallest bean bag tends to fall off of my car door. My larger one drapes over the door frame. With low perspective photos, using a bean bag is much easier than trying to get my tripod down low. If I need a little height, I put the bean bag on top of my camera bag.
Buying or Making a Camera Bean Bag
There are many photography bean bags for sale online. A popular choice seems to be the LensCoat LensSack Pro Beanbag Support designed to go over a car door. There are many less expensive options in different sizes and designs. Some of the options include a mounting screw or bracket. I can’t give you advice about buying bean bags because I always make mine with things I have laying around the house. I’ve made bags in different sizes. The larger bags tend to be a bit heavy for carrying around, but they double as sandbags. I’ve used them to stabilize my tripod or drape them over light stands so they won’t fall over in a breeze. Bean bags need not be more complicated than a pouch. I made my largest bean bag by sewing two rectangles of soft upholstery fabric together. Upholstery fabric stands up to a lot of tossing around, and I chose soft material so it won’t damage my car door. But this bean bag isn’t waterproof. If you want to use your bean bag in outdoor conditions, use waterproof fabric and place the filling in plastic bags inside the pouch. I’ve got an old waterproof windbreaker that is perfect for a bean bag. I cut off the sleeves and sew one end shut. The other sleeve goes inside as an extra layer of protection. I cut off a bit of the length, add the filling, and sew the other end shut. I have a perfect waterproof photography bean bag! Check filling amount by placing the bean bag on a flat surface and pressing down reasonably hard with your hand. You hand should be supported 1 to 2 inches off the surface. Be careful not to overfill the bag. You want the filling to have room to move and squish down. The bean bag I use the most is small enough to toss in my camera bag. It’s made from a black, pre-made, canvas zippered pouch that I picked up somewhere. It measures about 8×6”. I placed a ziplock bag inside and filled it with rice. The pouch has a strap so I can throw it over my shoulder. Canvas bags for grocery shopping seem to be everywhere, and some of them even zip closed. These are perfect for making a simple photography bean bag. I use rice in my bean bags because I had it handy, but other fillings will work – including beans. Other options are plastic beads, lentils, sunflower seeds, or birdseed. You could even use the packing material that came with your last online photography purchase. Choose filling that is small enough to shift when you place something heavy on it (like rice), but not so little that it will compact (like sand).
Final Thoughts
Of all the camera equipment you need to make better wildlife photos, a camera bean bag may be one of the least expensive and most useful. On any surface, camera bean bags provide support and reduce camera shake. This allows me to use longer lenses and long exposures without a tripod.
