Photo backdrop stands are relatively cheap to make and are very easy to assemble. Read on to find out how you can make your own DIY backdrop stand!
Materials and Measurements for Your DIY Backdrop Stand
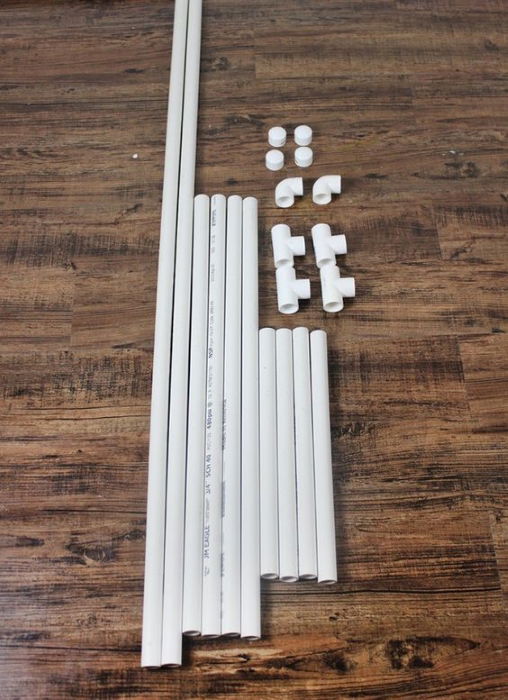
To build your DIY photo backdrop stand, you will need PVC pipes. You will be able to buy these from any hardware store.
Four T-pipes (Non-threaded) Six elbow pipes (Non-threaded) Four 1-metre pipes Four 50 cm pipes Two 2.5-metre pipes
The materials above will create a large backdrop frame that’s almost as tall as an average wall. If this isn’t what you’re looking for, you can use a shorter PVC pipe. Something that’s half as large as the backdrop will be enough for still life and portrait photography photos. The measurements for that would be:
Four 50cmm pipes Four 25cm pipes Two 1.25-metre pipes
You might not be able to find a PVC pipe with these specific lengths. In this case, you can buy a PVC cutter and make accurate cuts at home.
1. Create a Strong Base for Your DIY Photo Backdrop Stand
The first step is to assemble the legs. Your backdrop’s legs can’t be shaky or flexible. When you look for PVC pipes, make sure they’re not wobbly. The first ones I used seemed sturdy at first, but they ended up wobbling and falling apart. Don’t make the same mistake! To assemble the legs, you’ll need the following tools:
Four elbow pipes Two T-pipes Four 50cm pipes Two 1-metre pipes
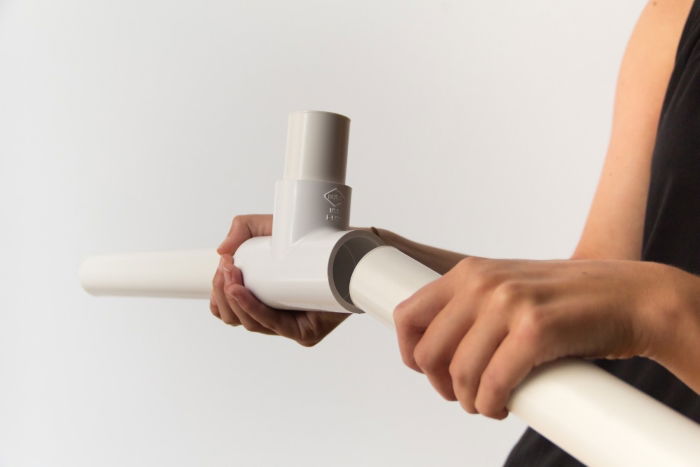
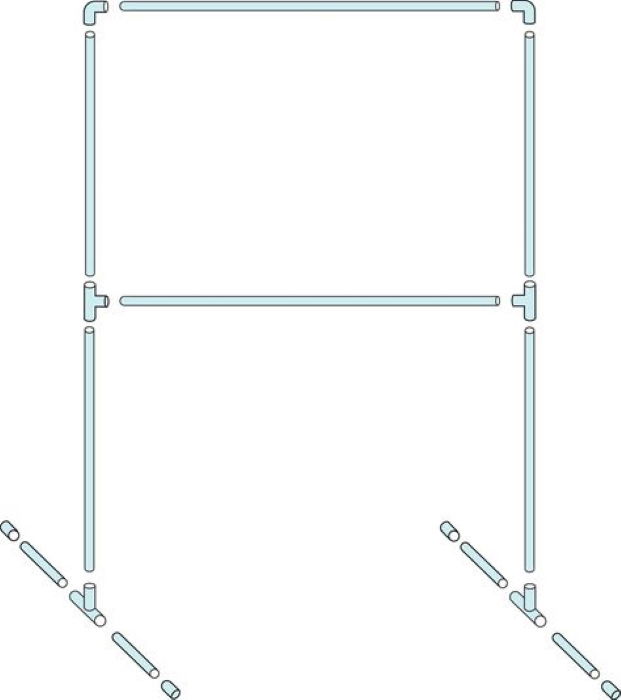
Take one T-pipe and place two of the 50cm pipes on either end, so they are parallel to each other. Repeat this with the other T-pipe and 50cm pieces. Then add the elbow pipes to the open end of the 50cm pipes to form feet, for extra stability. Next, you will need to place the 1m pipes into the remaining open end of the T-pipes. You should now have two T-shaped legs.
2. Attach the 2.5m Pipe to Two T-Pipes to Create a Balanced Middle
Place two T-pipes on top of the 1-metre pipes (your backdrop’s legs). Then, attach one 2.5-metre pipe to the horizontal T-pipe ends. This structure will strengthen the backdrop’s legs and create a balance. Without the middle PVC pipe, your backdrop stand will fall apart.
3. Create the Top Part of Your Backdrop Stand by Using the Remaining 5 Tools
You’ll use the top part of your backdrop stand as a hanger for backgrounds. You’ll need:
Two 1-metre pipes Two elbow pipes One 2.5-metre pipe
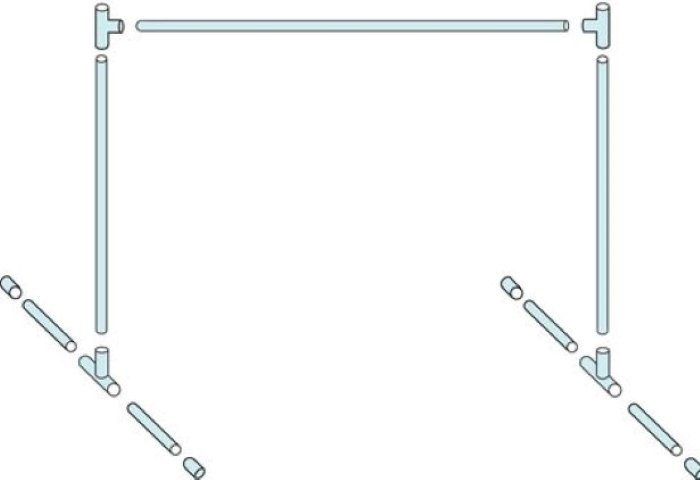
Put the remaining 1-metre pipes on top f the T-pipes. Attach one elbow pipe on each side. Finally, attach a 2.5-metre pipe to both elbow pipes. You can use this drawing as reference for the entire backdrop stand:
4. Hang Your Background Fabric Over the Top Pipe to Create a Mini Studio
You’re almost done! All you need to do is hang a large piece of fabric over the highest part of the backdrop stand. To make sure that your background doesn’t slide off the pipe, you can use pegs or binder clips. If you simply hang your background over the stand, it might move around too much. This movement might not be a problem in casual photoshoots. If you’re shooting professionally, this might be a big obstacle. When you hang the fabric over the pipe, leave a little piece behind it. Then, clip the remaining fabric to the one in front of it. Make sure you do this under the pipe, not on top of it. Do this on both sides of the pipe to keep everything in place.
Handy Tips for Using Your DIY Backdrop Stand
Save Space and Time by Avoiding Hot Glue
A backdrop stand with the measurements above will be huge and will take up a lot of space. You’ll find it much easier to disassemble everything every time you finish taking photos. You should use hot glue only if you use smaller measurements or if you have a storage space where your backdrop won’t get in the way. If you make a relatively small backdrop stand, you should probably use hot glue.
Experiment With Different DIY Backgrounds to Boost Your Creativity
You don’t need to use professional fabric for your photoshoots. Unless you’re working for a client that asked you to use a specific type of material, feel free to experiment with what you have. Experimenting will improve your creativity and give you lots of exciting photo opportunities. You can use materials like curtains, bedsheets, and even large sheets of paper. If you enjoy drawing or painting, you can make custom backdrops for your stand. Custom backgrounds are also perfect for family and wedding photoshoots. You can write something personal to your models so that your photos look unique.
Combine Ironed and Textured Backgrounds to Keep Your Photos Interesting
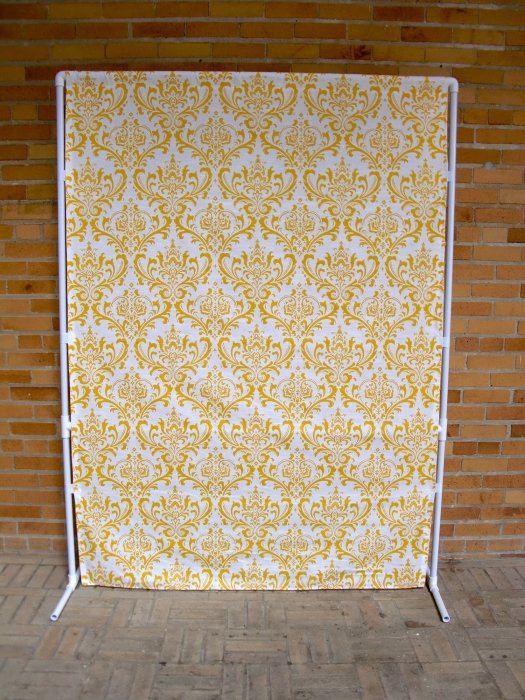
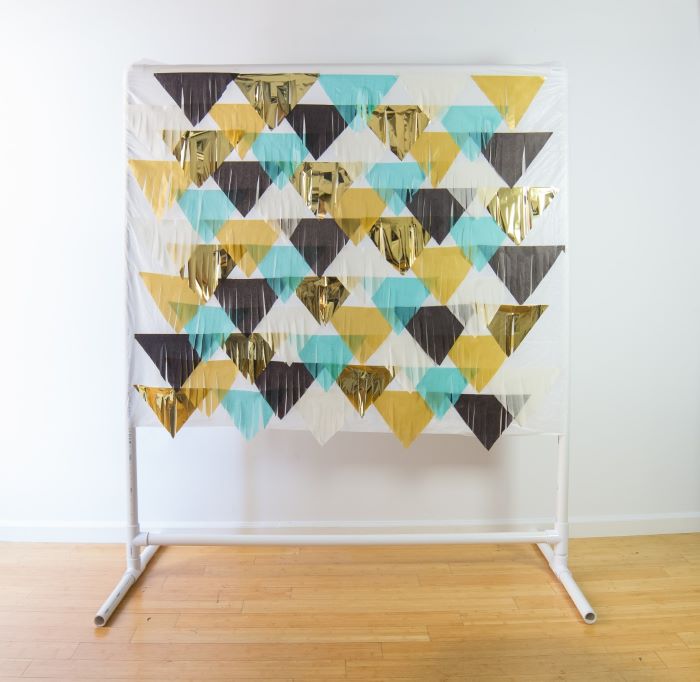
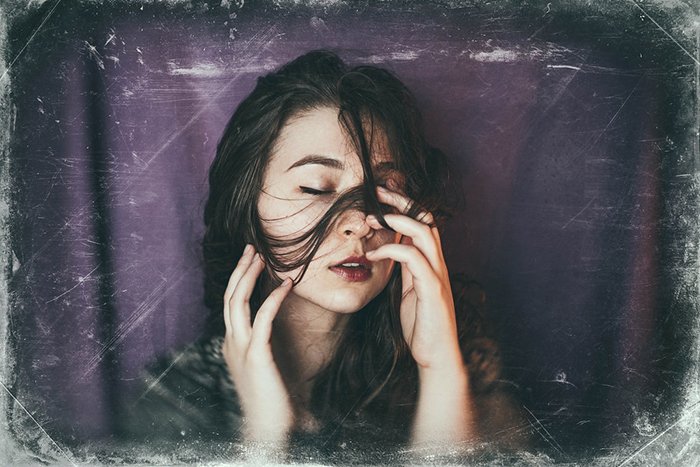
When you take professional studio photos of people and products, your background needs to look fresh. You should iron the background material before the shoot to get rid of wrinkles. Also, use a lint roller to remove dust and fur. If your photo shoot is a little more creative, you can experiment with textured backgrounds. These are great for fine art photography and conceptual photography. The background in the picture below might look fancy, but it’s actually a huge bedsheet! I hung it over my backdrop stand and posed in front of a large window. It was cloudy outside, so the light ended up soft and even.
Don’t Use Your DIY Backdrop Stand Outside to Avoid Accidents
Using a DIY backdrop outside can be problematic. Unless your PVC pipes are extra sturdy, they’ll probably fall apart on a windy day. For the best results, use your backdrop stand in a large room with lots of space. You should be able to walk around and experiment with different angles.
Use Natural Light to Enhance Your Background Stand Photography
If you don’t have artificial light, place your DIY backdrop stand next to a large window. The sunnier it is outside, the more effective your results will be. If needed, use curtains to soften the light. Place your subject right in front of the window for a soft look. For something moodier, you can change the position of the backdrop stand so that half of your subject is facing the window. This will add depth and mystery to your photos.
Common DIY Backdrop Stand Questions
What PVC Size Do I Need for a DIY Backdrop Stand?
The size of the PVC pipe depends on how large you want your stand to be. Generally, the diameter should be around 40mm.
Where Can I Buy a DIY Backdrop Stand?
You can buy everything you need for your DIY backdrop stand in your local plumbing supply store.
Conclusion
DIY backdrop stands aren’t challenging to make and can provide you with many fantastic photo opportunities. You can use professional backgrounds to take stunning studio photos. You can also experiment with curtains, blankets, paper, flowers and custom signs to give your photos a unique feel. Invest a little bit of time and money in your DIY backdrop stand. You’ll be able to take creative photos, no matter where you are. For more creative photography projects, check out how to make a DIY photo booth or our tutorial on shooting dark and moody flowers!


title: “How To Make Your Own Diy Backdrop Stand” ShowToc: true date: “2023-01-15” author: “Robert Hendrickson”
Photo backdrop stands are relatively cheap to make and are very easy to assemble. Read on to find out how you can make your own DIY backdrop stand!
Materials and Measurements for Your DIY Backdrop Stand
To build your DIY photo backdrop stand, you will need PVC pipes. You will be able to buy these from any hardware store.
Four T-pipes (Non-threaded) Six elbow pipes (Non-threaded) Four 1-metre pipes Four 50 cm pipes Two 2.5-metre pipes
The materials above will create a large backdrop frame that’s almost as tall as an average wall. If this isn’t what you’re looking for, you can use a shorter PVC pipe. Something that’s half as large as the backdrop will be enough for still life and portrait photography photos. The measurements for that would be:
Four 50cmm pipes Four 25cm pipes Two 1.25-metre pipes
You might not be able to find a PVC pipe with these specific lengths. In this case, you can buy a PVC cutter and make accurate cuts at home.
1. Create a Strong Base for Your DIY Photo Backdrop Stand
The first step is to assemble the legs. Your backdrop’s legs can’t be shaky or flexible. When you look for PVC pipes, make sure they’re not wobbly. The first ones I used seemed sturdy at first, but they ended up wobbling and falling apart. Don’t make the same mistake! To assemble the legs, you’ll need the following tools:
Four elbow pipes Two T-pipes Four 50cm pipes Two 1-metre pipes
Take one T-pipe and place two of the 50cm pipes on either end, so they are parallel to each other. Repeat this with the other T-pipe and 50cm pieces. Then add the elbow pipes to the open end of the 50cm pipes to form feet, for extra stability. Next, you will need to place the 1m pipes into the remaining open end of the T-pipes. You should now have two T-shaped legs.
2. Attach the 2.5m Pipe to Two T-Pipes to Create a Balanced Middle
Place two T-pipes on top of the 1-metre pipes (your backdrop’s legs). Then, attach one 2.5-metre pipe to the horizontal T-pipe ends. This structure will strengthen the backdrop’s legs and create a balance. Without the middle PVC pipe, your backdrop stand will fall apart.
3. Create the Top Part of Your Backdrop Stand by Using the Remaining 5 Tools
You’ll use the top part of your backdrop stand as a hanger for backgrounds. You’ll need:
Two 1-metre pipes Two elbow pipes One 2.5-metre pipe
Put the remaining 1-metre pipes on top f the T-pipes. Attach one elbow pipe on each side. Finally, attach a 2.5-metre pipe to both elbow pipes. You can use this drawing as reference for the entire backdrop stand:
4. Hang Your Background Fabric Over the Top Pipe to Create a Mini Studio
You’re almost done! All you need to do is hang a large piece of fabric over the highest part of the backdrop stand. To make sure that your background doesn’t slide off the pipe, you can use pegs or binder clips. If you simply hang your background over the stand, it might move around too much. This movement might not be a problem in casual photoshoots. If you’re shooting professionally, this might be a big obstacle. When you hang the fabric over the pipe, leave a little piece behind it. Then, clip the remaining fabric to the one in front of it. Make sure you do this under the pipe, not on top of it. Do this on both sides of the pipe to keep everything in place.
Handy Tips for Using Your DIY Backdrop Stand
Save Space and Time by Avoiding Hot Glue
A backdrop stand with the measurements above will be huge and will take up a lot of space. You’ll find it much easier to disassemble everything every time you finish taking photos. You should use hot glue only if you use smaller measurements or if you have a storage space where your backdrop won’t get in the way. If you make a relatively small backdrop stand, you should probably use hot glue.
Experiment With Different DIY Backgrounds to Boost Your Creativity
You don’t need to use professional fabric for your photoshoots. Unless you’re working for a client that asked you to use a specific type of material, feel free to experiment with what you have. Experimenting will improve your creativity and give you lots of exciting photo opportunities. You can use materials like curtains, bedsheets, and even large sheets of paper. If you enjoy drawing or painting, you can make custom backdrops for your stand. Custom backgrounds are also perfect for family and wedding photoshoots. You can write something personal to your models so that your photos look unique.
Combine Ironed and Textured Backgrounds to Keep Your Photos Interesting
When you take professional studio photos of people and products, your background needs to look fresh. You should iron the background material before the shoot to get rid of wrinkles. Also, use a lint roller to remove dust and fur. If your photo shoot is a little more creative, you can experiment with textured backgrounds. These are great for fine art photography and conceptual photography. The background in the picture below might look fancy, but it’s actually a huge bedsheet! I hung it over my backdrop stand and posed in front of a large window. It was cloudy outside, so the light ended up soft and even.
Don’t Use Your DIY Backdrop Stand Outside to Avoid Accidents
Using a DIY backdrop outside can be problematic. Unless your PVC pipes are extra sturdy, they’ll probably fall apart on a windy day. For the best results, use your backdrop stand in a large room with lots of space. You should be able to walk around and experiment with different angles.
Use Natural Light to Enhance Your Background Stand Photography
If you don’t have artificial light, place your DIY backdrop stand next to a large window. The sunnier it is outside, the more effective your results will be. If needed, use curtains to soften the light. Place your subject right in front of the window for a soft look. For something moodier, you can change the position of the backdrop stand so that half of your subject is facing the window. This will add depth and mystery to your photos.
Common DIY Backdrop Stand Questions
What PVC Size Do I Need for a DIY Backdrop Stand?
The size of the PVC pipe depends on how large you want your stand to be. Generally, the diameter should be around 40mm.
Where Can I Buy a DIY Backdrop Stand?
You can buy everything you need for your DIY backdrop stand in your local plumbing supply store.
Conclusion
DIY backdrop stands aren’t challenging to make and can provide you with many fantastic photo opportunities. You can use professional backgrounds to take stunning studio photos. You can also experiment with curtains, blankets, paper, flowers and custom signs to give your photos a unique feel. Invest a little bit of time and money in your DIY backdrop stand. You’ll be able to take creative photos, no matter where you are. For more creative photography projects, check out how to make a DIY photo booth or our tutorial on shooting dark and moody flowers!
