What Is Perfect Exposure In Lightroom?
Exposure is the amount of light that reaches your camera sensor. According to the degree of exposure, we can find 3 types of images: overexposed, underexposed and ‘correctly’ exposed. Underexposed images have a lack of light compared to the original scene. They are considered too dark. Overexposed images are exactly the opposite. It is an image that is brighter than it should be. The ‘correctly exposed’ images are those that feel balanced, not too bright and not too dark. In a well-balanced photo the details are not lost in the shadows or burnt out in highlights, and in general it has a similar look as the original scene. Why then the inverted commas in ‘correctly exposed’? If you are using photography as a creative tool, you might want to underexpose or overexpose an image on purpose in order to convey your vision. Correct or incorrect exposure doesn’t really exist when it comes to creative photography. You can choose the exposure that will best fit your purpose. It is good to know whether you have an underexposed or overexposed image for editing purposes. But don’t get caught up in trying to get the perfect exposure every time.
Shooting in RAW Will Give You More Editing Options but JPEG Files Are Smaller
You can check the exposure your image will have directly in-camera. Check the histogram or the camera meter to do so. Correct your exposure accordingly by adjusting the aperture, shutter speed or ISO settings. But what if you only notice your exposure isn’t right after you’ve downloaded the photos to your computer? This is where shooting in RAW comes in handy. You’ll have to fix the original photos in Lightroom or Photoshop. RAW photography increases your chances of recovering as much data as possible from your image. Most cameras these days have the option to interchange between RAW and JPEG. You can even create both at the same time. But keep in mind that RAW files are bigger than JPEGs. Before starting to shoot, you need to consider what is more important to you. Shooting in RAW to keep all the image data and have more flexibility in the post-processing but JPEGs will save up space on your memory card.
Lightroom Tools That Affect Exposure
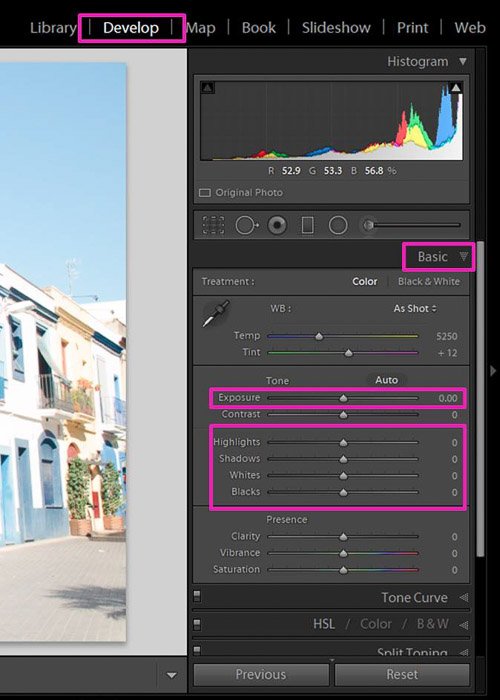
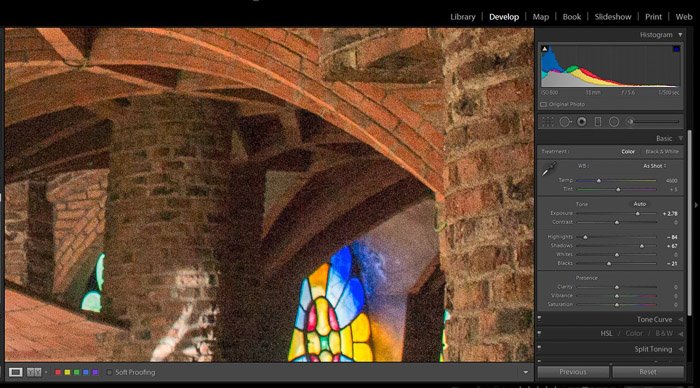
To easily fix overexposed and underexposed images you need to get familiar with some of the tools in the Basic panel of the Develop Module. Exposure slider. It controls the overall brightness of your photo. Your image will get darker when you slide it to the left and brighter towards the right side. Highlights. It affects only the brightest areas of the image by making them darker or brighter when you move it to the left or right respectively. Use it to bring back lost detail in these areas. Shadows. The shadows slider affects only the darker areas of the image. It is useful for recovering details in the shadows (sliding to the right), or making them darker (to the left) Whites. By moving the whites slider to the right you can make the white tones brighter and whiter. It is a way to adjust the White point of your image. Unlike Highlights, that affects only the brightest pixels, this tool affects the overall image. Blacks. The blacks slider adjusts the black point of the image (how dark the darkest areas are).
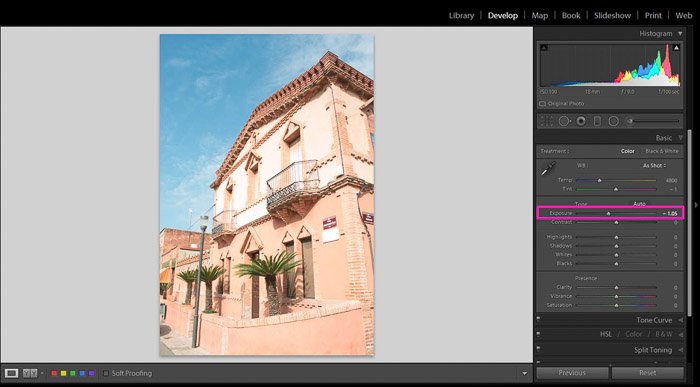
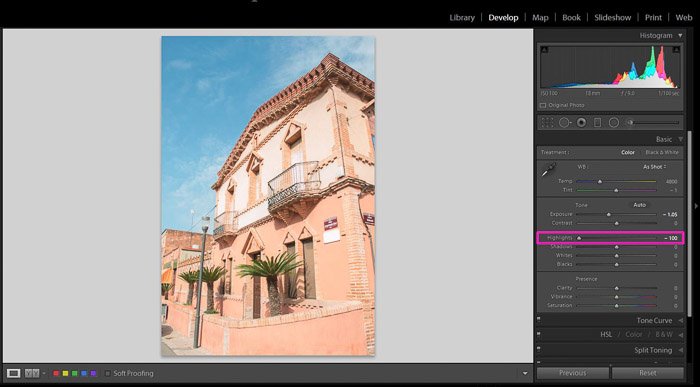
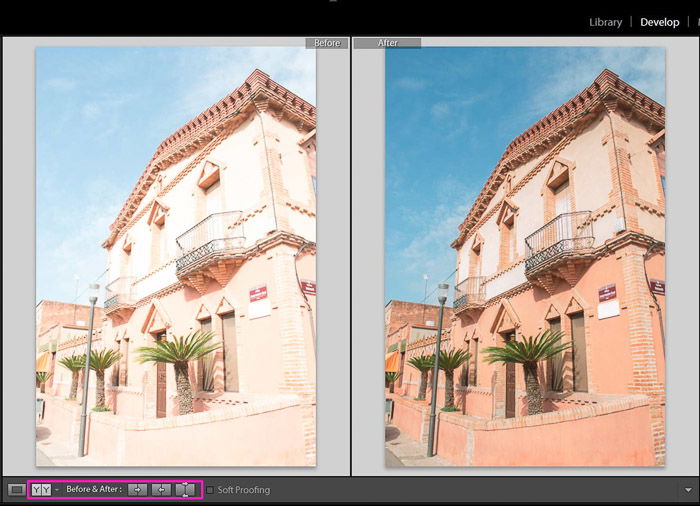
How to Fix Overexposed Photos in Lightroom
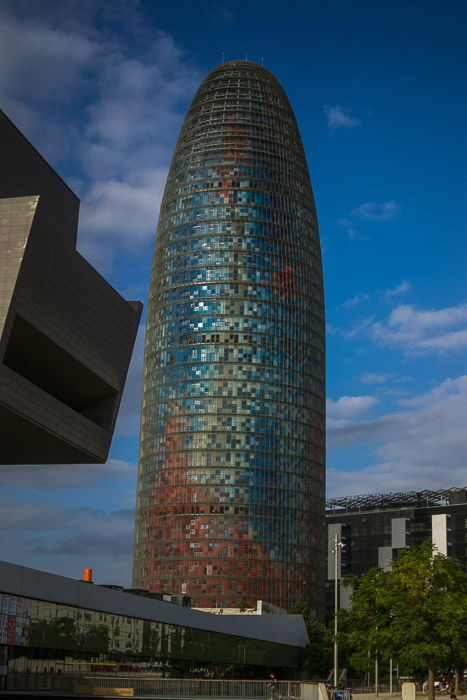
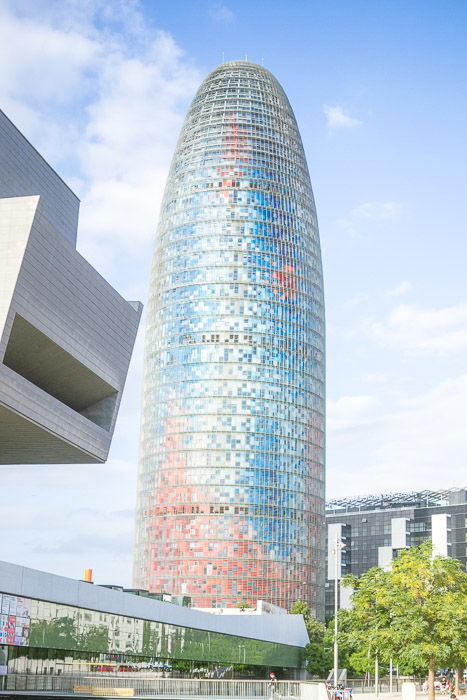
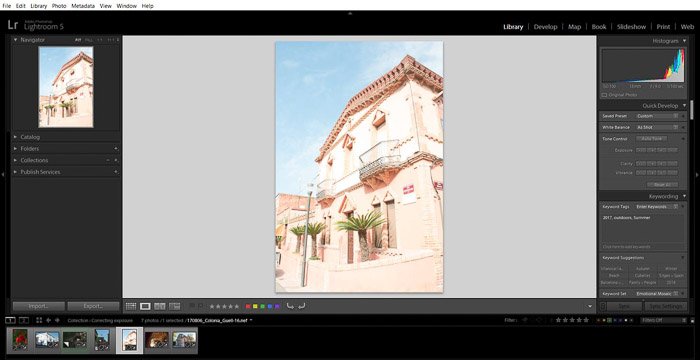
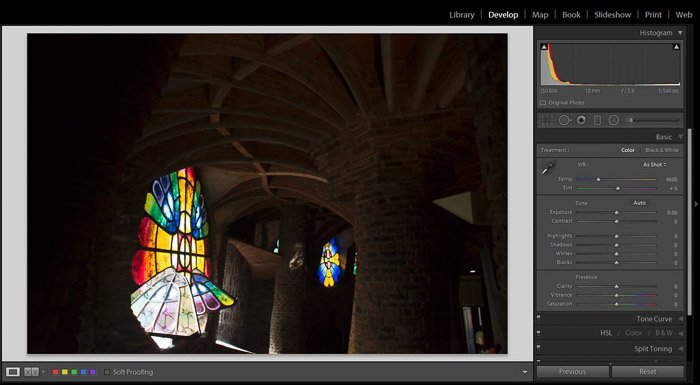
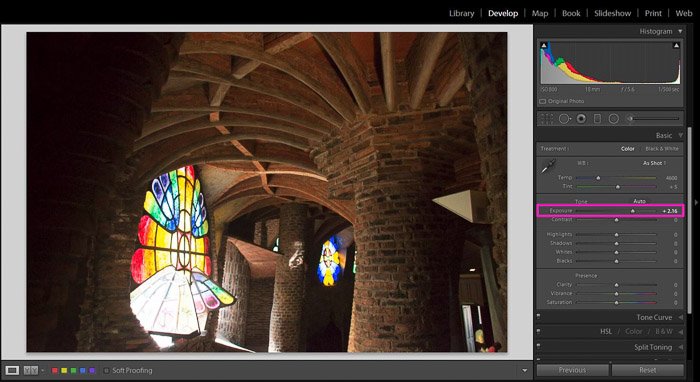
This is the photo I will use during this tutorial. It’s clearly overexposed and there are no details in some areas of the building. To fix overexposed photos you can mainly focus on 3 sliders: Exposure, Highlights, and Whites. If the whole photo is overexposed, start with the Exposure slider. It is quite sensitive, so small changes might have a big effect on the image. Pull it down slowly until you reach a point you like, and focus on the details that you recover from the image. The second step is to recover the highlights. This slider is much less sensitive than the Exposure one, so you might need to move it all the way to the left. The last step, you can adjust the Whites. In an overexposed photo, you probably will need to slide it to the left. This is mostly a personal preference, so you need to experiment. If you compare the before and after images, you can really see the improvements you can get from making just a few adjustments. In case that just some areas of the image are overexposed, adjust the highlights first. This might fix the problem without you needing to do anything else.
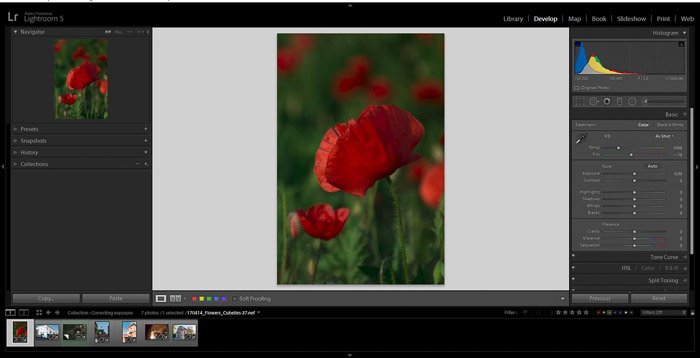
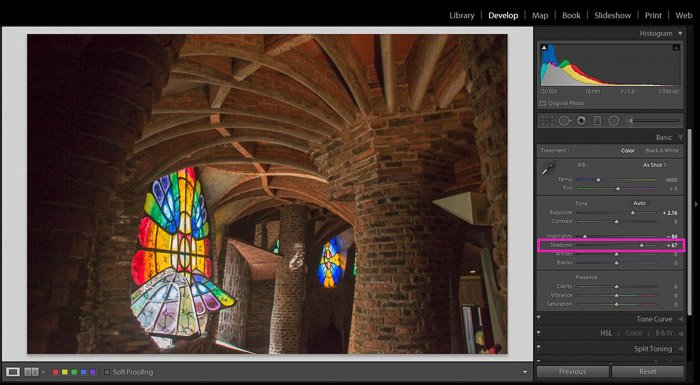
How to Fix Underexposed Photos
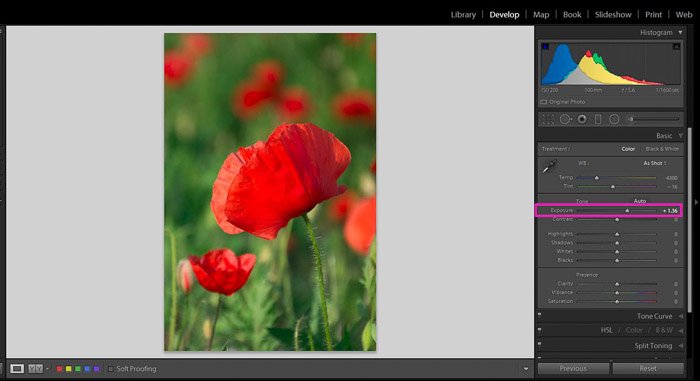
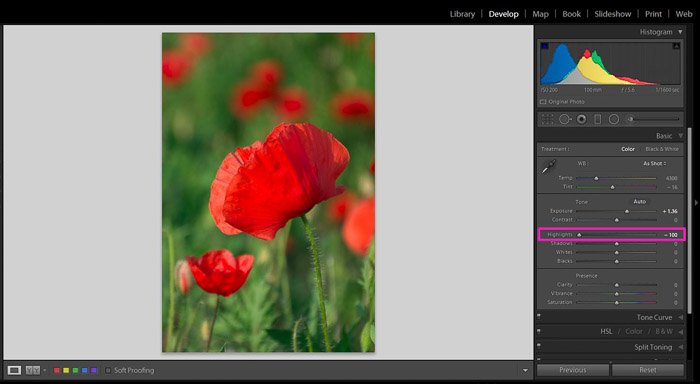
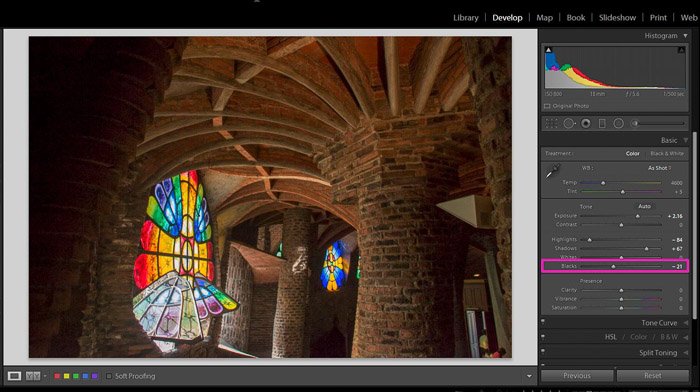
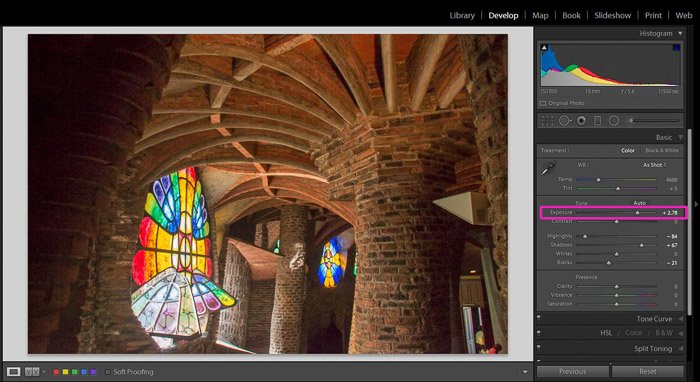
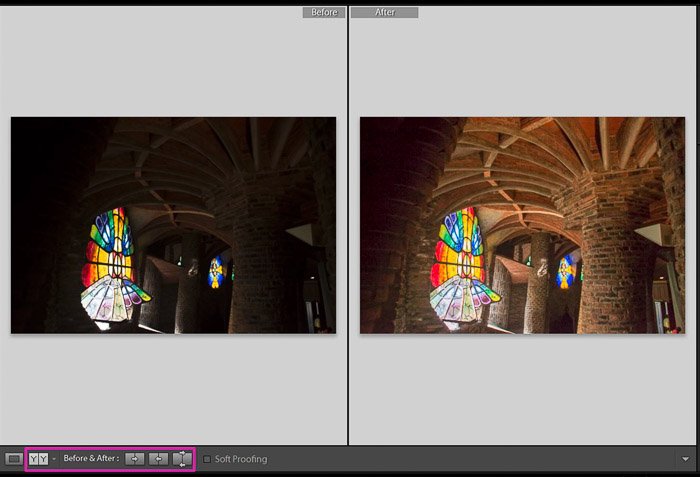
I will show you two ways of editing underexposed photos; one for simple cases and one for more complicated images. I will start with the easier fix. The first step is to increase the exposure using the slider. As you can see, there is a loss of detail in the highlights of the flower‘s petals. It is possible to recover the highlights by moving the Highlights slider to the left. And that’s all! Now I want to show you another underexposed image that will take a couple more steps to fix. I will start like in the previous image, by increasing the exposure. Next step is evaluating whether you need to add some light to the shadows to recover detail. If so, slide up the Shadow slider until you reach a point you like. This has a drawback: the image’s contrast will decrease and it will look quite plain. You can bring some contrast back by pulling down the blacks using the Black slider or, if you prefer, using the contrast slider. I usually come back to the Exposure slider to do a subtle readjustment after all the editing.
You can also readjust the other sliders. You can check the before and after to make sure you are happy with the result.
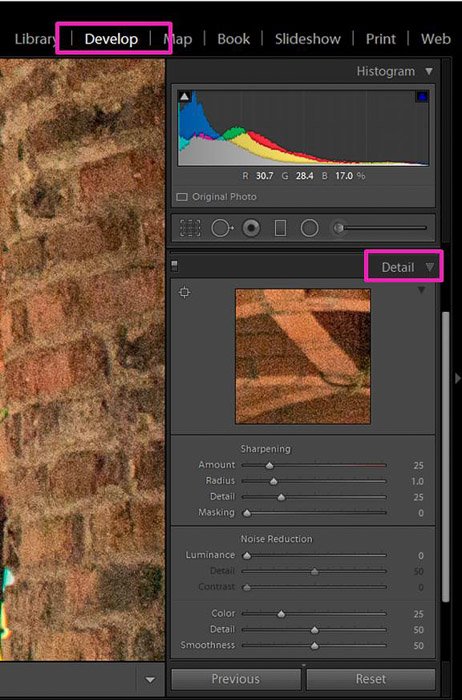
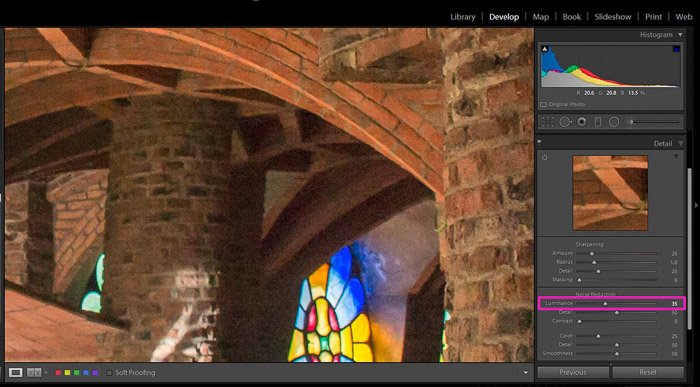
How to Decrease Image Grain
When fixing underexposed photos you might encounter another problem: an increase in the image grain, also known as noise. Although noise can be used for creative and artistic images, for the most part we want to have the minimum amount of grain in our photos. You need to move from the Basic to the Details panel. You can reduce the noise using the Luminance slider. By moving it towards the left, you progressively decrease the noise of your image. Keep in mind however that you also lose details. You need to find the balance between decreasing the grain and keeping the details. If you overdo it, the elements in your image will end up looking as if they are made of plastic.
Make Local Changes With the Brush Tool
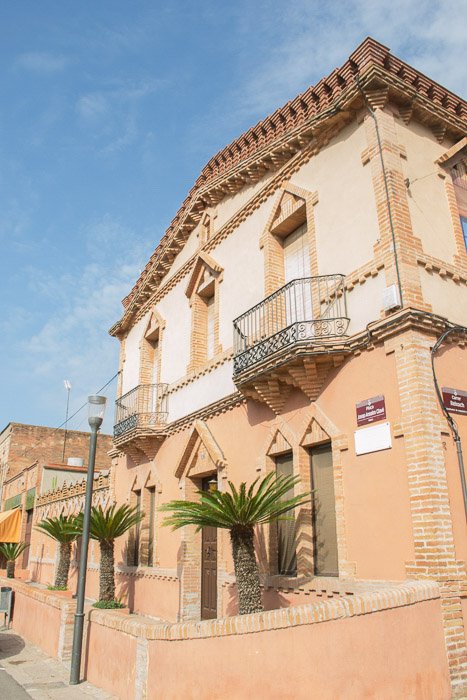
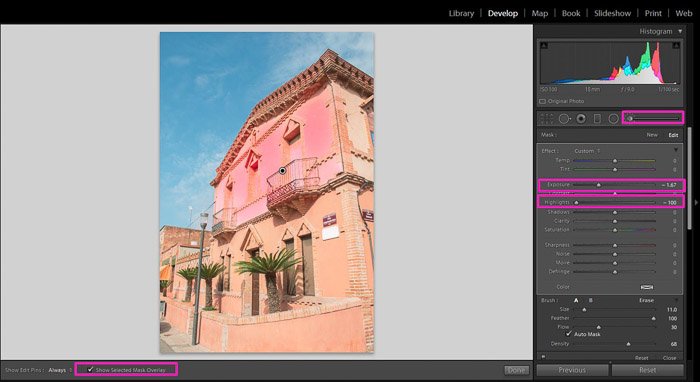
You can also adjust the exposure of some areas in the image using the adjustment brush tool. In the overexposed image I fixed previously, the overall exposure is fine, but the upper part of the house is still a bit too bright. To deal with this I selected the brush tool and brushed only the area of the upper floor, the only part I want to adjust. When using the brush, it is handy to check the box ‘Show selected cast overlay’. A pink overcast will show you the area you have already brushed. If you want to remove the overcast and see the effects of the adjustments you are making with the brush tool simply uncheck the box. The marker will be turned off (but not the adjustments). The brush tool panel is similar to the Basic panel. There you can find the sliders to adjust the exposure. In this example, I used 2 of the sliders to decrease the exposure and the highlights of the brush tool. The local adjustments you need to do will depend on your image. You might need to do exactly the opposite of what I showed in the example like increasing the brightness in some areas of your image. One option will be to use a bush tool to increase the exposure of the chosen area. In that case, I don’t recommend you to move the exposure slider a lot because it can be noticeable. Another option is to remove the shadows using a brush with the shadow slider towards the right.
Conclusion
You can fix overexposed and underexposed images in Lightroom using just a few basic tools and local brush adjustments. When editing, keep in mind that you can use exposure creatively to convey your photographic vision. You can and should also use these tools not only to get a ‘correct exposure‘ for your image, but also to experiment for more creative photography.

title: “How To Edit Exposure In Lightroom Under Or Overexposed " ShowToc: true date: “2023-02-19” author: “Carol Bolick”
What Is Perfect Exposure In Lightroom?
Exposure is the amount of light that reaches your camera sensor. According to the degree of exposure, we can find 3 types of images: overexposed, underexposed and ‘correctly’ exposed. Underexposed images have a lack of light compared to the original scene. They are considered too dark. Overexposed images are exactly the opposite. It is an image that is brighter than it should be. The ‘correctly exposed’ images are those that feel balanced, not too bright and not too dark. In a well-balanced photo the details are not lost in the shadows or burnt out in highlights, and in general it has a similar look as the original scene. Why then the inverted commas in ‘correctly exposed’? If you are using photography as a creative tool, you might want to underexpose or overexpose an image on purpose in order to convey your vision. Correct or incorrect exposure doesn’t really exist when it comes to creative photography. You can choose the exposure that will best fit your purpose. It is good to know whether you have an underexposed or overexposed image for editing purposes. But don’t get caught up in trying to get the perfect exposure every time.
Shooting in RAW Will Give You More Editing Options but JPEG Files Are Smaller
You can check the exposure your image will have directly in-camera. Check the histogram or the camera meter to do so. Correct your exposure accordingly by adjusting the aperture, shutter speed or ISO settings. But what if you only notice your exposure isn’t right after you’ve downloaded the photos to your computer? This is where shooting in RAW comes in handy. You’ll have to fix the original photos in Lightroom or Photoshop. RAW photography increases your chances of recovering as much data as possible from your image. Most cameras these days have the option to interchange between RAW and JPEG. You can even create both at the same time. But keep in mind that RAW files are bigger than JPEGs. Before starting to shoot, you need to consider what is more important to you. Shooting in RAW to keep all the image data and have more flexibility in the post-processing but JPEGs will save up space on your memory card.
Lightroom Tools That Affect Exposure
To easily fix overexposed and underexposed images you need to get familiar with some of the tools in the Basic panel of the Develop Module. Exposure slider. It controls the overall brightness of your photo. Your image will get darker when you slide it to the left and brighter towards the right side. Highlights. It affects only the brightest areas of the image by making them darker or brighter when you move it to the left or right respectively. Use it to bring back lost detail in these areas. Shadows. The shadows slider affects only the darker areas of the image. It is useful for recovering details in the shadows (sliding to the right), or making them darker (to the left) Whites. By moving the whites slider to the right you can make the white tones brighter and whiter. It is a way to adjust the White point of your image. Unlike Highlights, that affects only the brightest pixels, this tool affects the overall image. Blacks. The blacks slider adjusts the black point of the image (how dark the darkest areas are).
How to Fix Overexposed Photos in Lightroom
This is the photo I will use during this tutorial. It’s clearly overexposed and there are no details in some areas of the building. To fix overexposed photos you can mainly focus on 3 sliders: Exposure, Highlights, and Whites. If the whole photo is overexposed, start with the Exposure slider. It is quite sensitive, so small changes might have a big effect on the image. Pull it down slowly until you reach a point you like, and focus on the details that you recover from the image. The second step is to recover the highlights. This slider is much less sensitive than the Exposure one, so you might need to move it all the way to the left. The last step, you can adjust the Whites. In an overexposed photo, you probably will need to slide it to the left. This is mostly a personal preference, so you need to experiment. If you compare the before and after images, you can really see the improvements you can get from making just a few adjustments. In case that just some areas of the image are overexposed, adjust the highlights first. This might fix the problem without you needing to do anything else.
How to Fix Underexposed Photos
I will show you two ways of editing underexposed photos; one for simple cases and one for more complicated images. I will start with the easier fix. The first step is to increase the exposure using the slider. As you can see, there is a loss of detail in the highlights of the flower‘s petals. It is possible to recover the highlights by moving the Highlights slider to the left. And that’s all! Now I want to show you another underexposed image that will take a couple more steps to fix. I will start like in the previous image, by increasing the exposure. Next step is evaluating whether you need to add some light to the shadows to recover detail. If so, slide up the Shadow slider until you reach a point you like. This has a drawback: the image’s contrast will decrease and it will look quite plain. You can bring some contrast back by pulling down the blacks using the Black slider or, if you prefer, using the contrast slider. I usually come back to the Exposure slider to do a subtle readjustment after all the editing.
You can also readjust the other sliders. You can check the before and after to make sure you are happy with the result.
How to Decrease Image Grain
When fixing underexposed photos you might encounter another problem: an increase in the image grain, also known as noise. Although noise can be used for creative and artistic images, for the most part we want to have the minimum amount of grain in our photos. You need to move from the Basic to the Details panel. You can reduce the noise using the Luminance slider. By moving it towards the left, you progressively decrease the noise of your image. Keep in mind however that you also lose details. You need to find the balance between decreasing the grain and keeping the details. If you overdo it, the elements in your image will end up looking as if they are made of plastic.
Make Local Changes With the Brush Tool
You can also adjust the exposure of some areas in the image using the adjustment brush tool. In the overexposed image I fixed previously, the overall exposure is fine, but the upper part of the house is still a bit too bright. To deal with this I selected the brush tool and brushed only the area of the upper floor, the only part I want to adjust. When using the brush, it is handy to check the box ‘Show selected cast overlay’. A pink overcast will show you the area you have already brushed. If you want to remove the overcast and see the effects of the adjustments you are making with the brush tool simply uncheck the box. The marker will be turned off (but not the adjustments). The brush tool panel is similar to the Basic panel. There you can find the sliders to adjust the exposure. In this example, I used 2 of the sliders to decrease the exposure and the highlights of the brush tool. The local adjustments you need to do will depend on your image. You might need to do exactly the opposite of what I showed in the example like increasing the brightness in some areas of your image. One option will be to use a bush tool to increase the exposure of the chosen area. In that case, I don’t recommend you to move the exposure slider a lot because it can be noticeable. Another option is to remove the shadows using a brush with the shadow slider towards the right.
Conclusion
You can fix overexposed and underexposed images in Lightroom using just a few basic tools and local brush adjustments. When editing, keep in mind that you can use exposure creatively to convey your photographic vision. You can and should also use these tools not only to get a ‘correct exposure‘ for your image, but also to experiment for more creative photography.
