This article will cover essential wildlife photography gear. I’ll recommend high-end equipment used by professionals. I’ll also give moderately priced options perfect for the beginner wildlife photographer.
[ExpertPhotography is supported by readers. Product links on ExpertPhotography are referral links. If you use one of these and buy something, we make a little bit of money. Need more info? See how it all works here.]
Choosing the Best Wildlife Photography Gear: A Guide to Selecting the Right Camera for Wildlife Photography
Choose a wildlife camera that is quick. You’ll want a camera that can focus fast and can take at least 10 frames per second in burst mode. Low-light ISO performance is also vital as most wildlife are active at dusk and dawn. Waterproofing is also an important feature to check for wildlife photography. You may find yourself tracking wildlife through wet or snowy weather conditions. If you plan on wildlife watching in extreme temperatures, check the specs to see if the camera can endure severe cold or heat. Sony has designed a camera for sports and wildlife photography. The Alpha a9II is mirrorless, has 24.2MP, and can shoot up to 20 frames per second. It has quick focusing and includes animal eye tracking. If you want more megapixels, try the A7R IV which has 61MP. If you’re looking to buy Canon or Nikon, look at either the Canon EOS 1DX Mark II or the Nikon D5. Canon is set to release the Canon EOS 1Dx Mark III in February 2020. The crop sensor Sony a6600 is a more moderately priced option. It has many of the same features as the Alpha a9II. This camera is 24.2MP and can shoot up to 11 frames per second. It has quick focusing and includes animal eye tracking. The Sony a6400 and a6500 are still available. Both of these bodies will have many of the features of the later version at a lower price point. You can also check out our Sony a6500 review for more information. The full frame and crop sensor Sonys use the same mount system. Entry-level photographers can start on the crop sensor. You can upgrade to a full frame camera later and use the same lenses.
Get Close to the Wildlife With a Telephoto Lens
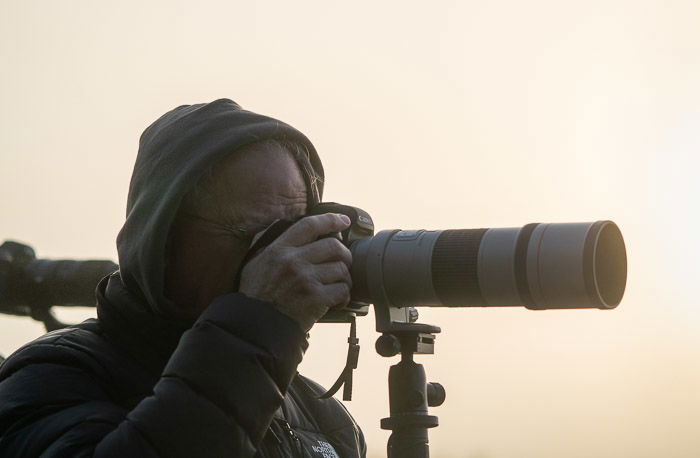
Wildlife photographers love long telephoto lenses. It’s not always easy or even possible to get close to some wildlife. Telephoto lenses allow you to get close wildlife shots from a distance. Don’t expect light and compact lenses. Long telephotos have some weight to them! For wildlife photography, the minimum focal length is 100mm. Popular wildlife lenses are 70-200mm and 100-400mm. Some wildlife photographers prefer prime lenses. These lenses have a fixed focal length like 600mm. Prime lenses have a history of being sharper but are less flexible than zoom lenses. With improvements to zoom lenses, the distinction is becoming less important. The best lenses for wildlife photography are fast. They have large apertures like f2.8 for low light conditions. There are often f4.0 or f5.6 versions of these lenses that are more moderately priced – at least in comparison. The more expensive zoom lenses have a fixed aperture. Variable-aperture lenses are usually less costly. A fixed-aperture lens will keep the same aperture regardless of the focal length. A variable-aperture will reduce the aperture as the lens zooms, letting in less light. In 2019, Sony released their FE 200-600 f/5.6-6.3 G OSS lens to join their popular FE 100-400mm f4.5-5.6 GM OSS lens. These lenses have gotten excellent reviews. They focus fast and have great stabilization. I use my 100-400mm for more than just wildlife photography!
Extend Focal Length With a Teleconverter
Wildlife photographers are always looking for more reach. A teleconverter is often on their kit. The teleconverter mounts between the camera and lens and extends the focal length. The best models work seamlessly with the electronics of the lens. There shouldn’t be a noticeable lag in autofocus or deterioration in image quality. But there may be a loss of light at the longer focal lengths. Teleconverters generally come in 1.4x or 2.0x. My Sony 1.4x teleconverter extends the reach of my 100-400mm lens to 560mm.
Tripods and Monopods for Wildlife Photographers
Most wildlife photographers use a tripod or monopod to stabilize their telephoto lens. It is possible to shoot wildlife photography without a tripod, but telephoto lenses can be heavy to hold. There is generally some hiking involved in wildlife photography, so the best tripod is both sturdy and lightweight. Carbon fiber a popular choice. I use a MeFOTO GlobeTrotter carbon fiber tripod. It extends to 163cm and is lightweight (1.7kg). I can convert the tripod to a monopod with ease. I prefer to use a monopod if I’m changing positions a lot. The MeFOTO RoadTrip model is more moderately priced. Other options are by Manfrotto (MT190XPRO4), Gitzo (GT1545TUS) and Really Right Stuff (TQC-14 Series 1 Mark 2). In 2020, Peak Design will make a play for the tripod market. I love Peak Design products, but I haven’t yet gotten my hands on one of their new tripods. They are advertised to be durable, lightweight, and extremely compact. The carbon fiber version is set to be around $400.
Switch to a Gimbal for Flexibility
Wildlife photographers often replace their tripod’s standard ball head with a gimbal. This mounting system allows more movement and flexibility while still stabilizing the camera. When buying a gimbal, look for balance and build quality. Remember, the gimbal needs to support the weight of a heavy telephoto lens. The Benro GH2 is often recommended as is the Wimberley Wh-200 Version II. If you’re on a budget or just want to try out the feel of a gimbal, the Neewer carbon fiber gimbal is a well-priced option.
Fast Memory Cards are a Must-Have for Wildlife Shots
I didn’t pay attention to memory cards until I started photographing wildlife and animals. My slower cards didn’t write fast enough. I’d take a burst of shots, and then I’d have to wait for the buffer to clear. It’s no good if I buy a camera that can take 10+ frames per second if my SD card can’t handle the speed. Write speed determines how fast images are saved onto the SD card. Faster write speeds generally increase the price of the SD. The Sony SF G card offers 299MB/s write speeds. But a 128GB SF G card is a bit expensive for most photographers. Many of my SD cards are 150MB/s, and these usually work fine. The Sony SF-M series TOUGH is more affordable for 128GB. SD cards continue to improve both in memory size and write speeds and prices will likely drop with time.
Try Using a Bean Bag for Stability
Photographers use bean bags to stabilize their cameras when a tripod isn’t workable. For instance, when photographing from a car or very low to ground. I wrote about using bean bags for wildlife photography in the article “How (And Why!) to Use a Camera Bean Bag for Wildlife photography”. In this article, I describe how to make your own photography bean bags, but you can also buy bean bags. The LensCoat LensSack Pro is designed to drape over a car door. A bean bag with a smaller profile is the Green Pod Camera Platform.
The Best Rain Covers to Protect Your Camera
Depending on what sort of animals or wildlife photography you’re interested in, you may find yourself standing for long periods in wet weather. Rain covers add a layer of protection to cameras and lenses in wet conditions. Make sure to buy a rain cover that is large enough to accommodate a long telephoto lens. I find rain covers cumbersome, so I generally only use them in heavy rain. For light rain, I cover my camera and lens with a moisture absorbent microfiber cloth. When I need a rain cover, I use a basic plastic covering like the Op/Tech USA Rainsleeve. If you want something more substantial, consider the Think Tank Hydrophobia.
Use a Ground Cover for Added Comfort
Getting low is sometimes essential when photographing wildlife. I carry a canvas ground cover to keep myself protected from mud and moisture. I’ll be able to photograph longer if I’m comfortable. A ground cover can be a piece of waterproof canvas or even an old yoga mat. I picked up the one I use at a local thrift store.
Carry a Headlamp
Wildlife is generally more active at dusk and dawn. This means that I spend at least some time in the dark. Even if I’ve scouted a place in daylight, I may need light to set up before dawn or get back to my car after sundown. Buy a headlamp with both a white and red light with separate buttons to activate these lights. The red light doesn’t ruin my night vision, and I don’t want to have to click through the white light to get to my red light. Some use replaceable batteries, and some are rechargeable. Take a look at the lumens and buy the brightest light you can afford. The Petzl Actik Core is a good choice. There’s also a range of Black Diamond headlamps. The Black Diamond Lite 160 is a cheaper option to start out with.
Choose the Best Backpack for Wildlife Photography Gear
A good camera backpack is an essential part of outdoor photography gear. I need a balanced bag that I can wear all day. I also want access without having to put the bag on the ground in muddy conditions. When looking for a camera bag, make sure it can accommodate the larger telephoto lens. I use Peak Design photography supplies, and I love their Everyday backpack. I use the smaller 20-litre bag (I’m a small gal), but many may prefer the larger 30-litre bag. I configure the inside of the bag so that I can put my long telephoto lens down one side. This leaves room on the other side for a smaller lens or a back-up camera body. I haven’t tried the new version 2, but when I do, I’ll let you know.
Take a Second Camera Body With a Holster
Many wildlife photographers carry two camera bodies. One with a telephoto lens and the other with a wide-angle lens. Sometimes wildlife is closer than expected, or there’s a lovely landscape to photograph while I wait for wildlife action. Its good to be prepared. To keep the second camera body handy, use a spider holster or a similar system. A spider holster clips the camera to your belt or backpack. Spider makes separate systems for DSLR and the lighter-weight mirrorless cameras. The Backpacker Kit is priced at around £100.
Wear Comfortable Clothing
Finally, comfortable clothes are an essential part of wildlife photography gear. Wildlife photographers can be anywhere from the humid rain forests to snowy mountains. Exactly what clothes you need to be comfortable depends on the weather conditions. Being comfortable ensures that you will wait patiently for the best shots. You’re not likely to wait as long if your feet are cold or if you’re uncomfortable and sweaty. At the very least, you’ll want waterproof boots. I add neoprene socks for an extra layer of insulation (NRS Hydroskin 0.5 Wetsocks). I like to wear clothing that breathes, and wicks sweat away from my body. Even in cold weather, I can build up a sweat hiking into the field, and then I stand still for long periods. I don’t want the moisture next to my skin. When photographing in cold, snowy conditions, add thermal layers and spikes for shoes.
Final Thoughts
You need specialised wildlife photography gear to make it easier to get quality images. Some of the professional camera equipment is expensive, but there are well-priced options available. The best cameras for wildlife photography focus fast and are capable of high burst rates. Add a telephoto lens, and you’re ready for action. Some of the equipment described impacts the actual shoot. These include the teleconverter, tripod, camera bean bag, gimbal, and fast SD cards. Other photography gear is essential for the wildlife photographer’s comfort (clothing, ground cover). Don’t forget to protect your camera too with a rain cover. With this photography gear and a bit of practice, you’ll be able to make fantastic wildlife images! For more information on improving your wildlife photography, see my article “12 Tips for Improving Your Wildlife Photography Composition”.


![]()
title: “How To Choose The Best Wildlife Photography Gear” ShowToc: true date: “2023-02-14” author: “Raymond Frisch”
This article will cover essential wildlife photography gear. I’ll recommend high-end equipment used by professionals. I’ll also give moderately priced options perfect for the beginner wildlife photographer.
[ExpertPhotography is supported by readers. Product links on ExpertPhotography are referral links. If you use one of these and buy something, we make a little bit of money. Need more info? See how it all works here.]
Choosing the Best Wildlife Photography Gear: A Guide to Selecting the Right Camera for Wildlife Photography
Choose a wildlife camera that is quick. You’ll want a camera that can focus fast and can take at least 10 frames per second in burst mode. Low-light ISO performance is also vital as most wildlife are active at dusk and dawn. Waterproofing is also an important feature to check for wildlife photography. You may find yourself tracking wildlife through wet or snowy weather conditions. If you plan on wildlife watching in extreme temperatures, check the specs to see if the camera can endure severe cold or heat. Sony has designed a camera for sports and wildlife photography. The Alpha a9II is mirrorless, has 24.2MP, and can shoot up to 20 frames per second. It has quick focusing and includes animal eye tracking. If you want more megapixels, try the A7R IV which has 61MP. If you’re looking to buy Canon or Nikon, look at either the Canon EOS 1DX Mark II or the Nikon D5. Canon is set to release the Canon EOS 1Dx Mark III in February 2020. The crop sensor Sony a6600 is a more moderately priced option. It has many of the same features as the Alpha a9II. This camera is 24.2MP and can shoot up to 11 frames per second. It has quick focusing and includes animal eye tracking. The Sony a6400 and a6500 are still available. Both of these bodies will have many of the features of the later version at a lower price point. You can also check out our Sony a6500 review for more information. The full frame and crop sensor Sonys use the same mount system. Entry-level photographers can start on the crop sensor. You can upgrade to a full frame camera later and use the same lenses.
Get Close to the Wildlife With a Telephoto Lens
Wildlife photographers love long telephoto lenses. It’s not always easy or even possible to get close to some wildlife. Telephoto lenses allow you to get close wildlife shots from a distance. Don’t expect light and compact lenses. Long telephotos have some weight to them! For wildlife photography, the minimum focal length is 100mm. Popular wildlife lenses are 70-200mm and 100-400mm. Some wildlife photographers prefer prime lenses. These lenses have a fixed focal length like 600mm. Prime lenses have a history of being sharper but are less flexible than zoom lenses. With improvements to zoom lenses, the distinction is becoming less important. The best lenses for wildlife photography are fast. They have large apertures like f2.8 for low light conditions. There are often f4.0 or f5.6 versions of these lenses that are more moderately priced – at least in comparison. The more expensive zoom lenses have a fixed aperture. Variable-aperture lenses are usually less costly. A fixed-aperture lens will keep the same aperture regardless of the focal length. A variable-aperture will reduce the aperture as the lens zooms, letting in less light. In 2019, Sony released their FE 200-600 f/5.6-6.3 G OSS lens to join their popular FE 100-400mm f4.5-5.6 GM OSS lens. These lenses have gotten excellent reviews. They focus fast and have great stabilization. I use my 100-400mm for more than just wildlife photography!
Extend Focal Length With a Teleconverter
Wildlife photographers are always looking for more reach. A teleconverter is often on their kit. The teleconverter mounts between the camera and lens and extends the focal length. The best models work seamlessly with the electronics of the lens. There shouldn’t be a noticeable lag in autofocus or deterioration in image quality. But there may be a loss of light at the longer focal lengths. Teleconverters generally come in 1.4x or 2.0x. My Sony 1.4x teleconverter extends the reach of my 100-400mm lens to 560mm.
Tripods and Monopods for Wildlife Photographers
Most wildlife photographers use a tripod or monopod to stabilize their telephoto lens. It is possible to shoot wildlife photography without a tripod, but telephoto lenses can be heavy to hold. There is generally some hiking involved in wildlife photography, so the best tripod is both sturdy and lightweight. Carbon fiber a popular choice. I use a MeFOTO GlobeTrotter carbon fiber tripod. It extends to 163cm and is lightweight (1.7kg). I can convert the tripod to a monopod with ease. I prefer to use a monopod if I’m changing positions a lot. The MeFOTO RoadTrip model is more moderately priced. Other options are by Manfrotto (MT190XPRO4), Gitzo (GT1545TUS) and Really Right Stuff (TQC-14 Series 1 Mark 2). In 2020, Peak Design will make a play for the tripod market. I love Peak Design products, but I haven’t yet gotten my hands on one of their new tripods. They are advertised to be durable, lightweight, and extremely compact. The carbon fiber version is set to be around $400.
Switch to a Gimbal for Flexibility
Wildlife photographers often replace their tripod’s standard ball head with a gimbal. This mounting system allows more movement and flexibility while still stabilizing the camera. When buying a gimbal, look for balance and build quality. Remember, the gimbal needs to support the weight of a heavy telephoto lens. The Benro GH2 is often recommended as is the Wimberley Wh-200 Version II. If you’re on a budget or just want to try out the feel of a gimbal, the Neewer carbon fiber gimbal is a well-priced option.
Fast Memory Cards are a Must-Have for Wildlife Shots
I didn’t pay attention to memory cards until I started photographing wildlife and animals. My slower cards didn’t write fast enough. I’d take a burst of shots, and then I’d have to wait for the buffer to clear. It’s no good if I buy a camera that can take 10+ frames per second if my SD card can’t handle the speed. Write speed determines how fast images are saved onto the SD card. Faster write speeds generally increase the price of the SD. The Sony SF G card offers 299MB/s write speeds. But a 128GB SF G card is a bit expensive for most photographers. Many of my SD cards are 150MB/s, and these usually work fine. The Sony SF-M series TOUGH is more affordable for 128GB. SD cards continue to improve both in memory size and write speeds and prices will likely drop with time.
Try Using a Bean Bag for Stability
Photographers use bean bags to stabilize their cameras when a tripod isn’t workable. For instance, when photographing from a car or very low to ground. I wrote about using bean bags for wildlife photography in the article “How (And Why!) to Use a Camera Bean Bag for Wildlife photography”. In this article, I describe how to make your own photography bean bags, but you can also buy bean bags. The LensCoat LensSack Pro is designed to drape over a car door. A bean bag with a smaller profile is the Green Pod Camera Platform.
The Best Rain Covers to Protect Your Camera
Depending on what sort of animals or wildlife photography you’re interested in, you may find yourself standing for long periods in wet weather. Rain covers add a layer of protection to cameras and lenses in wet conditions. Make sure to buy a rain cover that is large enough to accommodate a long telephoto lens. I find rain covers cumbersome, so I generally only use them in heavy rain. For light rain, I cover my camera and lens with a moisture absorbent microfiber cloth. When I need a rain cover, I use a basic plastic covering like the Op/Tech USA Rainsleeve. If you want something more substantial, consider the Think Tank Hydrophobia.
Use a Ground Cover for Added Comfort
Getting low is sometimes essential when photographing wildlife. I carry a canvas ground cover to keep myself protected from mud and moisture. I’ll be able to photograph longer if I’m comfortable. A ground cover can be a piece of waterproof canvas or even an old yoga mat. I picked up the one I use at a local thrift store.
Carry a Headlamp
Wildlife is generally more active at dusk and dawn. This means that I spend at least some time in the dark. Even if I’ve scouted a place in daylight, I may need light to set up before dawn or get back to my car after sundown. Buy a headlamp with both a white and red light with separate buttons to activate these lights. The red light doesn’t ruin my night vision, and I don’t want to have to click through the white light to get to my red light. Some use replaceable batteries, and some are rechargeable. Take a look at the lumens and buy the brightest light you can afford. The Petzl Actik Core is a good choice. There’s also a range of Black Diamond headlamps. The Black Diamond Lite 160 is a cheaper option to start out with.
Choose the Best Backpack for Wildlife Photography Gear
A good camera backpack is an essential part of outdoor photography gear. I need a balanced bag that I can wear all day. I also want access without having to put the bag on the ground in muddy conditions. When looking for a camera bag, make sure it can accommodate the larger telephoto lens. I use Peak Design photography supplies, and I love their Everyday backpack. I use the smaller 20-litre bag (I’m a small gal), but many may prefer the larger 30-litre bag. I configure the inside of the bag so that I can put my long telephoto lens down one side. This leaves room on the other side for a smaller lens or a back-up camera body. I haven’t tried the new version 2, but when I do, I’ll let you know.
Take a Second Camera Body With a Holster
Many wildlife photographers carry two camera bodies. One with a telephoto lens and the other with a wide-angle lens. Sometimes wildlife is closer than expected, or there’s a lovely landscape to photograph while I wait for wildlife action. Its good to be prepared. To keep the second camera body handy, use a spider holster or a similar system. A spider holster clips the camera to your belt or backpack. Spider makes separate systems for DSLR and the lighter-weight mirrorless cameras. The Backpacker Kit is priced at around £100.
Wear Comfortable Clothing
Finally, comfortable clothes are an essential part of wildlife photography gear. Wildlife photographers can be anywhere from the humid rain forests to snowy mountains. Exactly what clothes you need to be comfortable depends on the weather conditions. Being comfortable ensures that you will wait patiently for the best shots. You’re not likely to wait as long if your feet are cold or if you’re uncomfortable and sweaty. At the very least, you’ll want waterproof boots. I add neoprene socks for an extra layer of insulation (NRS Hydroskin 0.5 Wetsocks). I like to wear clothing that breathes, and wicks sweat away from my body. Even in cold weather, I can build up a sweat hiking into the field, and then I stand still for long periods. I don’t want the moisture next to my skin. When photographing in cold, snowy conditions, add thermal layers and spikes for shoes.
Final Thoughts
You need specialised wildlife photography gear to make it easier to get quality images. Some of the professional camera equipment is expensive, but there are well-priced options available. The best cameras for wildlife photography focus fast and are capable of high burst rates. Add a telephoto lens, and you’re ready for action. Some of the equipment described impacts the actual shoot. These include the teleconverter, tripod, camera bean bag, gimbal, and fast SD cards. Other photography gear is essential for the wildlife photographer’s comfort (clothing, ground cover). Don’t forget to protect your camera too with a rain cover. With this photography gear and a bit of practice, you’ll be able to make fantastic wildlife images! For more information on improving your wildlife photography, see my article “12 Tips for Improving Your Wildlife Photography Composition”.
![]()
