I’m a Lightroom user, but not everyone wants to commit to an Adobe subscription package. And I can’t always get the results I want in Lightroom. So I’m always looking for a good, free photo editing program. [ExpertPhotography is supported by readers. Product links on ExpertPhotography are referral links. If you use one of these and buy something, we make a little bit of money. Need more info? See how it all works here.]
What is Darktable vs Lightroom?
Darktable is an open-source photo post-processing program. Open source means that the software is downloadable on many operating systems. This includes Windows, iOS, and Linux. I’m a Mac user, so I’m looking at the iOS version. There are several platforms listed on the Darktable website available for download. It is a free Lightroom alternative. It supports RAW files from over 400 cameras and opens a wide range of file types. And like Lightroom, it is non-destructive photo editing software. This means your original file is never changed. The software manages your photos through a module called Lighttable. And the Darkroom module lets you edit photos.
The Darktable Interface
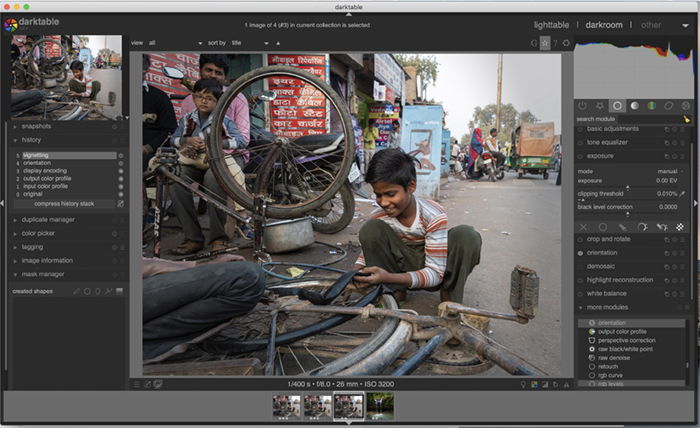
In many ways, Darktable looks and feels like Lightroom. But there are some notable differences, which we’ll discuss later in the article. The basic layout is familiar to Lightroom users. The image is shown on a central screen. And the left and right columns flank the central screen. These add functionality depending on the module. History and other functions are in the left-hand column. Processing tools and a histogram are in the right-hand column. There is also an optional filmstrip below the central screen. The filmstrip may be image thumbnails of like images or a timeline of when you took the images. I’ll focus on the Lighttable and the Darkroom modules in this review. These are alternatives to Lightroom’s Library and Develop modules. Like Lightroom, the software is divided into modules. Lighttable is functionally like Lightroom’s Library module. This is where you can import, cull, and organize your files. The Darkroom module is for image editing. Like Lightroom, you make changes using sliders to dial more or less of an effect. And there are further modules called Slideshow, Map, and Printing. These modules are also in Lightroom. Darktable includes a Tethering module. This allows you to connect your camera directly to Darktable. The image shows up immediately in the program when you press the shutter button. Lightroom also allows you to tether your camera directly to the program. But the function is embedded under the File menu rather than a standalone module.
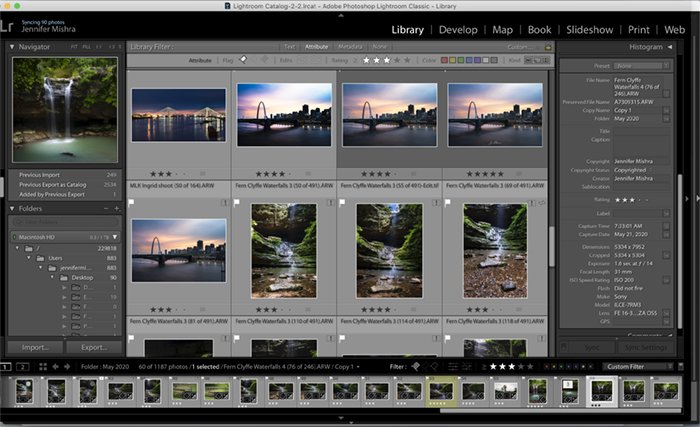
Lighttable vs Lightroom Library
In Lightroom’s library, catalogs, collections, and locations are in the left-hand column. Keywords and other metadata are in the right-hand column. In Darktable’s Library, metadata and collections are in the left-hand column. Functions like tagging, metadata editor, and export options are in the right-hand column. Importing images into Darktable is like Lightroom. There is an Import option on the top left of the Lighttable module. If importing from an SD card, you need to know exactly where your files are located.
Cataloging and Importing
Like Lightroom, Darktable only catalogs your images in the program. The files aren’t moved from where they are located on your hard drive. Lightroom allows me to define an import location. I can move the files to different hard drives or folders within the software. I haven’t yet figured out if this is possible in Lighttable. When importing from my camera’s SD card, the files remain stored on the SD card. I first had to copy my camera’s SD card files onto my hard drive and then import them using Lighttable. The import seemed like Lightroom.
Rating and Tagging
Once I imported my files, I could rate the files and add keywords (tags) and metadata as I would in Lightroom. There are hotkeys for ratings and color codings to speed up the process. I wasn’t as fast with my culling and keywording in Lighttable as in Lightroom. But this may simply be my familiarity with the software. The tools I commonly use in Lightroom seem to be available in Darktable. The tagging function seemed a bit basic. I couldn’t find a way of tagging many images at once or copying tags across images. But that’s not to say this function doesn’t exist… just that I couldn’t find it.
Showing Focus Points
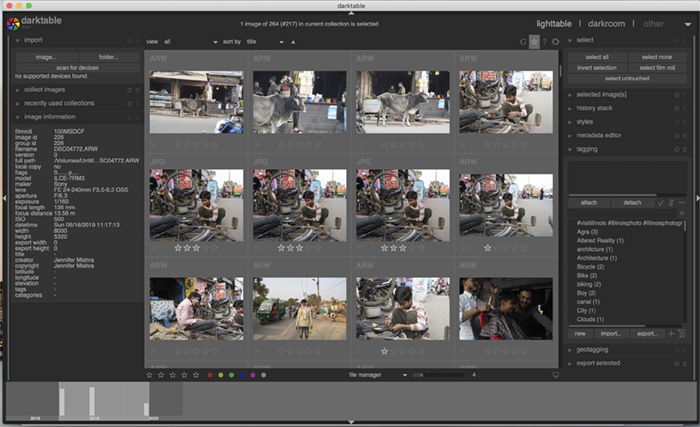
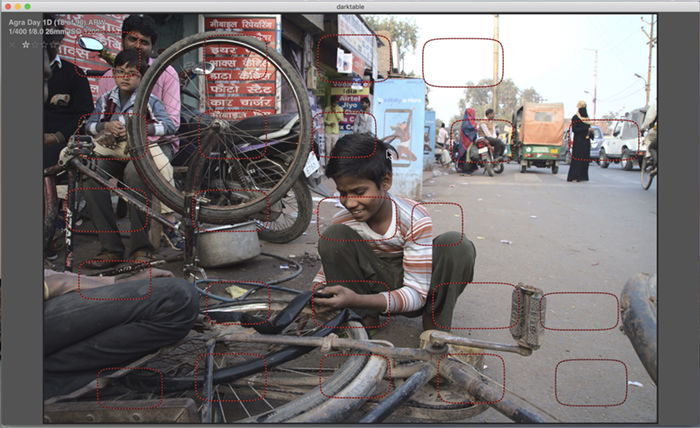
One cool feature I stumbled across in Lighttable was the ability to find focus points in your image. Pressing the “W” key allows you to see the image fullscreen. Pressing Cntl+W adds focus points. This could be really useful in deciding which images to keep. The Lighttable module seems a usable alternative to Lightroom’s Library module. Below is a screenshot of Darktable’s Lighttable screen. The parts of the image in focus are shown with a dashed red shape. Because I shot with an f/8 aperture, most of the scene is in focus.
Darktable vs Lightroom (Darkroom vs Develop Module)
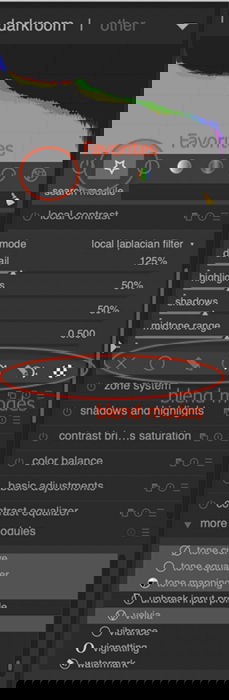
Editing tools in Darktable are called “image operation modules.” I found this term confusing, so I will use the term “tools” to refer to features that change your image. In the version I used, there were 61 tools. Commonly used tools are divided into groups designated by icons under the Histogram. The groups are Basic, Tone, Color, Correction, and Effects. The tools included in each group seem a little arbitrary. A Favorites group (star icon) lets you place commonly used tools together. This is very useful in targeting your often-used tools. There’s also a search function that lets me get to the tools faster. Many of the tools are familiar to Lightroom users. There are exposure control, white balance, tone curve, sharpening, and vignetting tools. Other tools will be familiar to Photoshop users. These include levels, color balance, high pass, liquify, and perspective correction. Finally, there are a few new tools that I didn’t recognize from either Adobe program. I had fun playing with them:
Bloom: Adds a soft light sphere over the entire image. It’s a bit like the Orton Effect. Framing: This lets you create a frame around my image. It is only available in Lightroom’s Print module. Zone System: This tool lets you edit as Ansel Adams might. You can selectively adjust nine zones of light. This tool works on color as well as black-and-white images.
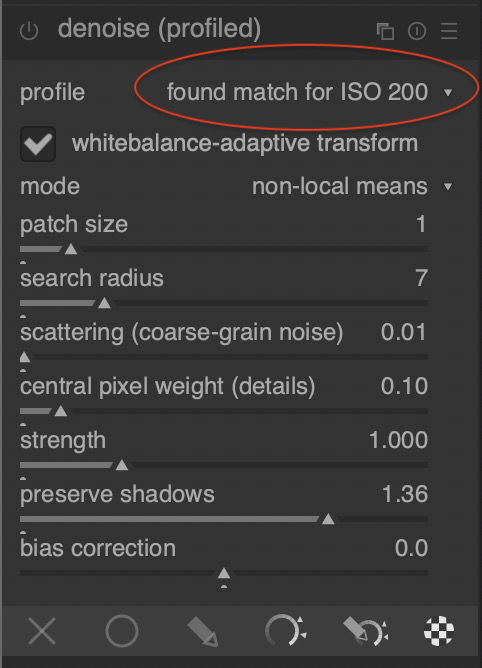
One cool tool is denoise (profiled). This tool detects which camera you use and adjusts noise based on ISO. And there are blend modes for nearly every processing tool.
Image-Edit Comparison
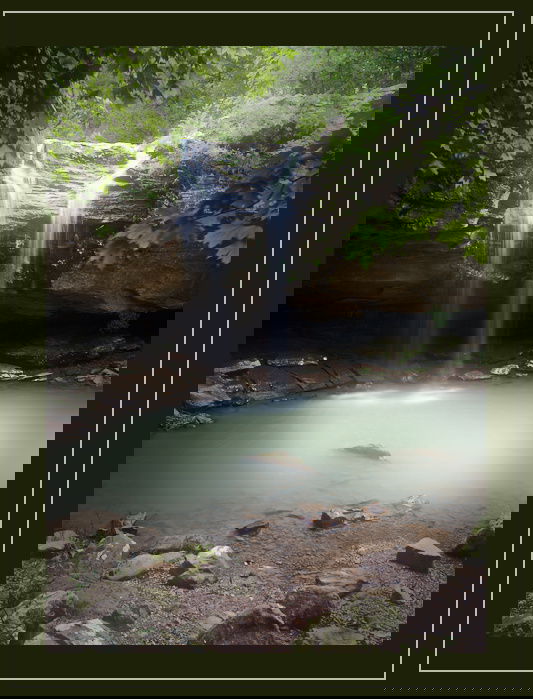
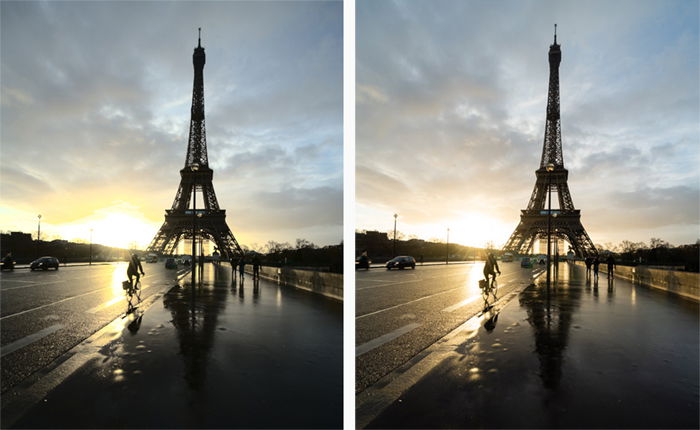
I did a few basic edits that allowed me to compare the programs’ photo editing results directly. I kept the edits basic to allow as much image-to-image comparison as possible. Here are the edits in order: This is a very rough photo edit. But it allowed me to compare the programs’ outputs. There were times Darktable tried to add other corrections. But I tried to keep the edits as fundamental as possible. Most of the differences I saw came from the white balance edit and in the highlights. Darktable has a highlight reconstruction tool. This seemed to fix the blown-out highlights better than lowering highlights. Darkroom is a viable alternative to Lightroom’s Develop module.
Darktable Usability Issues
There were a lot of things I liked about Darktable. Unfortunately, I did have some issues with Darktable repeatedly crashing. This marred an otherwise pleasant discovery. I found Darktable easy to use, but I had to refer to the user manual quite a bit for help. There are a lot of functions you can access with keyboard shortcuts. But you’re not going to stumble upon these. You need to know what they are. The manual is very easy to read. But the search function went to a 404 screen. So this limited usability. So I still need help figuring out how to reject an image during the culling process.
Darktable’s Sensitive Sliders
Darktable and Lightroom have a lot in common. You drag sliders left and right to increase or decrease the amount of the effect. But sometimes, the values on the Darktable sliders didn’t seem to make sense, or they covered too much ground. It wasn’t easy if I only wanted to tweak an effect by a point or two. The Darkroom slider is very sensitive. It was easy to over-adjust or under-adjust a setting. I missed the ability to enter a value directly rather than use the slider, like in Lightroom. This was frustrating when I wanted, for instance, an exact white balance.
History Panel, Undo Command, and Rendering
The History panel befuddled me. Like Lightroom, Darktable is a non-destructive editor. At any point, you should be able to return to a point in the History panel and start again. But sometimes, I couldn’t bypass the steps I wanted to erase. Nor could I directly delete them. I eventually figured out how to toggle effects on and off in the active module group. Plus, the Undo command seemed to have a mind of its own. Sometimes it didn’t seem to work. Other times it went back in unpredictable partial steps. I’m sure most, if not all, of these usability issues would disappear with more time in the program. Finally, I found Darktable took a while to render my edits. I upgraded my Mac in response to Lightroom lag, but I still had to wait to see the change… Two things might be confusing when using the tools in the Darkroom module—tool organization and choices.
Tool Organization
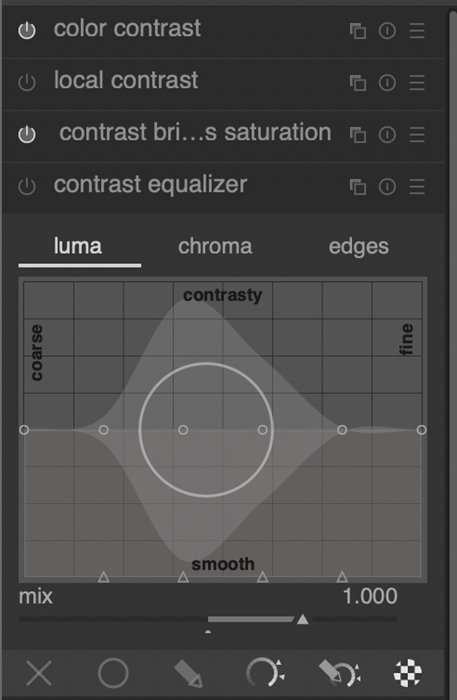
First, the tools are organized in unexpected ways. For instance, saturation is not located in the same place as vibrance. Also, different tools can control a similar edit. For instance, Darkroom gives me four tools to control contrast. It seems to take this common post-processing edit to a new level. Contrast options are embedded under other sliders, but let’s focus on these four: It’s a different way of thinking about contrast. I use many sliders in Lightroom to control contrast, but most are in the Basic panel. In Darktable, an underlying theory is probably determining which tools should be together. But I wasn’t always able to predict where I would find a tool. So this negatively impacts usability. But I’d probably get used to the tool organization.
Too Much Choice in Controls
Secondly, Darkroom gives you a lot of control. I mean a lot of control. This is not a negative for an advanced photographer. But for a beginner photographer, the amount of control may be overwhelming. I mentioned the cool tool denoise (profiled) tool earlier. Three other tools adjust noise:
Denoise (non-local means) Denoise (bilateral filter) Raw Denoise
For each, there are many options. In denoise (profiled), seven sliders are beside the sensor/ISO profile list. But if I wanted to clean my photo, I wouldn’t know where to start with all these choices. This is a good example of having too many choices. Because I couldn’t decide among all the options, I chose to make no change.
Missing and Hard-to-Use Tools
A few tools are missing in Darktable that are included in Lightroom. It may be that I have yet to find the tools or know how to use them. So this may be more of a usability issue on my part. I couldn’t find a tool like the HSL panel in Lightroom. So I don’t know how to alter colors selectively. I also struggled with the mask manager. This is equal to the radial filter and gradient tools in Lightroom. I use these tools in Lightroom a lot for dodging and burning. There is also a Spot Removal tool, but I have not yet figured out how to use it. Some tools weren’t very user-friendly, even with a good user manual.
Is Darktable as Good as Lightroom?
Let’s get to the key question I set out to answer in this article. Is Darktable as good as Lightroom? The short answer is yes. In fact, Darktable may be better than Lightroom. It has more tools and more precise manipulations of the elements of those tools. Longtime Lightroom users may wonder why Adobe hasn’t included some of these features. I’d vote for Adobe to immediately add the denoise (profiled) and framing options! The processing tools are not always intuitive. But if you work with this software for a while, you’ll figure out where things are.
Is Darktable as Easy to Use as Lightroom?
This is a different question. Darktable has a learning curve. There are not as many video tutorials to help teach you how to use the program. The user manual is easy to understand, but you may need some post-processing background. Many of the tools are broken down into parts. And you can control these independently. This is great if you’re an advanced photographer. But it was easy for me to go overboard and make a poorly edited photo. So Darktable may not be the best tool for a beginning photographer.
Conclusion
Darktable is a good Lightroom alternative for more advanced users. If you don’t want to buy into Adobe’s subscription model or use Linux, this program may also be for you. The bottom line is that this powerful program has a lot of bang for the buck… especially since the program is free! In comparing Darktable vs Lightroom, the interface is similar. Both have a file management system, and both include image processing tools. Darktable comes out ahead in the number of tools available. But with more functionality comes more complexity. If you’re the type who reads manuals to learn how to use a program, Darktable is for you. But for intuitive users like myself, Darktable may be a bit more frustrating at first. The tools are there. It’s just a matter of learning how to use them!