Using Long Exposure for Water Photography Settings
Long exposure is one of the most common techniques applied to moving water. In fact, you can use it with any kind of water with different results. If the water is restless and messy, like the sea, the final result could look like fog. If the water is relatively calm with a small swell (river or lake), a long exposure will turn it into a smooth mirror-like surface. To determine the shutter speed, you first need to understand what kind of effect you want to achieve. The actual values depend on the subject of photography and its speed. Typically, long exposure is anywhere from 1 second to infinity. Sometimes, exposures longer than 30 seconds are called ultra-long exposure. This is to emphasise the effect. But when people say that a photo is long exposure, they usually mean at least 5 seconds.
How to Freeze Motion in Water Photography
There are cases where you’ll want to freeze the motion of water. This could be wave photography or waterfall photography. Or even splashes (in nature or in the studio) or many other cases. There’s no one size fits all when it comes to shutter speed here. It depends greatly on the speed of water and on your focal length, so it’s going to be different each time. In general, the faster the shutter speed, the better. A rough guideline here would be to never go below 1/100 sec or even better 1/200 sec. There is a whole range on how exactly you want to freeze the water. Sometimes you’d want to have all water drops to be sharp and well formed. In other cases, you could try to make water trails – just like star trails made of stars. The shutter speed is still pretty fast and you need to experiment. For instance, 1/200 makes the wave frozen, while 1/30 smooths each particle into a trail. Same applies to rain – try different exposures to control the length of each drop trail.
How to Keep the Water’s Fluidity in Photos
Fluidity is important when it comes to water photography, for obvious reasons. And keeping it and showing it becomes one of the main purposes or even the Holy Grail of water photography. In fact, these effects related to flowing water cover all shutter speeds. From frozen to completely smoothed out states. And the exposure you choose dictates the amount of smoothness or busyness. A great value to start experiments is 1/2 seconds and then go from there.
Water Photography Settings Overview
The shutter speed ranges from ultra-long exposure to ultra-fast. And it’s the desired final look of the photo that determines it. The aperture does not have any special effects when it comes to water. As for any other landscape, open aperture creates a shallow depth of field and blurs part of the image. As for the ISO, sometimes raising it is the only way to freeze the wave at the exact amount of movement in the scene. Accept this fact and manipulate it as needed.
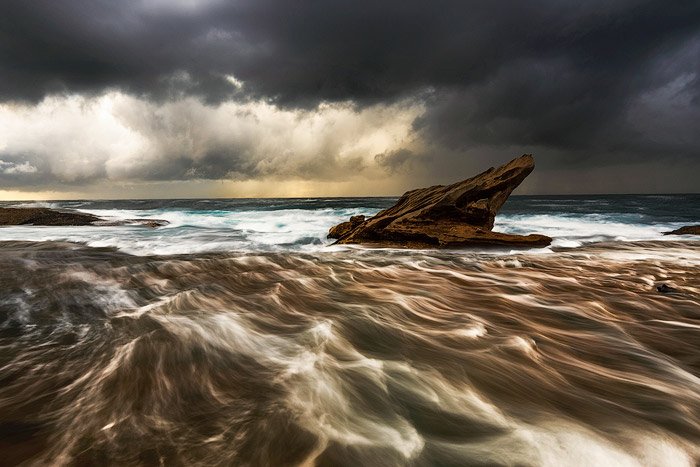
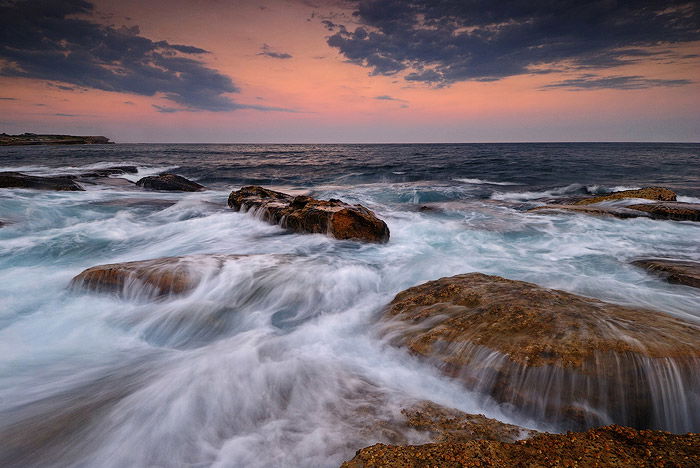
Settings for Shooting Flowing Water
I’ll start with the most exciting scene, the flowing water. It could be a seascape or a riverscape or anything. The good value to start experiments at is 1/2 a second but it depends on the water speed. For instance, if you are shooting a receding wave at the beach, the water is 3 times slower than an approaching wave. So, for the receding water I’d be trying 1/2 – 1 second. For the incoming waves, it could even be 1/8th of a second. This is to capture some small waterfalls when the wave crashes over the cliff or the rock. There is a trap here – the amount of light you are getting. When shooting before sunrise or during an overcast day it’s easy to manipulate the shutter speed with the aperture. But what do you do if the Sun is beaming and instead of half a second you are getting 1/50th of a second? The answer is ND filters and polarizing filters. The polarizer will remove all the flares and messy reflections and darken the shot. The ND filter will just darken the shot.
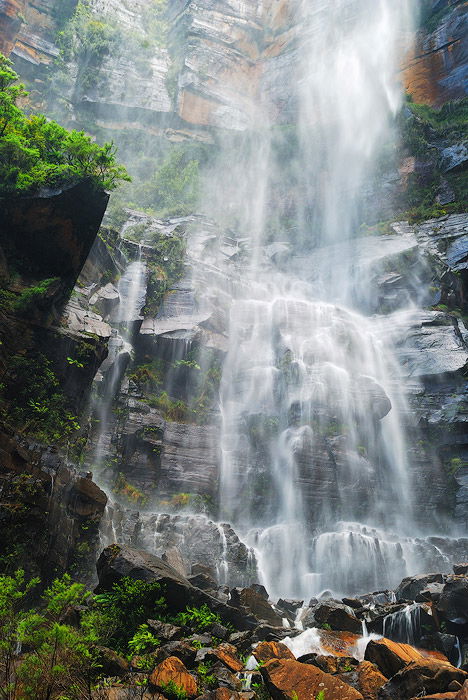
Settings for Waterfall Photography
Waterfall photography is no different from the general flowing water idea. But there is one issue. For some reason, people tend to use ultra-long exposures for the waterfalls. The beauty of waterfalls is, obviously, the falling water. The textures it creates, the splashes it makes, the powerful flow as it is. So why turn it into a muddy featureless piece of fog? To me, waterfall photography requires even more precise exposure measurements. This is to accommodate all textures while keeping the power of the waterfall. A very fast shot like 1/100 of a second makes it all too busy. But up to 1/4 or 1/8 makes it so much better than a 10 second exposure. My best advice is to capture a lot of frames with different shutter speeds and compare them on the large screen. Also, if the waterfall is high enough to “swag”, shoot many frames at the same exposure. Then combine them in Photoshop to add more water to it.
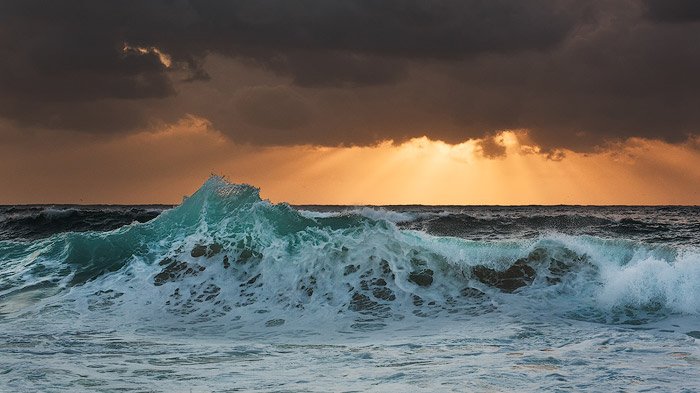
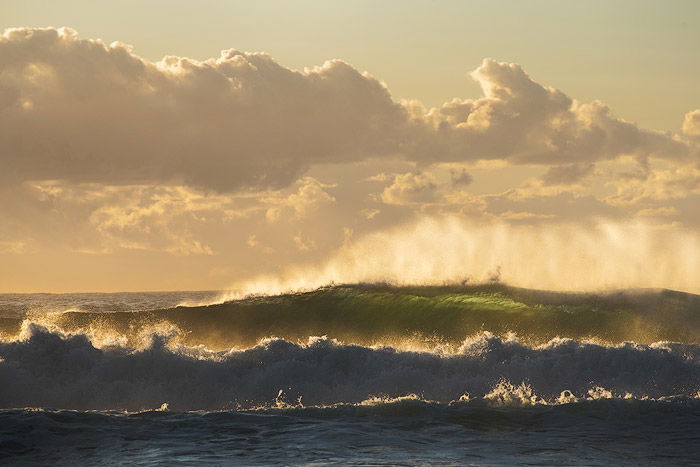
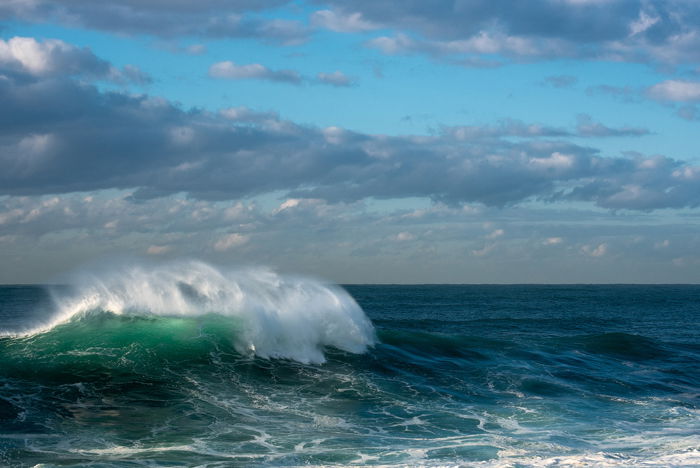
Settings for Shooting Waves
To shoot crashing waves, you need to be standing at a distance with telephoto zoomed in. Some pro photographers take it to the next level and photograph the waves right at the beach end. But it’s dangerous until you have some experience. For the big waves, please choose a position where you are 100% safe. Look around to make sure that the rocks/sand around you are dry. And you should pick the lowest vantage point you can. This way the waves look bigger and more powerful. There is another way – to shoot the waves right in the middle of the action. You need camera housing for that, which costs more than your camera does. Only for pros and dedicated enthusiasts! The general rule says that larger waves need faster shutter speed. The good starting point is 1/250 of a second. If the wave is larger than 20% of the photo, try 1/500. You can’t get it wrong with 1/800 or 1/1000 if you can go that high. Raise ISO to accommodate these shutter speeds. Especially when the wave takes up more than 50% of the frame.
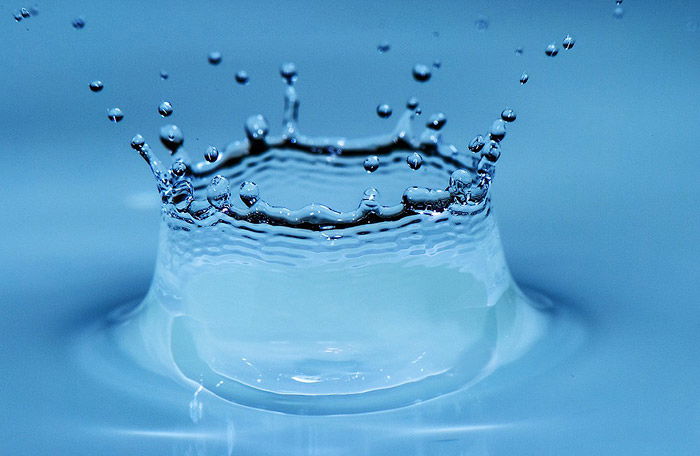
Settings for Shooting Splashes in a Studio
Some time ago splashes photography was trendy. There are many variations on how to do it and what end results you can get. Sometimes it can be just a single waterdrop making a splash. Sometimes stock photographers will drop a whole fruit into the aquarium. Other options include colouring and various special effects. The easiest way to do splash photography is to set aperture to at least f/8. Go up to f/16. Raise ISO as required to make a really fast shutter speed. You need at least 1/200 but I would start with 1/800 to be sure. Experiment a little because it also depends on your focal range.
Conclusion
Water is an ever-changing photography subject. It can be slow or fast, healing or killing, sparkling or dirty, still or stormy. It can be anything and thus the methods to photograph it differs each time. You’ve got to be flexible and adjust based on current conditions . Changing just this single parameter changes the whole look and feel of the photo. Always make several shots of the same scene with different shutter speeds. You can examine the shots later on a large screen.


title: “Best Water Photography Settings For Movement Mist Waves” ShowToc: true date: “2023-01-10” author: “Mai Lawrence”
Using Long Exposure for Water Photography Settings
Long exposure is one of the most common techniques applied to moving water. In fact, you can use it with any kind of water with different results. If the water is restless and messy, like the sea, the final result could look like fog. If the water is relatively calm with a small swell (river or lake), a long exposure will turn it into a smooth mirror-like surface. To determine the shutter speed, you first need to understand what kind of effect you want to achieve. The actual values depend on the subject of photography and its speed. Typically, long exposure is anywhere from 1 second to infinity. Sometimes, exposures longer than 30 seconds are called ultra-long exposure. This is to emphasise the effect. But when people say that a photo is long exposure, they usually mean at least 5 seconds.
How to Freeze Motion in Water Photography
There are cases where you’ll want to freeze the motion of water. This could be wave photography or waterfall photography. Or even splashes (in nature or in the studio) or many other cases. There’s no one size fits all when it comes to shutter speed here. It depends greatly on the speed of water and on your focal length, so it’s going to be different each time. In general, the faster the shutter speed, the better. A rough guideline here would be to never go below 1/100 sec or even better 1/200 sec. There is a whole range on how exactly you want to freeze the water. Sometimes you’d want to have all water drops to be sharp and well formed. In other cases, you could try to make water trails – just like star trails made of stars. The shutter speed is still pretty fast and you need to experiment. For instance, 1/200 makes the wave frozen, while 1/30 smooths each particle into a trail. Same applies to rain – try different exposures to control the length of each drop trail.
How to Keep the Water’s Fluidity in Photos
Fluidity is important when it comes to water photography, for obvious reasons. And keeping it and showing it becomes one of the main purposes or even the Holy Grail of water photography. In fact, these effects related to flowing water cover all shutter speeds. From frozen to completely smoothed out states. And the exposure you choose dictates the amount of smoothness or busyness. A great value to start experiments is 1/2 seconds and then go from there.
Water Photography Settings Overview
The shutter speed ranges from ultra-long exposure to ultra-fast. And it’s the desired final look of the photo that determines it. The aperture does not have any special effects when it comes to water. As for any other landscape, open aperture creates a shallow depth of field and blurs part of the image. As for the ISO, sometimes raising it is the only way to freeze the wave at the exact amount of movement in the scene. Accept this fact and manipulate it as needed.
Settings for Shooting Flowing Water
I’ll start with the most exciting scene, the flowing water. It could be a seascape or a riverscape or anything. The good value to start experiments at is 1/2 a second but it depends on the water speed. For instance, if you are shooting a receding wave at the beach, the water is 3 times slower than an approaching wave. So, for the receding water I’d be trying 1/2 – 1 second. For the incoming waves, it could even be 1/8th of a second. This is to capture some small waterfalls when the wave crashes over the cliff or the rock. There is a trap here – the amount of light you are getting. When shooting before sunrise or during an overcast day it’s easy to manipulate the shutter speed with the aperture. But what do you do if the Sun is beaming and instead of half a second you are getting 1/50th of a second? The answer is ND filters and polarizing filters. The polarizer will remove all the flares and messy reflections and darken the shot. The ND filter will just darken the shot.
Settings for Waterfall Photography
Waterfall photography is no different from the general flowing water idea. But there is one issue. For some reason, people tend to use ultra-long exposures for the waterfalls. The beauty of waterfalls is, obviously, the falling water. The textures it creates, the splashes it makes, the powerful flow as it is. So why turn it into a muddy featureless piece of fog? To me, waterfall photography requires even more precise exposure measurements. This is to accommodate all textures while keeping the power of the waterfall. A very fast shot like 1/100 of a second makes it all too busy. But up to 1/4 or 1/8 makes it so much better than a 10 second exposure. My best advice is to capture a lot of frames with different shutter speeds and compare them on the large screen. Also, if the waterfall is high enough to “swag”, shoot many frames at the same exposure. Then combine them in Photoshop to add more water to it.
Settings for Shooting Waves
To shoot crashing waves, you need to be standing at a distance with telephoto zoomed in. Some pro photographers take it to the next level and photograph the waves right at the beach end. But it’s dangerous until you have some experience. For the big waves, please choose a position where you are 100% safe. Look around to make sure that the rocks/sand around you are dry. And you should pick the lowest vantage point you can. This way the waves look bigger and more powerful. There is another way – to shoot the waves right in the middle of the action. You need camera housing for that, which costs more than your camera does. Only for pros and dedicated enthusiasts! The general rule says that larger waves need faster shutter speed. The good starting point is 1/250 of a second. If the wave is larger than 20% of the photo, try 1/500. You can’t get it wrong with 1/800 or 1/1000 if you can go that high. Raise ISO to accommodate these shutter speeds. Especially when the wave takes up more than 50% of the frame.
Settings for Shooting Splashes in a Studio
Some time ago splashes photography was trendy. There are many variations on how to do it and what end results you can get. Sometimes it can be just a single waterdrop making a splash. Sometimes stock photographers will drop a whole fruit into the aquarium. Other options include colouring and various special effects. The easiest way to do splash photography is to set aperture to at least f/8. Go up to f/16. Raise ISO as required to make a really fast shutter speed. You need at least 1/200 but I would start with 1/800 to be sure. Experiment a little because it also depends on your focal range.
Conclusion
Water is an ever-changing photography subject. It can be slow or fast, healing or killing, sparkling or dirty, still or stormy. It can be anything and thus the methods to photograph it differs each time. You’ve got to be flexible and adjust based on current conditions . Changing just this single parameter changes the whole look and feel of the photo. Always make several shots of the same scene with different shutter speeds. You can examine the shots later on a large screen.
