People say that the best camera is the one you have with you. In today’s world, this well-known motto translates to ‘learn to use your camera phone‘. Modern smartphones like the iPhone 8 are, by far, the most common cameras out there. Here’s how to use your iPhone 8 camera for awesome smartphone photos. There are two shortcuts to quickly open the iPhone camera app. Neither is specific to the iPhone 8. Every iPhone with a recent version of iOS will work the same.
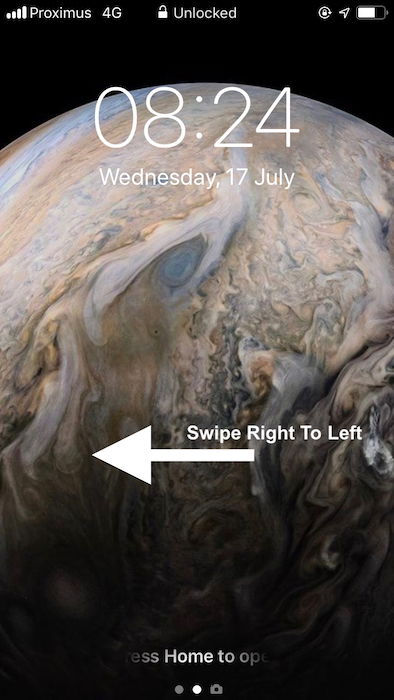
Method 1: Open Camera App With Locked iPhone
If your iPhone is locked, press the power button once. When the screen lights up, swipe from right to left to access the camera.
Quicker done than said.
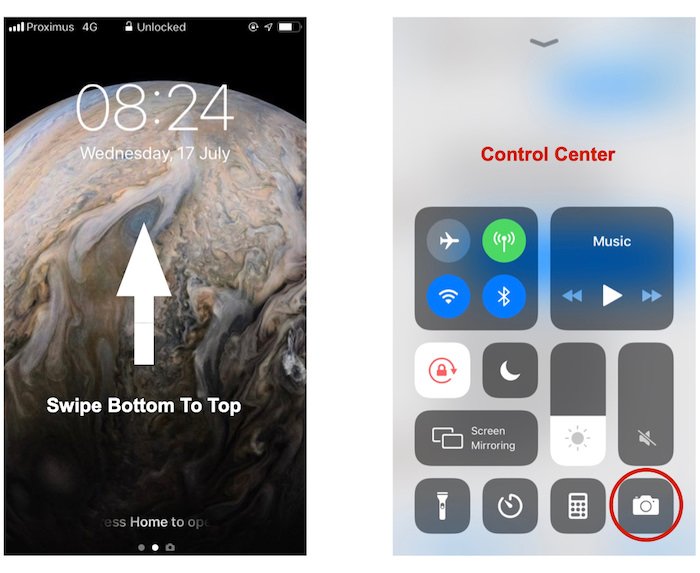
Method 2: Open Camera App From The Control Center
Whether you are using your iPhone or it’s locked, swipe from the bottom up to reveal the Control Center. Now tap the camera icon.
A Fast Alternative to Method 1
If you too use Touch ID to unlock your iPhone, you will never touch the power button to wake the phone. This is because Touch ID is lighting fast. Unlock the phone via Touch ID, press the home button to jump on the first “home” screen and tap on the Camera app icon.
For this method to work best, make sure the Camera app icon is the first icon on the top left corner of the “home” screen.
9. Select a Specific Shooting Mode With 3D Touch
The screen of your iPhone 8 is sensitive to pressure. Tap&Hold “hard” on the Camera App icon and a menu will pop up. From there you can choose:
Take a Selfie, Record a Video, Scan a QR code, Take Photo.
Another interesting way to access the Camera app is to ask Siri. For this, you need to enable Siri in the Settings Menu. To access Siri, either keep pressing the Home button for few seconds or say “Ehi Siri” out loud. When using Siri to pick a shooting mode, you have more possibilities with respect to the 3d Touch. You can ask Siri things like:
take a photo take a video, take a slow-motion video, take a selfie, take a square photo.
Siri will then open the Camera App with the selected shooting mode. What Siri won’t do is take the photo for you. You still need to do that by yourself.
7: Three Simple Ways to Take a Photo Without Touching Your Phone
Being able to take a photo without touching your phone ensures sharp and motion blur-free images. Tapping the shutter icon means you need to see the screen. Pressing the volume buttons on the phone may introduce camera shake.
Method 1: Use The Self-Timer
As with all compact cameras, the old trick to use the self-timer works well on the iPhone too. On the iPhone 8 camera, you can set 3-second or 10-second delays, before taking the photo. A countdown will be visible on the screen. People in front of the phone will see the flash blink during the countdown. With the self-timer, your iPhone will shoot a burst of 10 photos. For better results stay still a bit longer after the flash stops blinking. You can later select the best images from the burst.
Method 2: Use Your Earphones as a Remote Shutter Release
The downside of using the self-timer is that you have little control over the timing. If you want to snap the photo at a precise moment without touching the phone, plug your earphones in. With the camera app open, pressing on the earphone volume button will fire the shutter.
Method 3: Use Bluetooth Earphone or Apple Watch For More Flexibility.
The earphones’ cable is not that long, so you need to stay close to your iPhone. If you want taking selfies from far or use your phone as a photo trap for birds, a Bluetooth earphone is what you need. To trigger the shutter, press the volume button on your paired BT earphone. If you have an Apple Watch, you can also fire the shutter from there. It is worth noticing that you can also use your earphones as a remote shutter while listening to music.
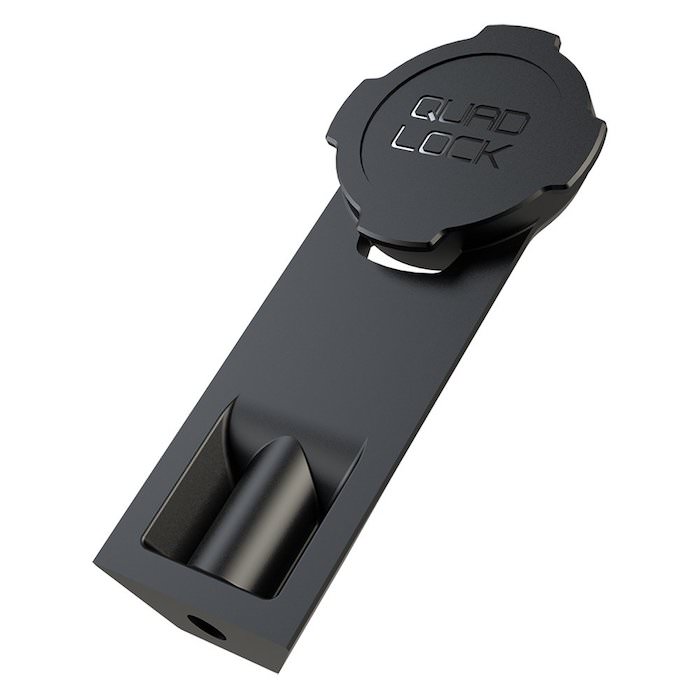
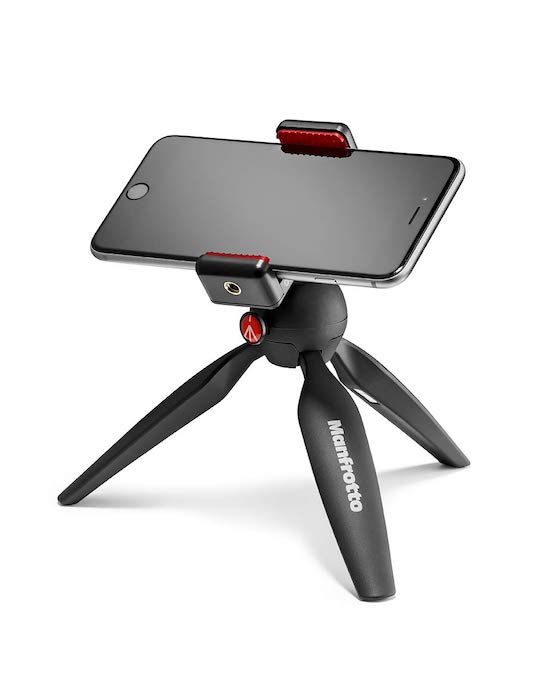
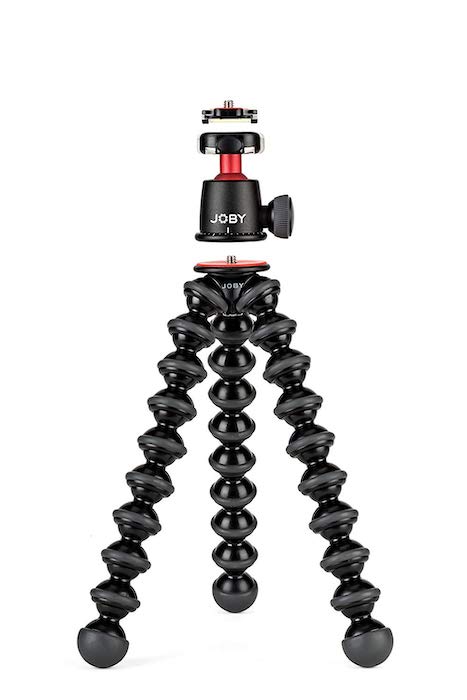
6: Get a Tripod For Sharpest Images
Of course, to be able to shoot without touching the phone, you should place it somewhere. The best and most obvious solution is to mount your iPhone on a tripod. The market offers plenty of solutions to mount the phone on your current tripod, at all prices. One that I particularly like, if you have a QuadLock case, is the QuadLock tripod mount. It allows you to quickly change between portrait to landscape orientation. If you don’t own a tripod already, or you want a very portable one, you can take a table tripod. Some selfie sticks also work as a basic tripod. Unfortunately, they are too unstable for anything serious. One of the most flexible solutions is the Gorillapod. It is a small, lightweight tripod that can wrap around things. You can use it almost anywhere. Buy a high-end version like the Gorillapod 3K, and you will be able to use it also with your standard camera.
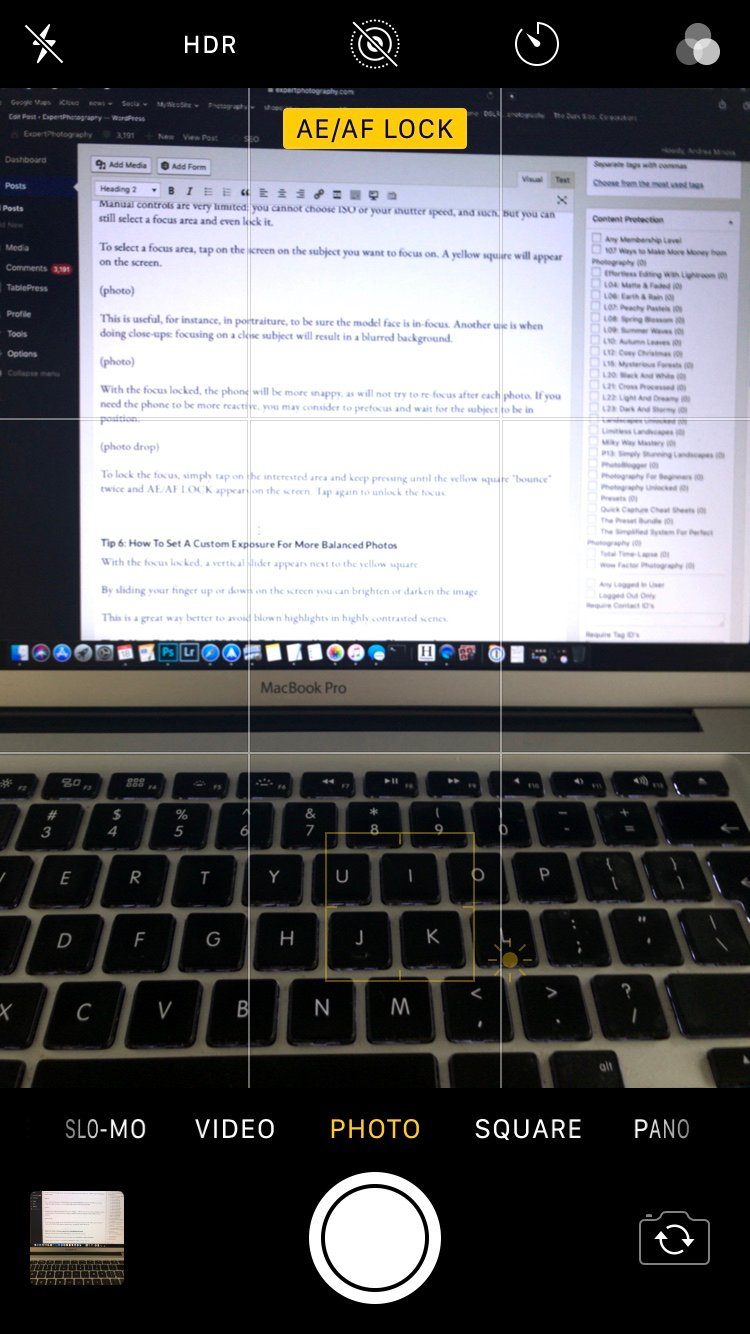
5. How To Chose and Lock the Focus Point for Sharper Details and Creative Effects
The Apple Camera App is not the most complete camera app out there. Manual controls are very limited. You cannot choose ISO or your shutter speed. But you can still select a focus area and even lock it. To select a focus area, tap on the screen on the subject you want to focus on. A yellow square will appear on the screen. This is useful, for instance, in portraiture, to be sure the model face is in-focus. Another use is when doing close-ups. Focusing on a close subject will result in a blurred background. For more creative effects, you can throw out of focus your entire image. First, lock the focus on a close object, then reframe on a more distant scene. With the focus locked, the phone will be more snappy. It will not try to re-focus after each photo. If you need the phone to be more reactive, you may consider to prefocus and wait for the subject to be in position. To lock the focus, tap on the interesting area and keep pressing until the yellow square ‘bounces’ twice and AE/AF LOCK appears on the screen. Tap again to unlock the focus.
4. How To Set a Custom Exposure for More Balanced Photos
When you select a focus area, whether you lock focus or not, you are also exposing for that area. To alter the exposure, so as to darken or brighten the image, you must swipe your finger up or down.
When you swipe, a cursor appears next to the yellow square. This shows you how much you are over- or under-exposing. This is a great way to avoid blown highlights in highly contrasted scenes.
3. How to Use the HDR Mode to Improve Your Landscape Photography
The HDR mode is on by default on your iPhone 8. To disable it, you have to do so from the Camera Settings. Older iPhone owners can toggle the HDR mode between Auto, On and Off directly in the Camera App. With the HDR mode on, the phone will take a series of images using different exposure settings. Then, it will merge them together in a final image displaying a greater dynamic range.
This is a great mode to improve the quality of landscape images. Use this mode with sunsets and other high-contrast scenes. There are some situations, though, where you don’t want to use the HDR mode, like for silhouettes. Also, the blending of the different images with fast-moving subjects may result in some artifacts. On-screen, the difference between an HDR image and a single exposure may not be huge. The HDR one, though, will be much easier to edit and, ultimately, will give better results.
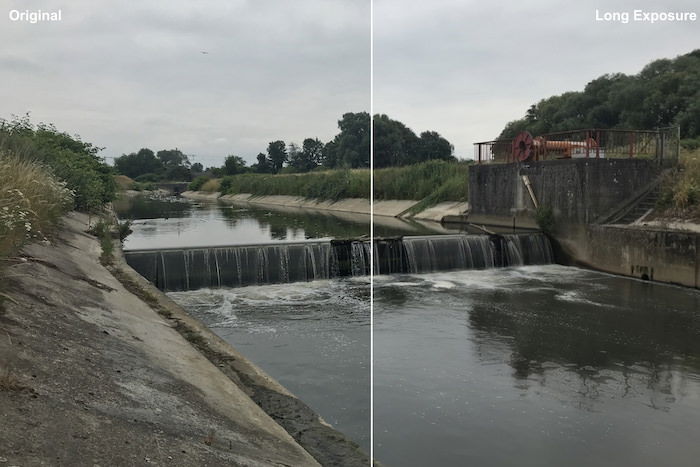
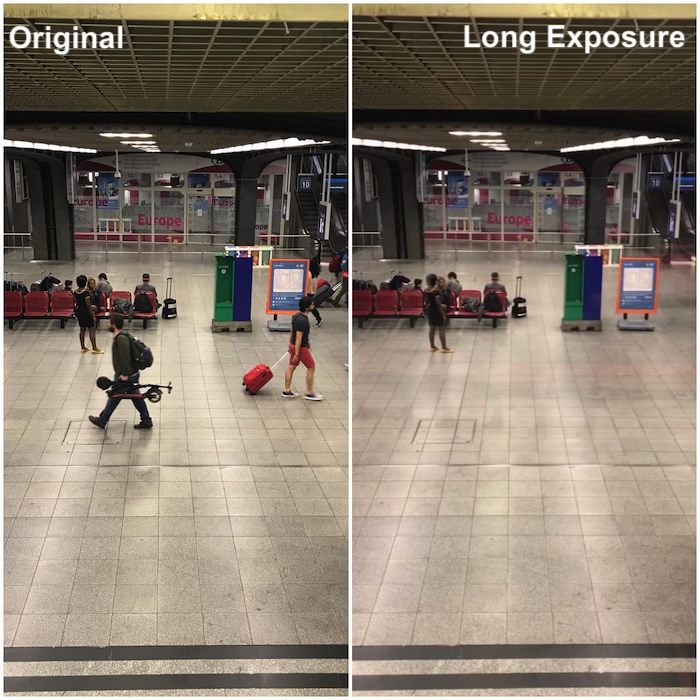
2. How to Use Live Mode to Create Long Exposure
Do you want to create long exposures straight from your iPhone, without a dedicated app or a tripod? Here is the solution. Turn on the live mode for your photo in the Camera App. In this mode, your iPhone will shoot a 3-second video (1.5 sec before actually taking the photo, and 1.5 after that). This results in a “living” photo. Take the photo. The word Live will appear on the screen. Try to stay as still as possible until the word Live disappears from the screen. In the Photo App, visualize the live image and swipe from bottom to top. Three Effects will become visible.
Loop: the recording is played in a loop, creating a clip repeating itself. Bounce: the recording is played forward till the end, and then backward from the end to the beginning. Long exposure: this is what we were looking for.
By selecting the Long Exposure Effect, all the frames are averaged together. The resulting image mimics a true long exposure, with nice results.
This mode is also useful to remove passers-by from crowded places or to create nice trails. For better results, if you plan to use the long exposure effect, have the phone on a tripod. Use your earphones to remotely fire the shutter.
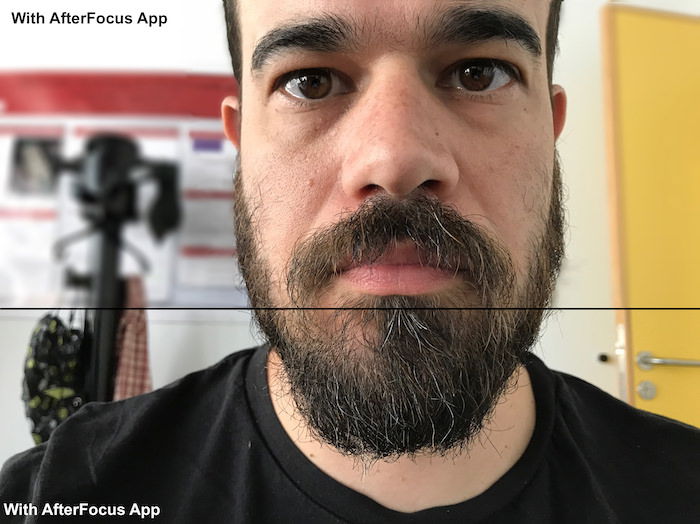
9. Make Use of the iPhone 8 Plus Portrait Mode For Better Portraits
In portraiture, it is important to have a good separation between the model and the background. Traditionally, we would shoot with a shallow depth of field. This way the model will be in focus while the background will result blurred. With the iPhone, you could get this effect by locking the focus on your subject and going up close to him. Unfortunately, single cameras iPhones have wide-angle lenses. Using short focal lengths from up-close may distort your model’s face in awkward ways. iPhones with a double camera (iPhone 7 Plus, iPhone 8 Plus, etc.) can solve this problem. When taking a portrait with this mode, the software will use the telephoto lens to get the actual image. The wide-angle lens is used to get subject-to-background distance and other parameters. That data will create a nine-layer depth map, to blur the background simulating the bokeh. If you have an iPhone 8, you will have a single camera and you will not have the Portrait Mode. You must rely on apps such as AfterFocus. These apps allow you to digitally blur areas on your images.
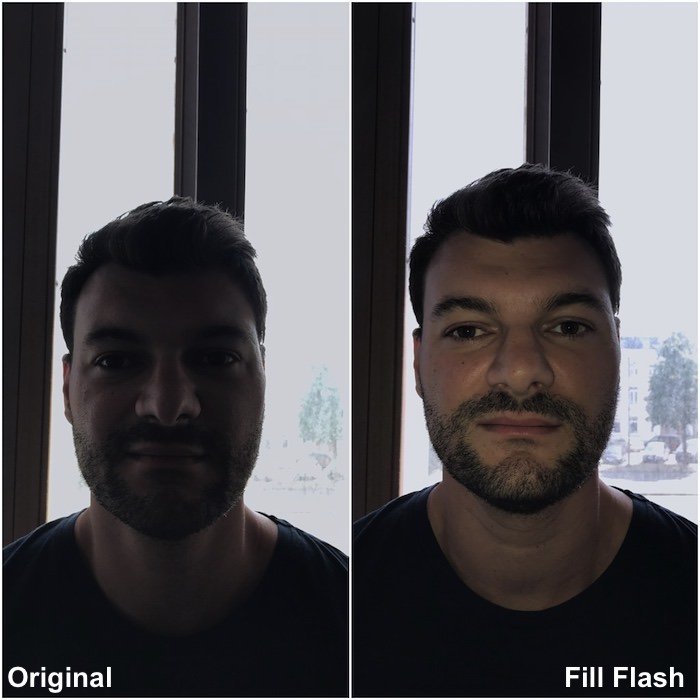
Bonus Tip: Use the Fill-Flash When Shooting Against the Light
Shooting against the light creates high-contrast images, with the subject underexposed. In these situations, the HDR mode can help, but will not do miracles. When shooting against the light, use the flash as a fill light. This will lift the shadows, thus balancing the exposure.
Because the led flash is rather weak, you have to be close. This technique won’t work miracles. But it will make your image easier to edit.
Conclusion
Smartphone photography is now a reality. Everyone can do it and it is a lot of fun to experiment with your phone capabilities. Now that you know everything about the iPhone Camera app, you are ready to challenge yourself. Don’t be surprised if you end up taking photos worth printing with your iPhone. Check out our post on how to use Camera+ App for perfect iPhone photos next!


title: “9 Iphone 8 Camera Tips To Make The Most Of Your Camera” ShowToc: true date: “2023-02-25” author: “Luis Wilfong”
People say that the best camera is the one you have with you. In today’s world, this well-known motto translates to ‘learn to use your camera phone‘. Modern smartphones like the iPhone 8 are, by far, the most common cameras out there. Here’s how to use your iPhone 8 camera for awesome smartphone photos. There are two shortcuts to quickly open the iPhone camera app. Neither is specific to the iPhone 8. Every iPhone with a recent version of iOS will work the same.
Method 1: Open Camera App With Locked iPhone
If your iPhone is locked, press the power button once. When the screen lights up, swipe from right to left to access the camera.
Quicker done than said.
Method 2: Open Camera App From The Control Center
Whether you are using your iPhone or it’s locked, swipe from the bottom up to reveal the Control Center. Now tap the camera icon.
A Fast Alternative to Method 1
If you too use Touch ID to unlock your iPhone, you will never touch the power button to wake the phone. This is because Touch ID is lighting fast. Unlock the phone via Touch ID, press the home button to jump on the first “home” screen and tap on the Camera app icon.
For this method to work best, make sure the Camera app icon is the first icon on the top left corner of the “home” screen.
9. Select a Specific Shooting Mode With 3D Touch
The screen of your iPhone 8 is sensitive to pressure. Tap&Hold “hard” on the Camera App icon and a menu will pop up. From there you can choose:
Take a Selfie, Record a Video, Scan a QR code, Take Photo.
Another interesting way to access the Camera app is to ask Siri. For this, you need to enable Siri in the Settings Menu. To access Siri, either keep pressing the Home button for few seconds or say “Ehi Siri” out loud. When using Siri to pick a shooting mode, you have more possibilities with respect to the 3d Touch. You can ask Siri things like:
take a photo take a video, take a slow-motion video, take a selfie, take a square photo.
Siri will then open the Camera App with the selected shooting mode. What Siri won’t do is take the photo for you. You still need to do that by yourself.
7: Three Simple Ways to Take a Photo Without Touching Your Phone
Being able to take a photo without touching your phone ensures sharp and motion blur-free images. Tapping the shutter icon means you need to see the screen. Pressing the volume buttons on the phone may introduce camera shake.
Method 1: Use The Self-Timer
As with all compact cameras, the old trick to use the self-timer works well on the iPhone too. On the iPhone 8 camera, you can set 3-second or 10-second delays, before taking the photo. A countdown will be visible on the screen. People in front of the phone will see the flash blink during the countdown. With the self-timer, your iPhone will shoot a burst of 10 photos. For better results stay still a bit longer after the flash stops blinking. You can later select the best images from the burst.
Method 2: Use Your Earphones as a Remote Shutter Release
The downside of using the self-timer is that you have little control over the timing. If you want to snap the photo at a precise moment without touching the phone, plug your earphones in. With the camera app open, pressing on the earphone volume button will fire the shutter.
Method 3: Use Bluetooth Earphone or Apple Watch For More Flexibility.
The earphones’ cable is not that long, so you need to stay close to your iPhone. If you want taking selfies from far or use your phone as a photo trap for birds, a Bluetooth earphone is what you need. To trigger the shutter, press the volume button on your paired BT earphone. If you have an Apple Watch, you can also fire the shutter from there. It is worth noticing that you can also use your earphones as a remote shutter while listening to music.
6: Get a Tripod For Sharpest Images
Of course, to be able to shoot without touching the phone, you should place it somewhere. The best and most obvious solution is to mount your iPhone on a tripod. The market offers plenty of solutions to mount the phone on your current tripod, at all prices. One that I particularly like, if you have a QuadLock case, is the QuadLock tripod mount. It allows you to quickly change between portrait to landscape orientation. If you don’t own a tripod already, or you want a very portable one, you can take a table tripod. Some selfie sticks also work as a basic tripod. Unfortunately, they are too unstable for anything serious. One of the most flexible solutions is the Gorillapod. It is a small, lightweight tripod that can wrap around things. You can use it almost anywhere. Buy a high-end version like the Gorillapod 3K, and you will be able to use it also with your standard camera.
5. How To Chose and Lock the Focus Point for Sharper Details and Creative Effects
The Apple Camera App is not the most complete camera app out there. Manual controls are very limited. You cannot choose ISO or your shutter speed. But you can still select a focus area and even lock it. To select a focus area, tap on the screen on the subject you want to focus on. A yellow square will appear on the screen. This is useful, for instance, in portraiture, to be sure the model face is in-focus. Another use is when doing close-ups. Focusing on a close subject will result in a blurred background. For more creative effects, you can throw out of focus your entire image. First, lock the focus on a close object, then reframe on a more distant scene. With the focus locked, the phone will be more snappy. It will not try to re-focus after each photo. If you need the phone to be more reactive, you may consider to prefocus and wait for the subject to be in position. To lock the focus, tap on the interesting area and keep pressing until the yellow square ‘bounces’ twice and AE/AF LOCK appears on the screen. Tap again to unlock the focus.
4. How To Set a Custom Exposure for More Balanced Photos
When you select a focus area, whether you lock focus or not, you are also exposing for that area. To alter the exposure, so as to darken or brighten the image, you must swipe your finger up or down.
When you swipe, a cursor appears next to the yellow square. This shows you how much you are over- or under-exposing. This is a great way to avoid blown highlights in highly contrasted scenes.
3. How to Use the HDR Mode to Improve Your Landscape Photography
The HDR mode is on by default on your iPhone 8. To disable it, you have to do so from the Camera Settings. Older iPhone owners can toggle the HDR mode between Auto, On and Off directly in the Camera App. With the HDR mode on, the phone will take a series of images using different exposure settings. Then, it will merge them together in a final image displaying a greater dynamic range.
This is a great mode to improve the quality of landscape images. Use this mode with sunsets and other high-contrast scenes. There are some situations, though, where you don’t want to use the HDR mode, like for silhouettes. Also, the blending of the different images with fast-moving subjects may result in some artifacts. On-screen, the difference between an HDR image and a single exposure may not be huge. The HDR one, though, will be much easier to edit and, ultimately, will give better results.
2. How to Use Live Mode to Create Long Exposure
Do you want to create long exposures straight from your iPhone, without a dedicated app or a tripod? Here is the solution. Turn on the live mode for your photo in the Camera App. In this mode, your iPhone will shoot a 3-second video (1.5 sec before actually taking the photo, and 1.5 after that). This results in a “living” photo. Take the photo. The word Live will appear on the screen. Try to stay as still as possible until the word Live disappears from the screen. In the Photo App, visualize the live image and swipe from bottom to top. Three Effects will become visible.
Loop: the recording is played in a loop, creating a clip repeating itself. Bounce: the recording is played forward till the end, and then backward from the end to the beginning. Long exposure: this is what we were looking for.
By selecting the Long Exposure Effect, all the frames are averaged together. The resulting image mimics a true long exposure, with nice results.
This mode is also useful to remove passers-by from crowded places or to create nice trails. For better results, if you plan to use the long exposure effect, have the phone on a tripod. Use your earphones to remotely fire the shutter.
9. Make Use of the iPhone 8 Plus Portrait Mode For Better Portraits
In portraiture, it is important to have a good separation between the model and the background. Traditionally, we would shoot with a shallow depth of field. This way the model will be in focus while the background will result blurred. With the iPhone, you could get this effect by locking the focus on your subject and going up close to him. Unfortunately, single cameras iPhones have wide-angle lenses. Using short focal lengths from up-close may distort your model’s face in awkward ways. iPhones with a double camera (iPhone 7 Plus, iPhone 8 Plus, etc.) can solve this problem. When taking a portrait with this mode, the software will use the telephoto lens to get the actual image. The wide-angle lens is used to get subject-to-background distance and other parameters. That data will create a nine-layer depth map, to blur the background simulating the bokeh. If you have an iPhone 8, you will have a single camera and you will not have the Portrait Mode. You must rely on apps such as AfterFocus. These apps allow you to digitally blur areas on your images.
Bonus Tip: Use the Fill-Flash When Shooting Against the Light
Shooting against the light creates high-contrast images, with the subject underexposed. In these situations, the HDR mode can help, but will not do miracles. When shooting against the light, use the flash as a fill light. This will lift the shadows, thus balancing the exposure.
Because the led flash is rather weak, you have to be close. This technique won’t work miracles. But it will make your image easier to edit.
Conclusion
Smartphone photography is now a reality. Everyone can do it and it is a lot of fun to experiment with your phone capabilities. Now that you know everything about the iPhone Camera app, you are ready to challenge yourself. Don’t be surprised if you end up taking photos worth printing with your iPhone. Check out our post on how to use Camera+ App for perfect iPhone photos next!
