This technique isn’t as hard as it sounds. A lot of it comes down to your choice in shutter speed. We can show you how to get it right.
[ExpertPhotography is supported by readers. Product links on ExpertPhotography are referral links. If you use one of these and buy something, we make a little bit of money. Need more info? See how it all works here.]
Sparkler Photography: Safety Warning!
Sparklers are great fun. But they are still dangerous to use indoors. Keep a container of water handy, put any flammable items away, and don’t wear flammable clothes. If you have soft skin, use gloves. You might want to wear safety goggles to cover your eyes too. Keep children and pets away from the open fire. Treat fire as a serious business — even a small one. And stay safe.
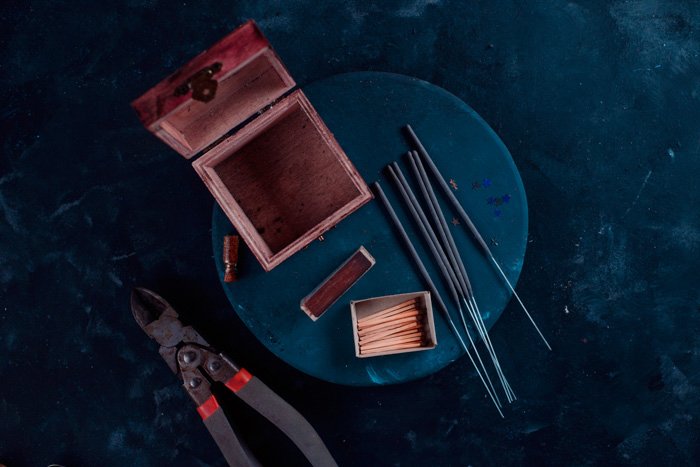
1. Gather Props and Gear You Need
The list of things you need to get a beautiful sparkler image is incredibly short:
Sparklers; Matches; Items for your still life; A light source; A camera and a tripod.
You can also use a pair of tweezers if your scene is small, and you’re going to use short sparklers. For your light source, you can use anything you like. Are you used to working with natural light? Great! Prefer studio lights? Perfect! My go-to lights are two speedlights SB-910, so I used them.
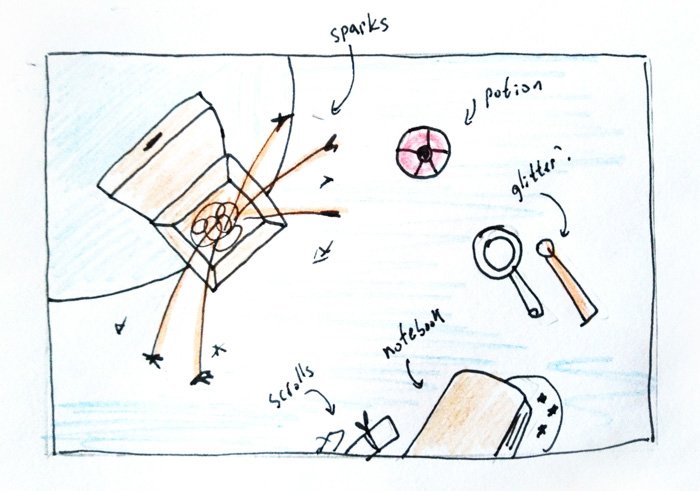
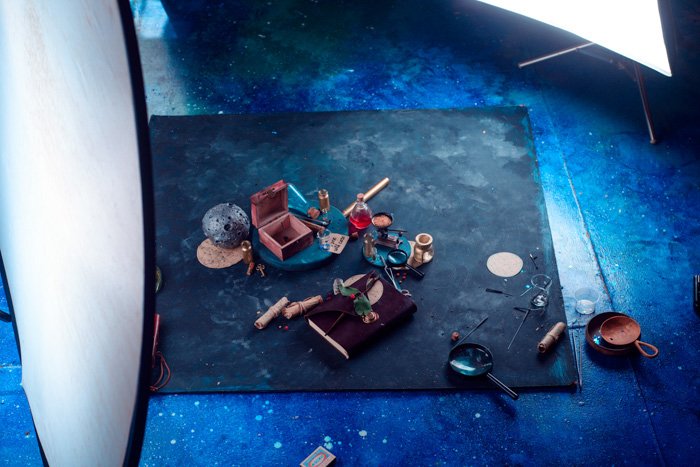
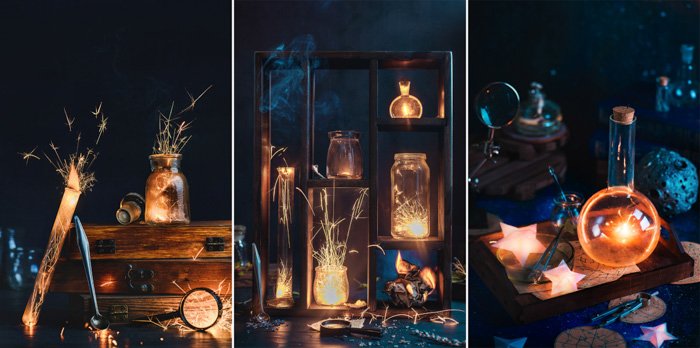
2. Create a Still Life Story to Engage Viewers
People often use sparkler at wedding, but there are plenty of other uses for it in still life photography It’s crucial to think about your concept in advance. Do you imagine an alchemist workplace full of laboratory flasks and beakers with burning fire? Or do you have a fiery potion in mind with a sparkler as a secret ingredient? Here’s a sparklers picture I made for New Year. I didn’t want it to look too Christmassy, but it needed some seasonal hint. So I just added a couple of fir tree branches and a garland in the background.
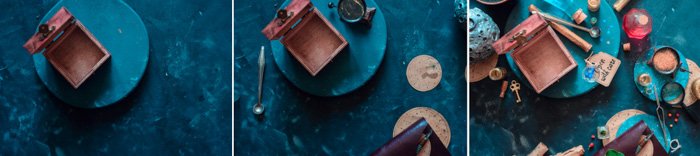
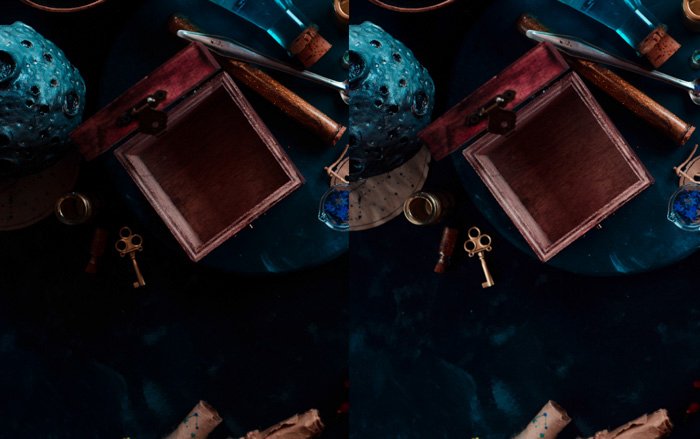
3. Build Your Set One Object at a Time
The easiest way to work on sparklers pictures is to start with the relatively big objects and to move to the smaller ones. I started with a wooden coaster and a box. After that, I added a leather notebook and a couple of notes with constellations. The next step was to add little details like a tiny magnifying glass, potion bottles, and a pinch of stardust. You can keep the background dark. It will make sparks more prominent. But that doesn’t mean you can’t use light and colorful or even white background. You’ll still be able to see the sparks, but they won’t be so bright and fiery. Remember to let your composition breathe, avoid clutter, and leave some space for sparks!
4. Use Two Lights for Sparkler Photography
For sparkler pictures, the lighting here is quite simple. In my case, I often light my scene with two speedlights. One inside of a strip box on the right corner and another behind a large diffuser on the left. You can use one light source and a reflector. It’s as simple as that. Natural light would also work perfectly well. It is harder to control, but if you’re used to it, go ahead! Place black flags (pieces of black cardboard will do) between a window and the scene to cut some excessive light if you need to. Keep in mind that the sparklers also light up the scene, so be careful not to overexpose the image. It’s even better to underexpose it a little, letting the sparkler shine and cast reflections and flares on other items.
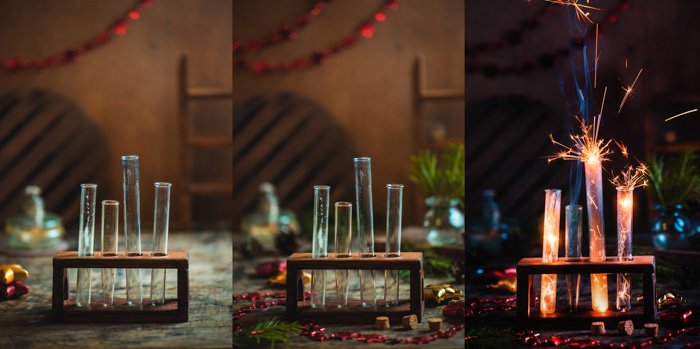
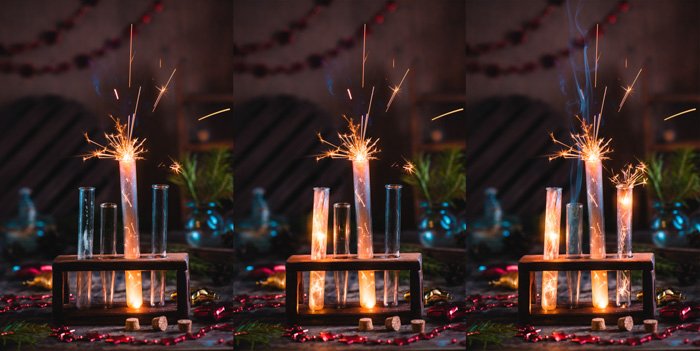
5. Keep the Sparkler Steady to Prevent Motion Blur
When photographing sparkler photos, I often put my sparklers in a glass jar and let them burn. But if you want it to be a tiny star in a box, you’ll need a way to keep it stable. Cut a sparkler in half since you probably won’t need it to be too long. Stick it in cork, a piece of Plasticine, or even a chewing gum. You can also bend its end, so it stays still.
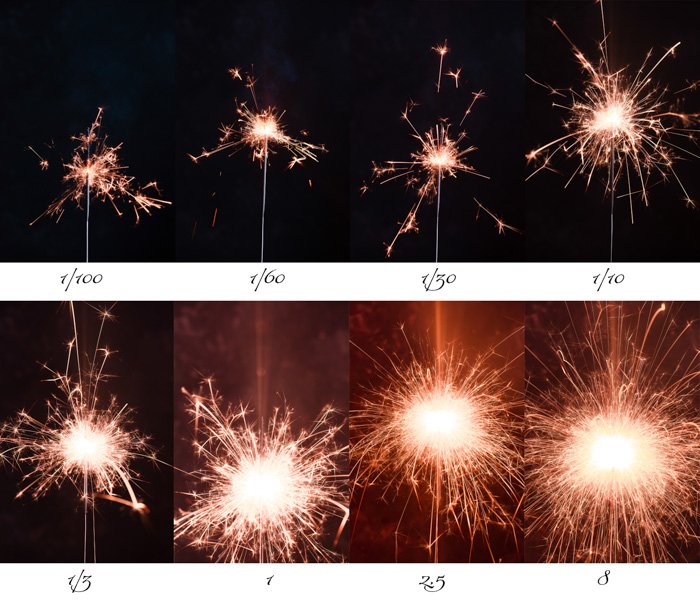
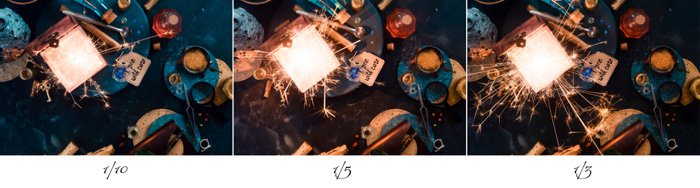
6. Adjust Your Camera Settings to Create Well-exposed Sparkler Photos
The critical setting here is the shutter speed. The longer the shutter speed, the longer the fiery tails of sparks and the more light from the sparkler. When shooting sparkler photos, shutter speed about 0,5 second practically burns out every detail in the scene. But if your shutter speed is too fast, you won’t get the beautiful glare, and the fiery trails will be too short. In my experiments, the ideal shutter speed for still life photos lies between 1/100 to 1/10 second. The exact shutter speed settings will depend on the quality of sparklers you use and the size of the area you want to light. It’s okay if you don’t get it right the first time. Just change your shutter speed and try again! You can make a couple of test shots and then decide which one you like most. Another important thing is to use high-speed continuous shooting mode (or burst mode). That way, you won’t miss a moment as you burn your sparklers. Here’s the technical information for the shot I took, broken down. Exposure details: manual mode, 50 mm, 1/10 s, f/6.3, ISO 160 Gear: Nikon D800, 50 mm, speedlight SB-910, Westcott Strip Box (10×24″).
7. Photograph Sparklers Inside Jars
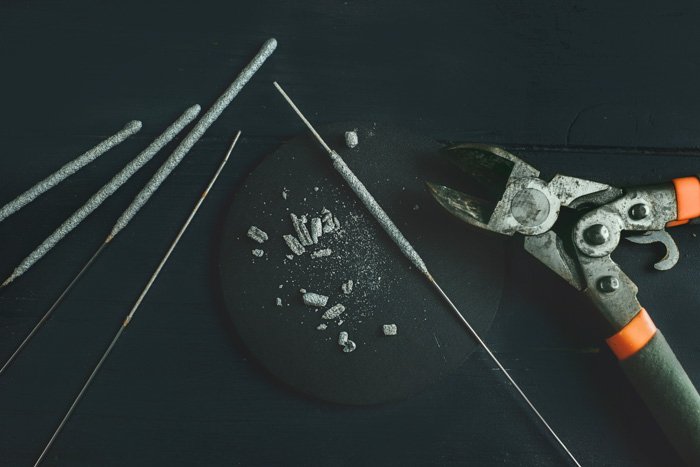
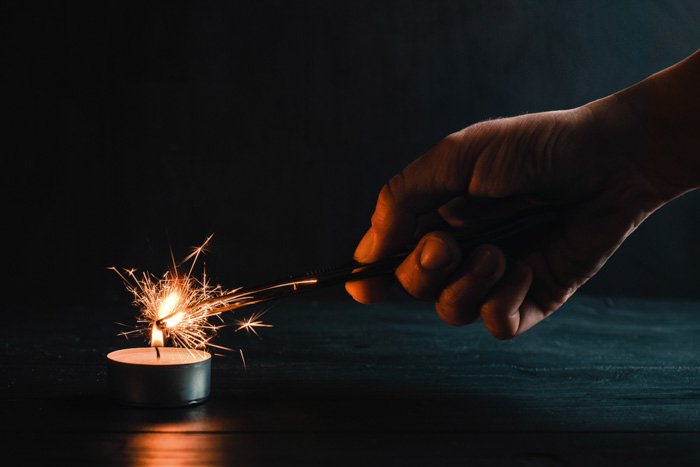
There are other interesting ways to shoot long exposure sparkler photos. For example, you can create a fire collection of a sort by shooting sparkling fire inside glass jars. For this trick, we are not going to use the entire sparkler. Instead, we will be burning bits of them. So peel off the pieces of the combustible mixture from the stem. Keep them relatively big, and try not to turn them into dust. Get a pair of very long tweezers. I use dental tweezers with bent tips for practically everything and can highly recommend them for this shooting sparkler photos too. After that, find a glass jar with thick walls. For most of my work, I just use jars for spices. They are pretty cheap but look beautiful once you removed a plastic cap. They could last till the end of shooting, and if they crack, it wouldn’t be an expensive loss. Laboratory glassware like flasks and test tubes are ideal, but these guys are pricier and more fragile. I’m always trying to be very careful with them. Not all glass is heat-resistant. Sparkles are scorching and thin glass can crack from the heat right in the middle of shooting and ruin your sparkler photos. So choose jars with strong walls and don’t use objects you’re afraid to break. I lost only one jar from six, but still, it’s good to be on the safe side. After arranging your jars into a beautiful composition, prepare to add some fire to it! Light a candle. Take the piece of a peeled sparkler with tweezers, hold it above the candle, and right after it burns, drop it into the jar. Take a few sparkler photos in a row. Try to act quickly and be careful with the sparks. If you have several jars, shoot fire inside them one after another, and combine these shots later.
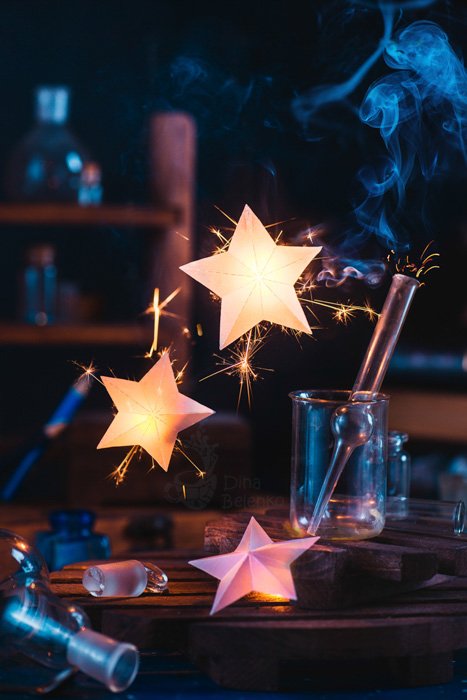
8. Make Glowing Figures with Sparklers
One more trick before the end. Hold burning sparklers behind a figure cut from tracing paper and make it glow! When this star was just a flat figure from tracing paper, it looked nice, but not very interesting. But then I added stiffening ribs and turned it into a 3D object.
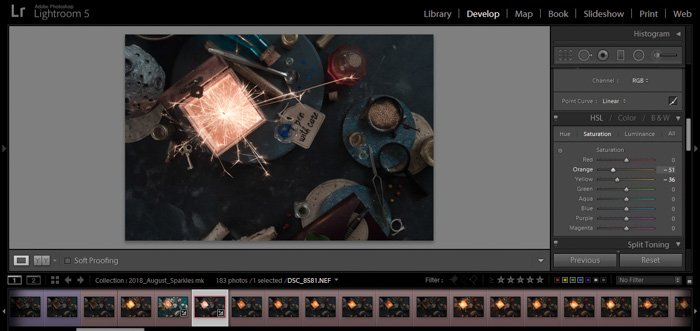
9. How to Post-Process Sparkler Photography
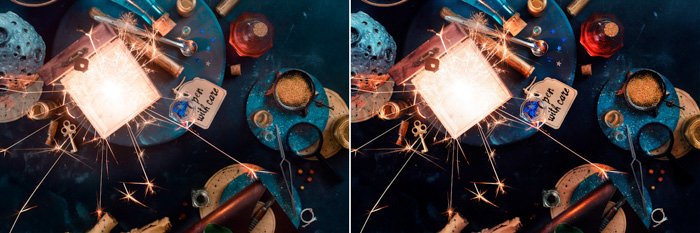
You don’t need much post-processing to do for your sparkler photos. It’s just a matter of choosing the best shot. I generally just decrease the saturation of the orange colors during the conversion from RAW. That way, the flames look whiter and hotter. After that, I just go through my usual process of adjusting tone and contrast. Another way you can approach post-processing is to merge a couple of shots into one picture. Using a tripod during shooting should make this very simple. Use Layer Mask and a soft brush to conceal the parts you don’t want visible. Add some sparks here and there and give the image a little polish in general. Ta-da!
Conclusion
Now, over to you! Experiment with sparkler photography. Find tricks of your own and explore the endless possibilities. Bring to life all the magical potions and paper dragons! Burn your tracing paper castles! Brew a fiery mixture! Long exposure can also help you create some magic in your sparkler photography. Looking for some more creative still life ideas? Check out our posts on shooting amazing coffee photography or experimenting with scanography. Learn how to create incredible still life images with our Creative Photography Cookbook!


title: “9 Creative Sparkler Photography Techniques For Still Lifes” ShowToc: true date: “2023-01-22” author: “Demarcus Barry”
This technique isn’t as hard as it sounds. A lot of it comes down to your choice in shutter speed. We can show you how to get it right.
[ExpertPhotography is supported by readers. Product links on ExpertPhotography are referral links. If you use one of these and buy something, we make a little bit of money. Need more info? See how it all works here.]
Sparkler Photography: Safety Warning!
Sparklers are great fun. But they are still dangerous to use indoors. Keep a container of water handy, put any flammable items away, and don’t wear flammable clothes. If you have soft skin, use gloves. You might want to wear safety goggles to cover your eyes too. Keep children and pets away from the open fire. Treat fire as a serious business — even a small one. And stay safe.
1. Gather Props and Gear You Need
The list of things you need to get a beautiful sparkler image is incredibly short:
Sparklers; Matches; Items for your still life; A light source; A camera and a tripod.
You can also use a pair of tweezers if your scene is small, and you’re going to use short sparklers. For your light source, you can use anything you like. Are you used to working with natural light? Great! Prefer studio lights? Perfect! My go-to lights are two speedlights SB-910, so I used them.
2. Create a Still Life Story to Engage Viewers
People often use sparkler at wedding, but there are plenty of other uses for it in still life photography It’s crucial to think about your concept in advance. Do you imagine an alchemist workplace full of laboratory flasks and beakers with burning fire? Or do you have a fiery potion in mind with a sparkler as a secret ingredient? Here’s a sparklers picture I made for New Year. I didn’t want it to look too Christmassy, but it needed some seasonal hint. So I just added a couple of fir tree branches and a garland in the background.
3. Build Your Set One Object at a Time
The easiest way to work on sparklers pictures is to start with the relatively big objects and to move to the smaller ones. I started with a wooden coaster and a box. After that, I added a leather notebook and a couple of notes with constellations. The next step was to add little details like a tiny magnifying glass, potion bottles, and a pinch of stardust. You can keep the background dark. It will make sparks more prominent. But that doesn’t mean you can’t use light and colorful or even white background. You’ll still be able to see the sparks, but they won’t be so bright and fiery. Remember to let your composition breathe, avoid clutter, and leave some space for sparks!
4. Use Two Lights for Sparkler Photography
For sparkler pictures, the lighting here is quite simple. In my case, I often light my scene with two speedlights. One inside of a strip box on the right corner and another behind a large diffuser on the left. You can use one light source and a reflector. It’s as simple as that. Natural light would also work perfectly well. It is harder to control, but if you’re used to it, go ahead! Place black flags (pieces of black cardboard will do) between a window and the scene to cut some excessive light if you need to. Keep in mind that the sparklers also light up the scene, so be careful not to overexpose the image. It’s even better to underexpose it a little, letting the sparkler shine and cast reflections and flares on other items.
5. Keep the Sparkler Steady to Prevent Motion Blur
When photographing sparkler photos, I often put my sparklers in a glass jar and let them burn. But if you want it to be a tiny star in a box, you’ll need a way to keep it stable. Cut a sparkler in half since you probably won’t need it to be too long. Stick it in cork, a piece of Plasticine, or even a chewing gum. You can also bend its end, so it stays still.
6. Adjust Your Camera Settings to Create Well-exposed Sparkler Photos
The critical setting here is the shutter speed. The longer the shutter speed, the longer the fiery tails of sparks and the more light from the sparkler. When shooting sparkler photos, shutter speed about 0,5 second practically burns out every detail in the scene. But if your shutter speed is too fast, you won’t get the beautiful glare, and the fiery trails will be too short. In my experiments, the ideal shutter speed for still life photos lies between 1/100 to 1/10 second. The exact shutter speed settings will depend on the quality of sparklers you use and the size of the area you want to light. It’s okay if you don’t get it right the first time. Just change your shutter speed and try again! You can make a couple of test shots and then decide which one you like most. Another important thing is to use high-speed continuous shooting mode (or burst mode). That way, you won’t miss a moment as you burn your sparklers. Here’s the technical information for the shot I took, broken down. Exposure details: manual mode, 50 mm, 1/10 s, f/6.3, ISO 160 Gear: Nikon D800, 50 mm, speedlight SB-910, Westcott Strip Box (10×24″).
7. Photograph Sparklers Inside Jars
There are other interesting ways to shoot long exposure sparkler photos. For example, you can create a fire collection of a sort by shooting sparkling fire inside glass jars. For this trick, we are not going to use the entire sparkler. Instead, we will be burning bits of them. So peel off the pieces of the combustible mixture from the stem. Keep them relatively big, and try not to turn them into dust. Get a pair of very long tweezers. I use dental tweezers with bent tips for practically everything and can highly recommend them for this shooting sparkler photos too. After that, find a glass jar with thick walls. For most of my work, I just use jars for spices. They are pretty cheap but look beautiful once you removed a plastic cap. They could last till the end of shooting, and if they crack, it wouldn’t be an expensive loss. Laboratory glassware like flasks and test tubes are ideal, but these guys are pricier and more fragile. I’m always trying to be very careful with them. Not all glass is heat-resistant. Sparkles are scorching and thin glass can crack from the heat right in the middle of shooting and ruin your sparkler photos. So choose jars with strong walls and don’t use objects you’re afraid to break. I lost only one jar from six, but still, it’s good to be on the safe side. After arranging your jars into a beautiful composition, prepare to add some fire to it! Light a candle. Take the piece of a peeled sparkler with tweezers, hold it above the candle, and right after it burns, drop it into the jar. Take a few sparkler photos in a row. Try to act quickly and be careful with the sparks. If you have several jars, shoot fire inside them one after another, and combine these shots later.
8. Make Glowing Figures with Sparklers
One more trick before the end. Hold burning sparklers behind a figure cut from tracing paper and make it glow! When this star was just a flat figure from tracing paper, it looked nice, but not very interesting. But then I added stiffening ribs and turned it into a 3D object.
9. How to Post-Process Sparkler Photography
You don’t need much post-processing to do for your sparkler photos. It’s just a matter of choosing the best shot. I generally just decrease the saturation of the orange colors during the conversion from RAW. That way, the flames look whiter and hotter. After that, I just go through my usual process of adjusting tone and contrast. Another way you can approach post-processing is to merge a couple of shots into one picture. Using a tripod during shooting should make this very simple. Use Layer Mask and a soft brush to conceal the parts you don’t want visible. Add some sparks here and there and give the image a little polish in general. Ta-da!
Conclusion
Now, over to you! Experiment with sparkler photography. Find tricks of your own and explore the endless possibilities. Bring to life all the magical potions and paper dragons! Burn your tracing paper castles! Brew a fiery mixture! Long exposure can also help you create some magic in your sparkler photography. Looking for some more creative still life ideas? Check out our posts on shooting amazing coffee photography or experimenting with scanography. Learn how to create incredible still life images with our Creative Photography Cookbook!
